Posted on

Beginner Photography: Food

Hey guys! This week was a bit tough for me since we don’t have a live show coming up to base my project off of. But at the very last minute I got a suggestion from Chelsea to do food. We’ve done a few live shows on the topic, which you can see here and here as well as the awesome fast food challenge video with Toby and Christina here. So I used those as my basis for some quick food shots.

Remember, I’m using my Android phone for these shots, so I have no control over my settings. Luckily I’ll be getting a real camera soon, so I’ll eventually revisit these subjects to see how my technique and my gear have improved!

Luckily my husband is the cook in the house, so I just asked him to make dinner extra pretty. We were having kielbasa with french fries and salad. Not the most upscale of meals to capture, but colorful and delicious none the less.

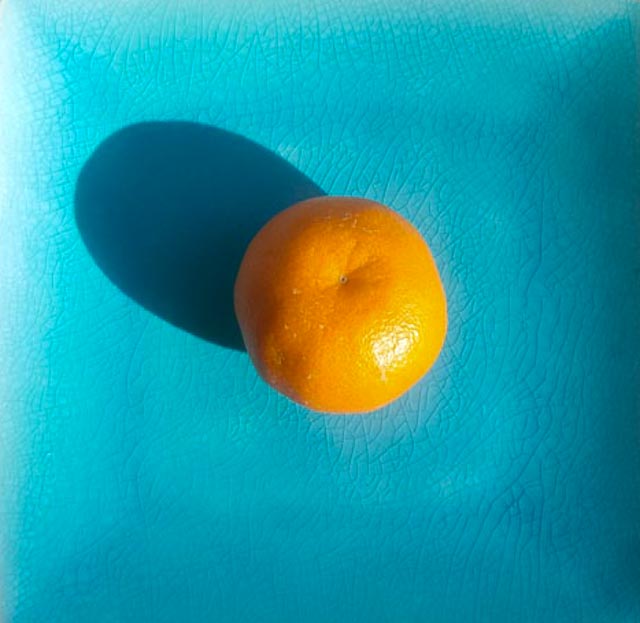
First I decided to take a simple still life of a clementine on a plate. Our dishes are turquoise, so I thought it would be a nice complementary color scheme.

finalornage-2I used some hard natural light to get a dramatic shadow and some highlights on the skin.

Next up was dinner. 

20160815_final-Edit

The hard, overhead lighting was too hard. While the specular highlights are good, the reflections on the plate and the shadows are unappealing.

20160815_181755-Edit

The close-up works a bit better. The kielbasa is in focus, the specular highlights are appealing, and look at those grill marks!

Now for dessert. Yogurt, berries and a fresh sprig of mint from the garden.

20160815_195104-Edit

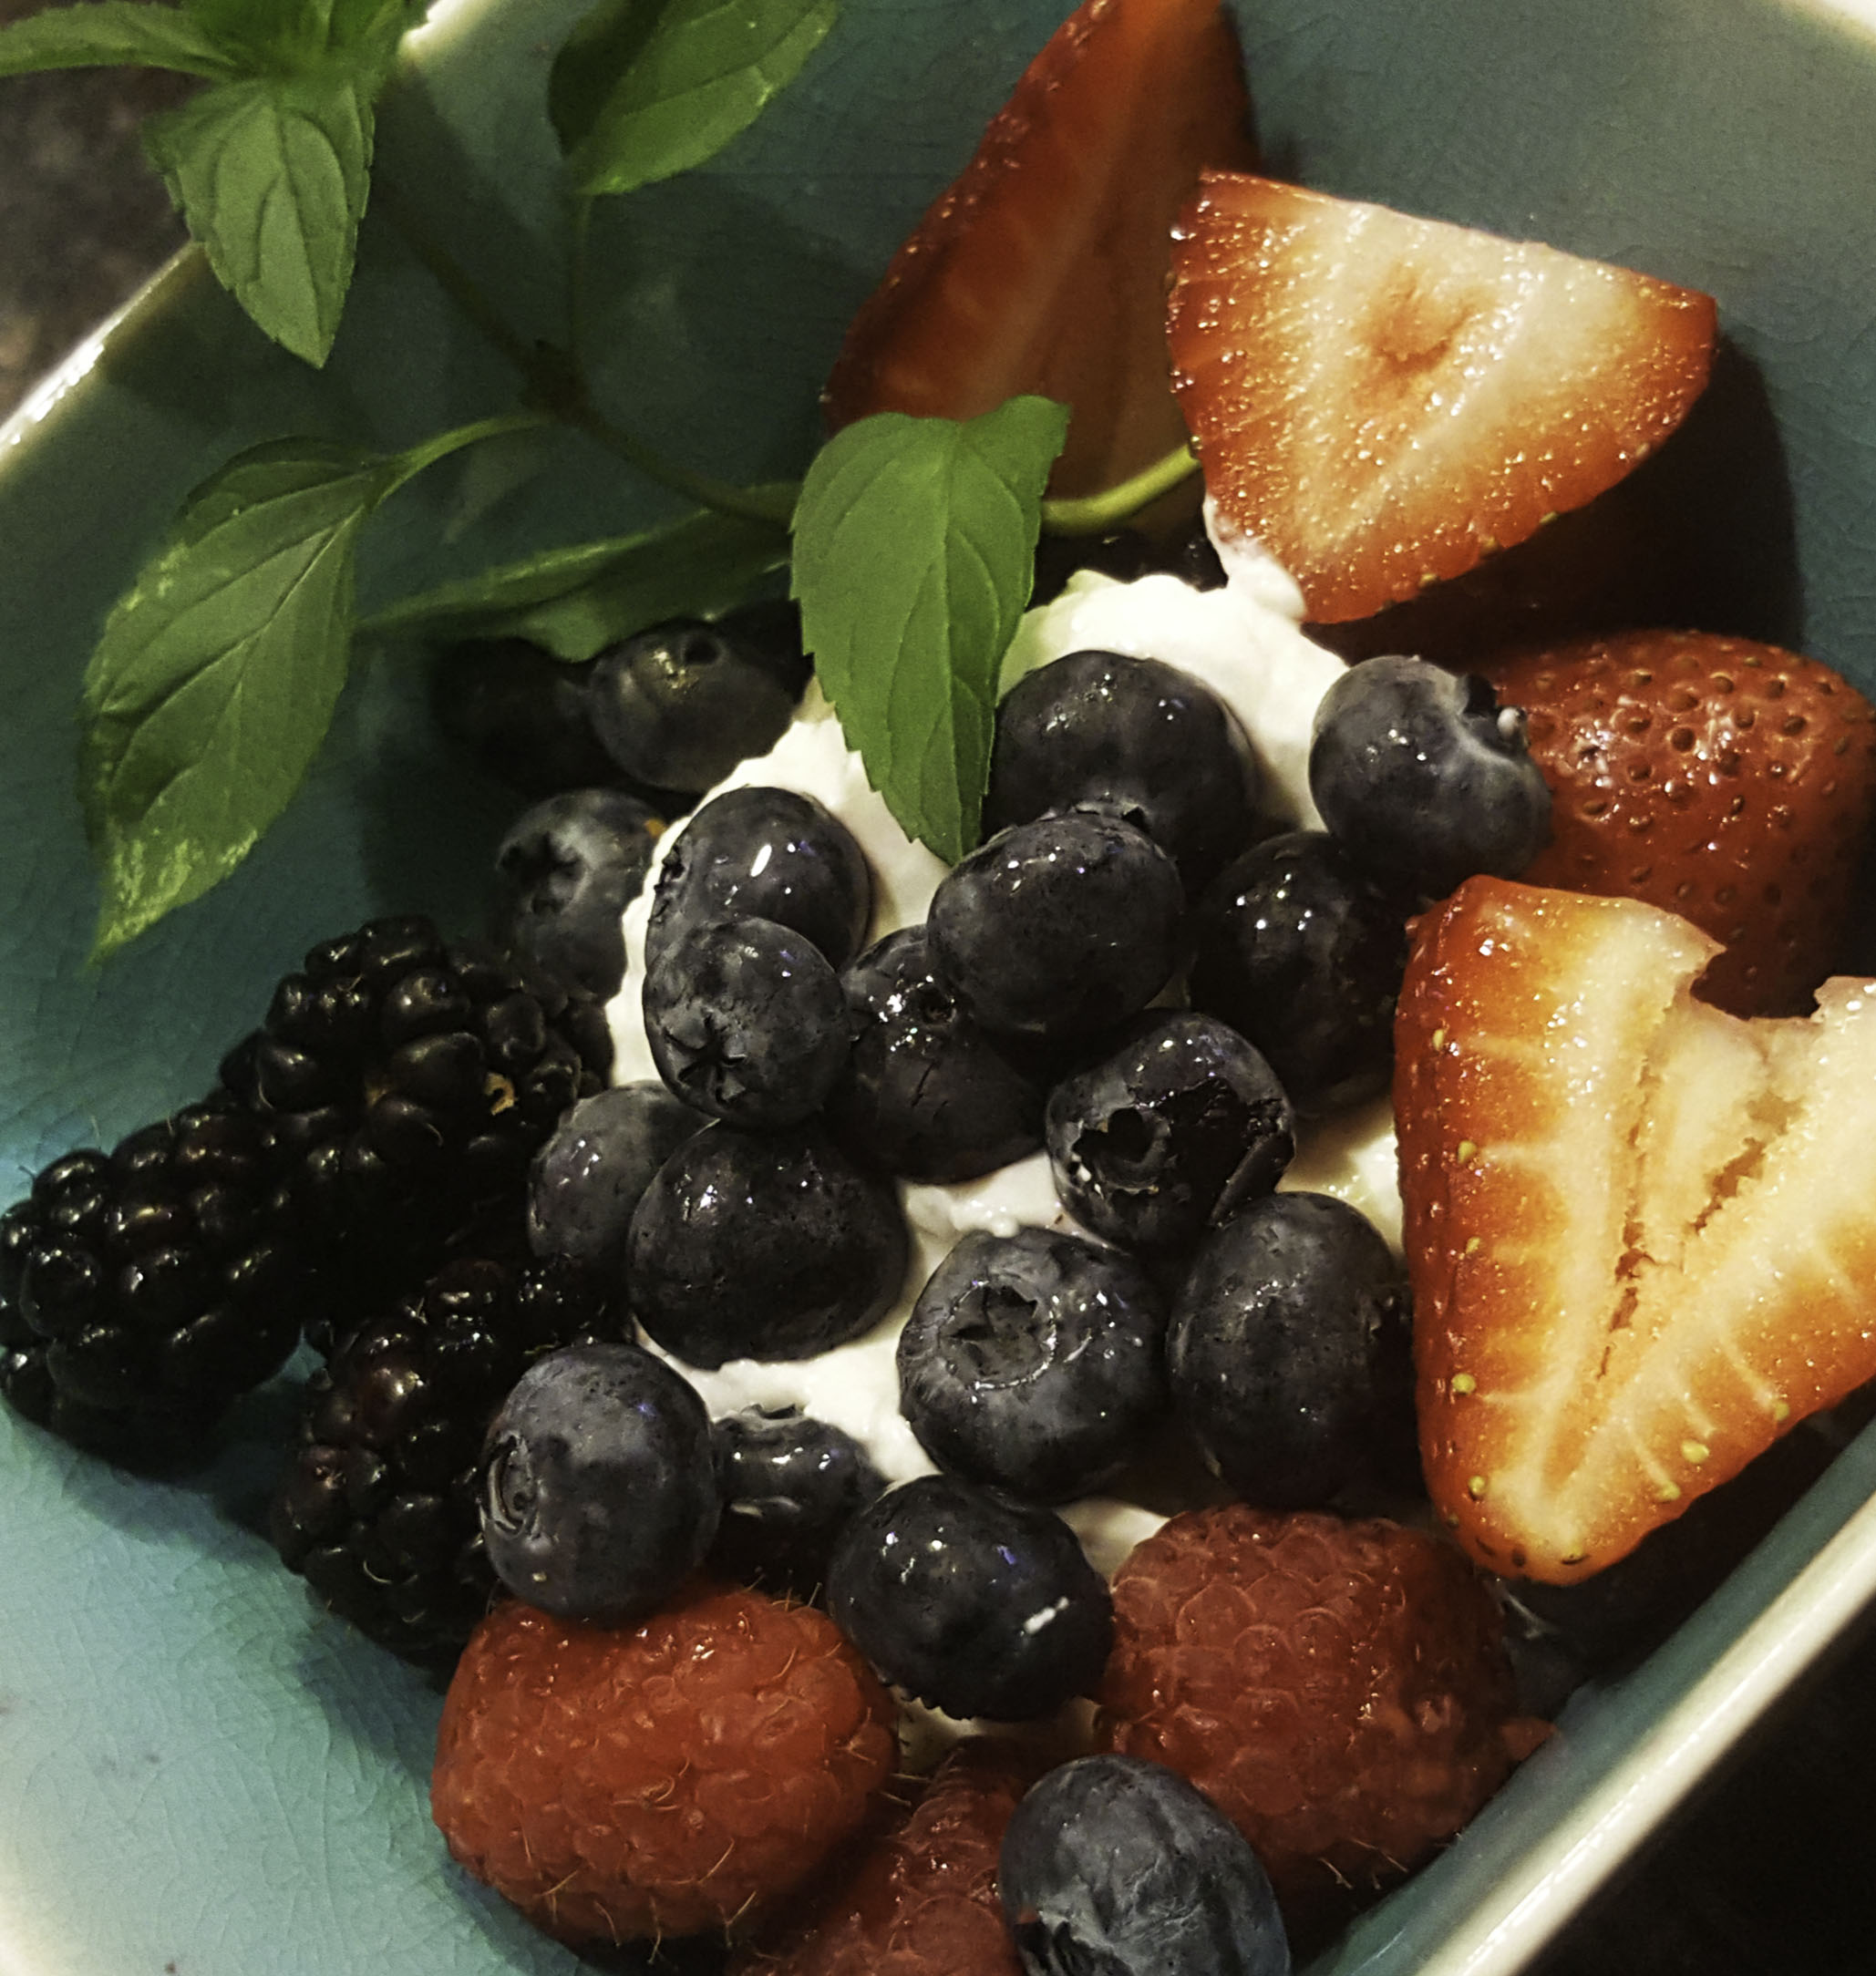
The setting wasn’t ideal, so I went for a closeup with a dutch tilt, filling the frame. The highlights and the color are pretty good, if I do say so myself.

Welp, I did my best and I ate well, that’s all you can ask for, really. Please, comment below and tell me what I could have done better. How would you have shot these dishes?

Posted on

Beginner Photography: Portraits

Hello friends, here goes my beginner photography training, week two. This week I’m working on portraits in preparation for our live show on Thursday with special guest Matt Granger!

So I should point out (for the sake of my vanity) that I am shooting with my phone. I have no other camera at this time, so I can pretend that I am limited by my gear and that is the reason I cannot create beautiful works of art. Really what it means is I can’t do the amount of editing I would like to do to my images to make them presentable.

I shot some pictures of my five year old daughter, Eloise, and of my husband Eric. I have to say, Eric’s came out better than Eloise’s, if only because he knows how to sit still. I chose our ivy-covered stone wall in the back yard as the backdrop, as that is really the only good option. Not to mention the natural light. So I shot them on two separate days, but both coming up on the golden hour of the evening. 

Eloise is hard to photograph. She wiggles a lot, has no concept of smiling normally in photos, and hunches her shoulders like Lurch. But she’s adorable, so I still got a few shots that I can live with. Unfortunately the focusing on my phone camera is not the best, so who knows what part of the image it focused on.

20160807_185006

So, not great. Her hair is a bit of a mess, her dress is wrinkly, and I for sure missed focus on the eyes.

20160807_185018

A bit better. I got a real smile, but the previous errors are still there.

20160807_185704_001

This one I like just because it captures her spirit well. She’s a wild child and an animal lover. But the background is crowded and her dress is a mess.

Eric was easier to shoot, although he is terribly uncomfortable in front of the camera. I did some editing on my favorite photo of him, following the directions on how to add background blur in this tutorial. If I had more time, I’d do it to all of the shots I took. I might do some of Eloise’s later today.  Here’s the before and after:


20160808_194423

Before

ericfinal

After


Isn’t he handsome? The differences are subtle, but I removed the yellow cord at the bottom left of the frame and added just a bit of background blur to make him stand out. I had tried to crop so that his face was in the right third of the frame, but it felt too cramped, I didn’t leave enough space to do it properly. 

So all in all I think the background and lighting worked well, they both have catch lights in their eyes, the light is soft and flattering. Unfortunately the focusing isn’t too precise and my tiniest model needs some styling and posing help. I have a feeling they are going to be forced to grow as models as I grow as a photographer. What tips would you give me that I can apply within my limited resources?

As always, feel free to learn along with me and share your progress. I post images on Instagram with the hashtag #stunnersoninsta as many of our viewers do!

To learn more about shooting portraits, here are some great free tutorials on shooting portraits and here are some on editing.

Posted on

Beginner Photography: Abstract

I’m back! For those of you who don’t know me (impossible!) I do customer support, video editing, and moderate the comments on TCLive for Northrup Photography. What I am not is a photographer. I’ve always loved photography, and all art, but haven’t had the drive to learn. You’d think working for Tony and Chelsea for the past year and a half would get me moving, but work can get in the way of art if you let it. Turns out I learn best with a task to complete, so I’m going to write this blog one day a week so that I can learn photography and hopefully some of you can learn along with me! I’ll be hashtagging some of my photos on Instagram (@SiobhanKyle) and using the hashtag #StunnersOnInsta to show my progress. I encourage you to do the same! There are tons of great photos on there already from our YouTube community.

This week I took inspiration from our live show and decided to work on some abstract shots in my house and on the street. I can’t say they were totally successful, but it was a fun challenge. Abstract art is actually one of my favorite genres. I love looking at things in a new way and finding the beauty in things that are often overlooked. A successful abstract can make everyday objects look otherworldly. It’s a method of capturing an object out of context or zooming in and framing an object in a way that makes it unrecognizable. You can do this in a few ways:

Zoom in

20160801_182319_002This view of an overhead light is not what you generally see when you walk into the dining room. But by getting directly underneath it and zooming in, cutting into the edges, you get an unusual take on a simple object.

Play with shapes


20160801_182422

Look for interesting angles, leading lines or patterns. This view of a skylight turned on its side made the image more interesting than if it were just square.


Use light and shadow

20160801_182726 Dramatic lighting adds visual interest by playing up contrast and texture.


 If all else fails, go black and white

20160802_084556

Black and white is always a great way to abstract your image and bring attention to shape and texture.


So those are my efforts. I know a lot can be done in post processing, but I’m not at that level yet. I did some color and saturation tweaks as well as some creative cropping and converting to black and white in Lightroom. What tips do you have for making abstract images?

 If you wan to learn more about making abstract photography, watch this video or check out our past live show on abstract photography here.

Posted on

Everything You Need to Prepare for a Fashion Shoot

Image od a woman with a long dress
Bloom by Sarah Bowman

Here are a list of resources from Tony, Chelsea and our bloggers to aid you in setting up and executing a successful fashion shoot.

Video Tutorials:

  • In this first video we cover a glamour shoot in-studio. Chelsea will take you through her lighting and gear, challenges you may have, makeup and styling, posing, and post-processing.

You can see some more of our post processing tutorials here for Lightroom, and a video on how to add makeup in Photoshop here.


  • In this next video we follow Tony and Chelsea on a fashion shoot on the beach. They’ll show you how they set up test shots, shooting to make a composite, working with a model, and post processing the image into what became the cover for our Photoshop book!


Blogs:

  • Start off with 10 Tips For Your First Fashion Shoot by Anushila Shaw. In it, she gives you ten easy to follow steps on setting up you first fashion shoot; from finding inspiration, hiring models and stylists, to marketing. A must-read for everyone!
  • Our friend and blogger Sarah Bowman has written multiple tutorials on shooting incredible portraits. You can read those here:
  1. How to Composite a Dress is the tutorial that Tony and Chelsea followed to create the image in the Glamour Photoshoot posted above

  2. 10 Tips to Improve Your Portraits gives you simple and critical tips on shooting great portraits; lighting, posing, depth-of-field, perspective and more!

  3. Self-Portraits: How a Selfie Can Improve Your Portraits Selfies are a great way to practice shooting portraits before bringing in a model. This post will teach you how to get comfortable in front of the camera to improve your work behind it.

Live Show:

  • Our previous live show on fashion photography will give you some great tips and show you previous work from our talented viewers! You can read my blog on that show here for highlights.


We hope all that information leaves you prepared for a great fashion shoot. We’ll be reviewing fashion photos on our live show this week, sdp.io/live. Can’t wait to see what you came up with!

Posted on

Social Stock: Tips for Landing Social Stock Clientele

In my last blog I talked about some guidelines I follow when at a client’s space shooting for their social media feeds. I also covered some of the expectations the client may have that may be a bit different than shoots you’ve worked in the past. If you’re interested in picking up social stock clients, I suggest you first read my post about how to shoot for them, here.

Unique Garnish
Unique Garnish

With the explosion of social media and it’s strong ties to marketing, it’s no surprise that companies of all sizes are looking to stand out online against their competitors. A well-considered image is likely to steal more than a moment’s glance from feeds cluttered with bland mobile phone snapshots, but it’s getting your camera in the door that can prove a bit more difficult. Continue reading for tips on connecting with businesses and how to shoot for their social feeds.

Continue reading Social Stock: Tips for Landing Social Stock Clientele

Posted on

How to Create Light Painting Photos

Want to submit your Light Painting Photo to Tony & Chelsea LIVE for review? Watch this weeks episode HERE. It airs Thursday nights at 5pm EST (check your timezone.)

Light Painting

Light painting is manually adding light to a long exposure. During a long exposure (say, 30 seconds,) you can walk through the frame without appearing in the final picture. This gives you the opportunity to walk around a picture and selectively add light wherever you’d like it. To help hide your movements, wear all black.

At its simplest, you might use light painting like a portrait photographer uses strobes—to improve the ambient light by filling in shadows. However, light painting is also a rapidly developing art form where people create amazing pictures using night landscapes and complex, custom-build light contraptions. Though he wasn’t the first light painter, Pablo Picasso showed the world light painting in 1949 when Life magazine photographer Gjon Mili visited him; Picasso had been inspired when Mili showed him his photos of ice skaters with lights attached to their skates, jumping in darkness.

F10-13

Light Painting Tips:

  • Long exposure Use bulb mode (learn how to set bulb mode on your camera here) and a remote shutter timer to keep the shutter open for minutes at a time. (Get a cheap remote shutter timer for Canon and Nikon here.)
  • Light source You’ll need something to “paint” with such as a flashlight, glow sticks, or glow wire.
  • Keep moving Whoever is doing the painting needs to keep moving so that they don’t show up in the shot.
  • Don’t set a fire Be responsible out there, kids.

This is a small excerpt from the Night Photography chapter of Stunning Digital Photography. Read more on night photography here.

Book-cover-11-25-15

Posted on

Controlling Vertical Distortion in Architectural Photography

The Mandir at Chino-large
Subtle distortion correction, both vertical and horizontal, was necessary here. But a choice was also made not to correct all the way. More on this below.

What is vertical distortion?

You’ve seen it before. It’s most obvious when photographing man-made things with straight edges, like buildings. If the thing you’re shooting is taller than you, you tilt your camera back to fit the entire object in the frame. Suddenly, lines that look parallel to your eye seem to converge toward the top of the frame and make what you’re shooting look strange. The wider your angle, the more of this you’ll see.

Peace Tower Vertical Skew
If weird is your goal, this kind of thing will get you there.

This is vertical perspective distortion. It happens every time your camera is not pointed at the horizon, and we’re going to talk about a few ways to deal with it, first while shooting, and then when you get the image into Lightroom. Sometimes you might want to keep the effect, but it’s good to know what to do when you don’t.

Continue reading Controlling Vertical Distortion in Architectural Photography

Posted on

Social Stock: Shooting for a Company’s Social Feeds

Let’s face it, the opportunities available to budding photographic hopefuls aren’t as bountiful as they once were. Traditional channels of employment, outside of weddings and portraiture, have become increasingly rare.  In the age of “citizen journalism,” capturing the world’s every move via smartphone and beaming it to social streams, it can feel like there’s little room to capitalize on your skills.

But this blog isn’t about throwing in the towel, it’s about doing what you do better than “citizen x” with an iPhone! Let’s talk about creating compelling images for a company’s social media feeds. Captivating images; shots that set quality spaces and businesses apart from the white noise of snapshots.

Shooting social stock can mean different things to different businesses. Today we’ll focus on bars and restaurants. Theses spaces can be challenging to shoot in due to their fast pace and often limited lighting, but that’s a good thing. It gives you an opportunity to leverage your skills and equipment to produce quality work. A job done well can amplify a space’s social signals, and with that comes increased engagement in their business. If your images can do that, expect to be asked back.

When shooting a space these are a few guidelines that I like to follow.

  • Don’t get in the way.

    Often times you’ll be asked to shoot during very busy times. No one wants shots of their bar/restaurant empty so in order to get your shot expect to work quickly and efficiently. If shooting around a busy bar you’ll need to keep your head on a swivel. Once bartenders or servers see you as an obstacle you’ll have made your job much more difficult.


Be prepared to work quickly as to not delay food service.


Work close but don't get in the way.
Work close but don’t get in the way.


  • Keep it candid.

    Posed shots can feel a bit too much like an advertisement. You want the feed’s viewers to easily imagine themselves in the space. Posed shots of a beautiful couple can almost feel intimidating to the audience. Your images should feel welcoming.


Candid couple


  • Focus on what makes the space special.

    This can be the decor, the staff, or maybe a unique dish or cocktail. If you’re lucky it’ll be all of those things. If nothing stands out don’t be afraid to ask staff or management. You’re there to make them look as good as possible which in turn will showcase your skills.


What makes a space unique?


Patrons engaged.
Patrons engaged.


  • Be accommodating.

    A couple might ask for a photo or simply want to know what your up to. I’ll always oblige a photo request and let the subject know that they should follow the establishment on social media to see images from the shoot but that the social media manager will determine which images are posted. It’s not out of line to pass a business card and offer to email a shot of a couple or individual. Moments like these can lead to future work.

  • Wait your turn.

    You may very well end up with shots you like a lot and would love to share on your social streams. That’s great but unless the person cutting the check tells you otherwise I’d suggest you post an image only after the client has first shared it themselves. This isn’t as bad as it seems because the client will often post those best shots first.


This isn’t sterile product photography. Don’t be afraid to stylize an image.


  • It’ll be dark, so be prepared.

    You may shoot in bars that are comically dark and flash is very distracting to everyone in the space. I never use it on these shoots. Nothing you do should risk turning off a customer to considering a future visit. Find what light there is and exploit it. Shoot with the fastest lens you have and test the limits of the reciprocal rule. I’ll often shoot in bursts which will result in catching an acceptably sharp frame. These images are frequently shared at lower resolution and viewed on a mobile phone. Try to set aside any obsession you may have for the perfect file in your other work. If the noise gets to be too much just convert to black and white; ART!


....For the night is dark and full of liquors....
….For the night is dark and full of liquors….


Exploit available light.


  • Catch them looking.

    Most of the time you’ll be shooting patrons while trying to remain inconspicuous. That said, if you spot an interesting patron that seems to have a friendly disposition try taking an extra beat with the camera to your eye in an attempt to be noticed. It might just be a fleeting glance, so be ready when it happens.


Get caught looking.


  • Ask about a punch list.

    Your client likely has a particular list of things that they’d like to see. Make sure you know what it is and do your best to cover it. For a bar/ restaurant shoot expect something like food/drinks, details and customers.


Shoot a design element in a way that no patron ever will. Here, I laid on the floor to get the shot.


A framed piece of art created by a local artist makes for a great social share.


  • Do your thing.

    Don’t hesitate to get creative. If a client is following you on social media and asks you to “do your thing,’ do it. Your style is likely why they hired you. Just be sure that the aesthetic of their space works in tandem with your stylistic touches.


Don't hesitate to do some of the things that make your shots stand out.
Don’t hesitate to do some of the things that make your shots stand out.


Night long exposures looking into a space can show of interior design details in a unique way.
Night-time long exposures looking into a space can show off interior and exterior design details in a unique way.


These are some examples of what has worked for me, but ultimately each space and client is unique. Knowing when to adjust your plan can be just as important as having one.

It’s not lost on me that shooting the job is one thing but landing the job is another hurdle entirely. In my next blog I’ll discuss some ways to drum up these social stock shoots.

Questions? Feel free to leave a comment or contact me via my website or social feeds.


Read Andy’s previous posts on gear, creativity and more here.

Special thanks go out to the Detroit Optimist Society and their collection of great bars and restaurants (The Peterboro, The Sugar House, Wright & Co., Cafe 78 and Honest John’s,) some of which are featured in this blog.  

Posted on

Complementary Colors and Photography


Color Theory: Complementary Colors

Color theory can be applied to all forms of visual art, including fashion and interior design. In this post, we’ll look at how it can be utilized in the realm of photography, dealing specifically with the complementary color scheme.

Continue reading Complementary Colors and Photography

Posted on

Bartering: Profiting Without the Money

hr-jag-2

Sometimes the “business” of photography reminds me of this old children’s nursery rhyme:

All around the mulberry bush,
The monkey chased the weasel.
The monkey stopped to pull up his sock,
Pop goes the weasel.

As a metaphor it’s a bit of a stretch I grant you, but the more you think about it the more it makes some kind of quirky sense. Assuming for a moment that we’re the monkey and the weasel represents success, money or recognition (take your pick.) We chase after it in circles until we’re exhausted, stopping only briefly for a respite, and then suddenly there it is: Pop goes the weasel. A new moneymaking idea jumps out of the box.

Bartering. It’s the new “old” idea. It’s the ancient practice of trading goods or services for another person’s goods or services of equal value. Bartering has a lot of benefits, it’s an exchange based on negotiated value not on retail prices, it’s a currency of exchange, not money, and you can do it anywhere at anytime. Photography is a natural commodity. People always want great photographs of themselves, their family, their pets, their homes and their business. Sometimes they just want beautiful wall art. The one thing they don’t want is to pay for it.

Continue reading Bartering: Profiting Without the Money