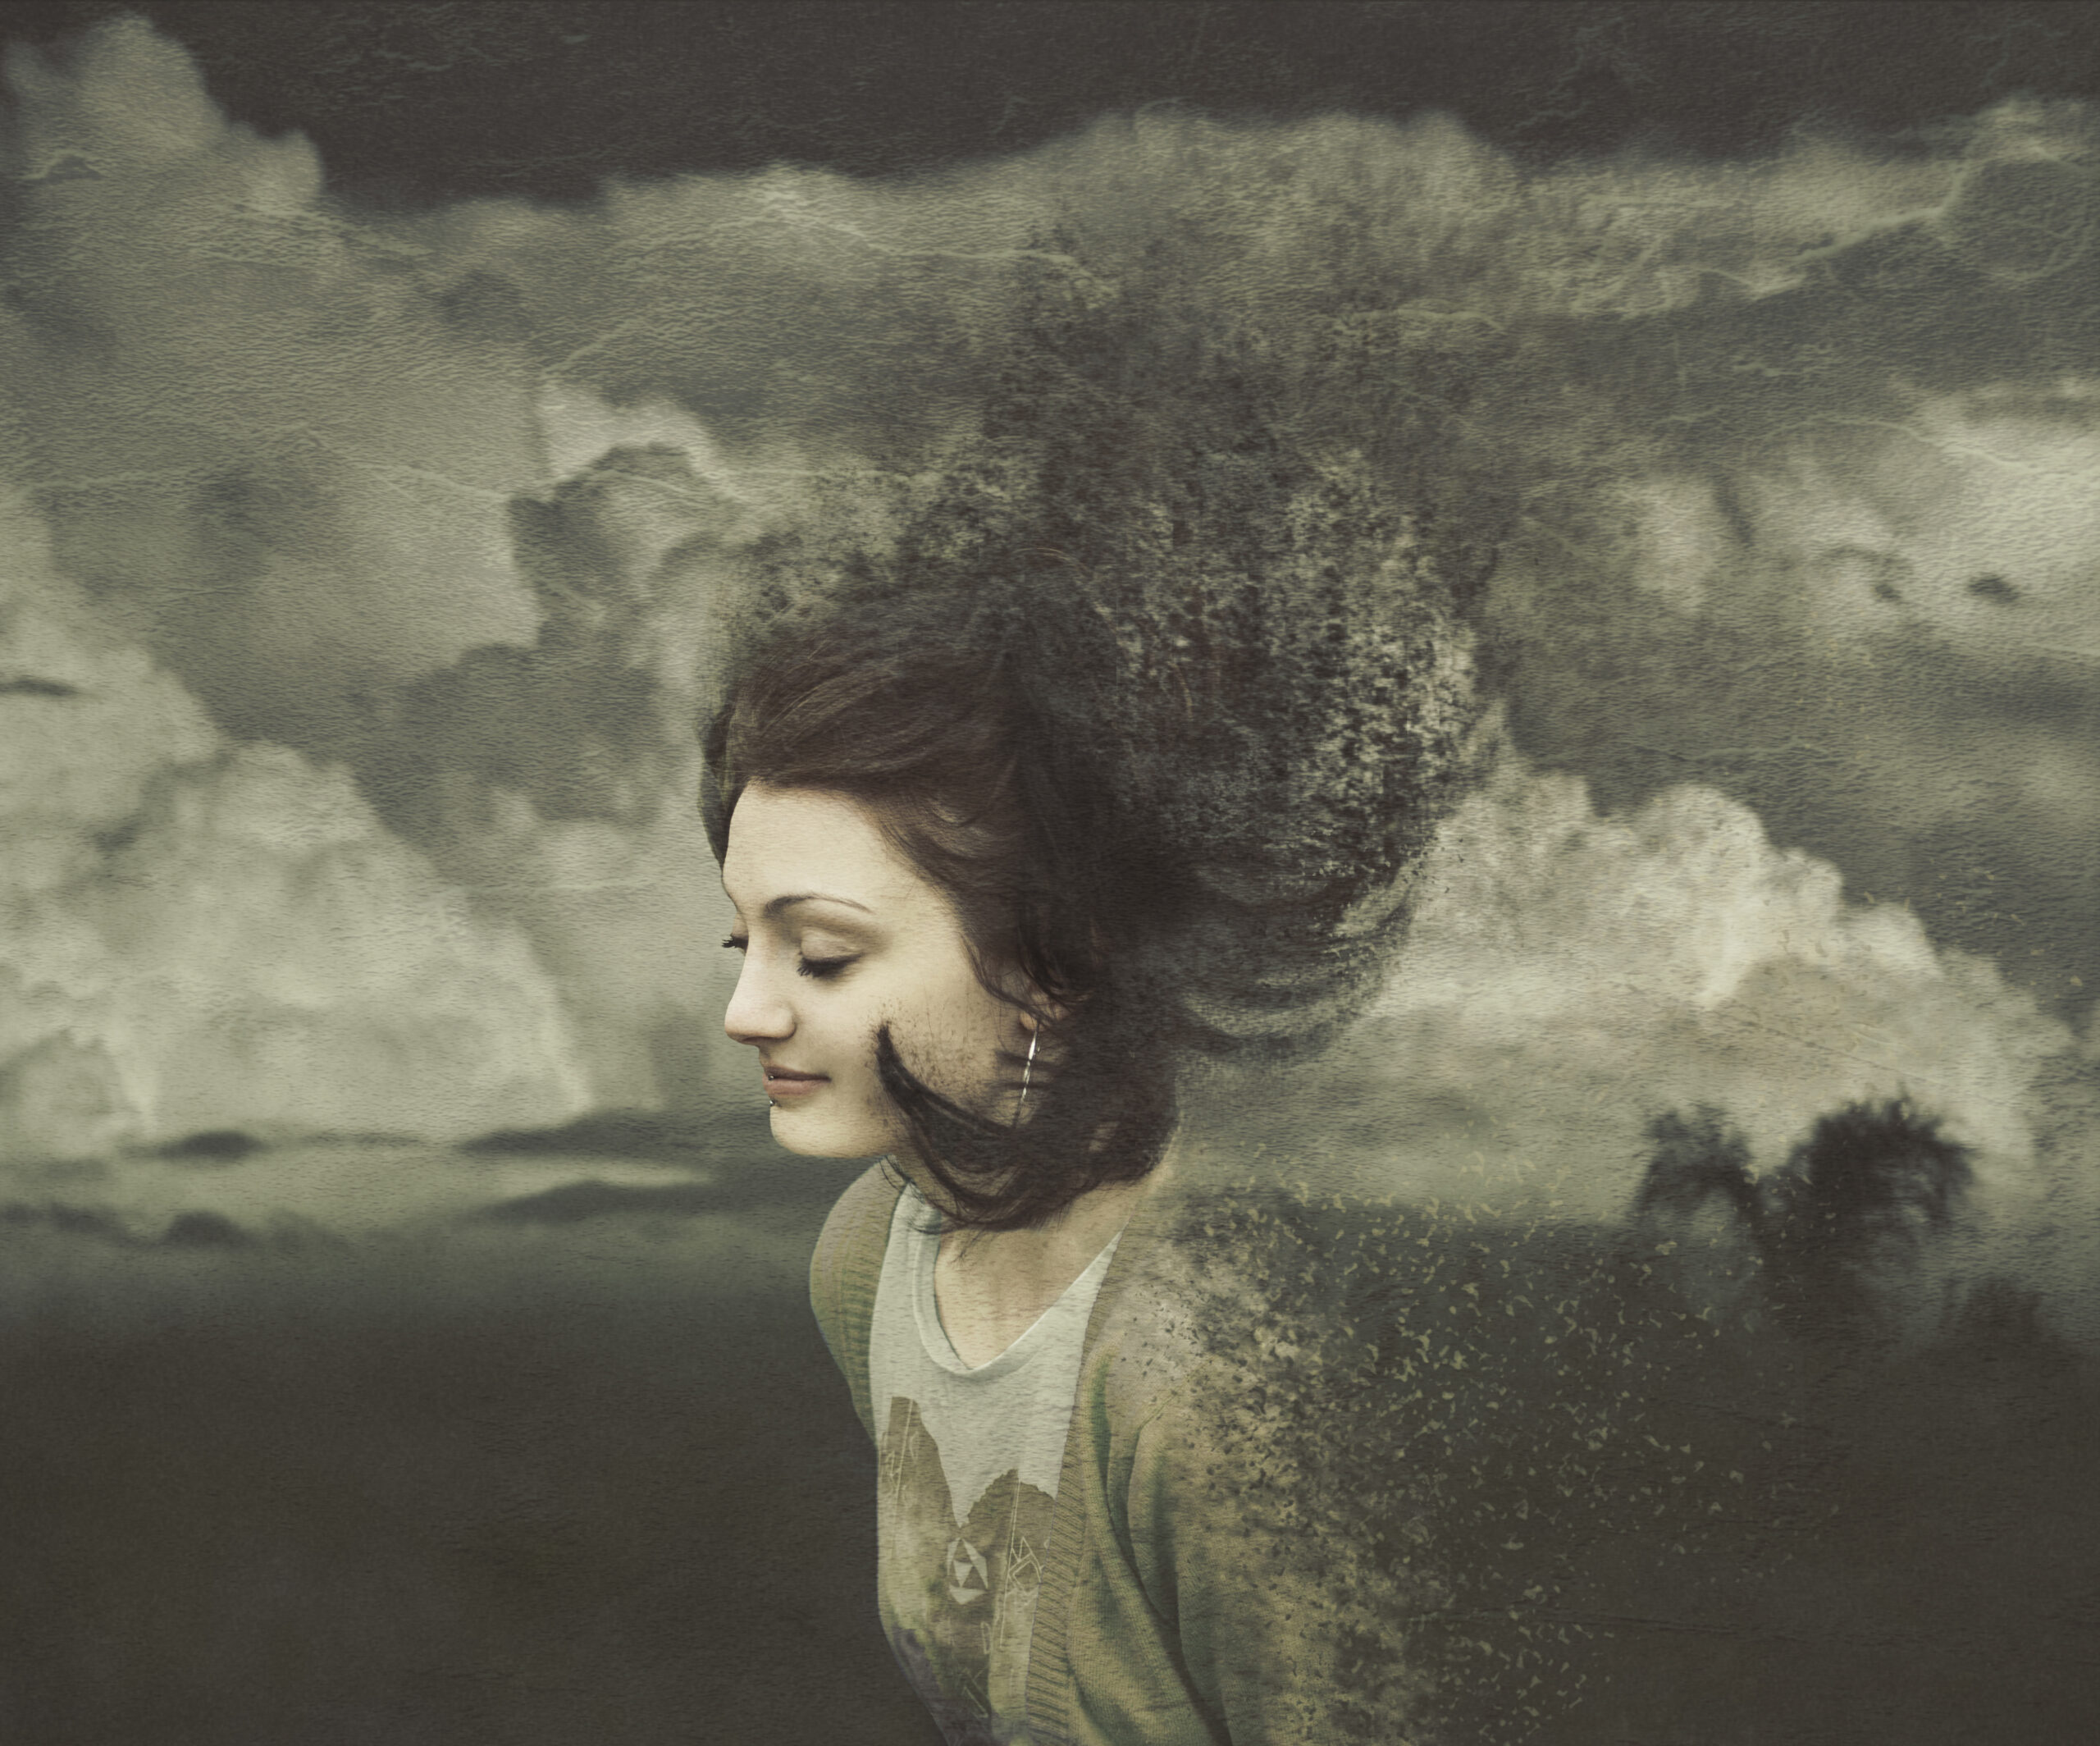
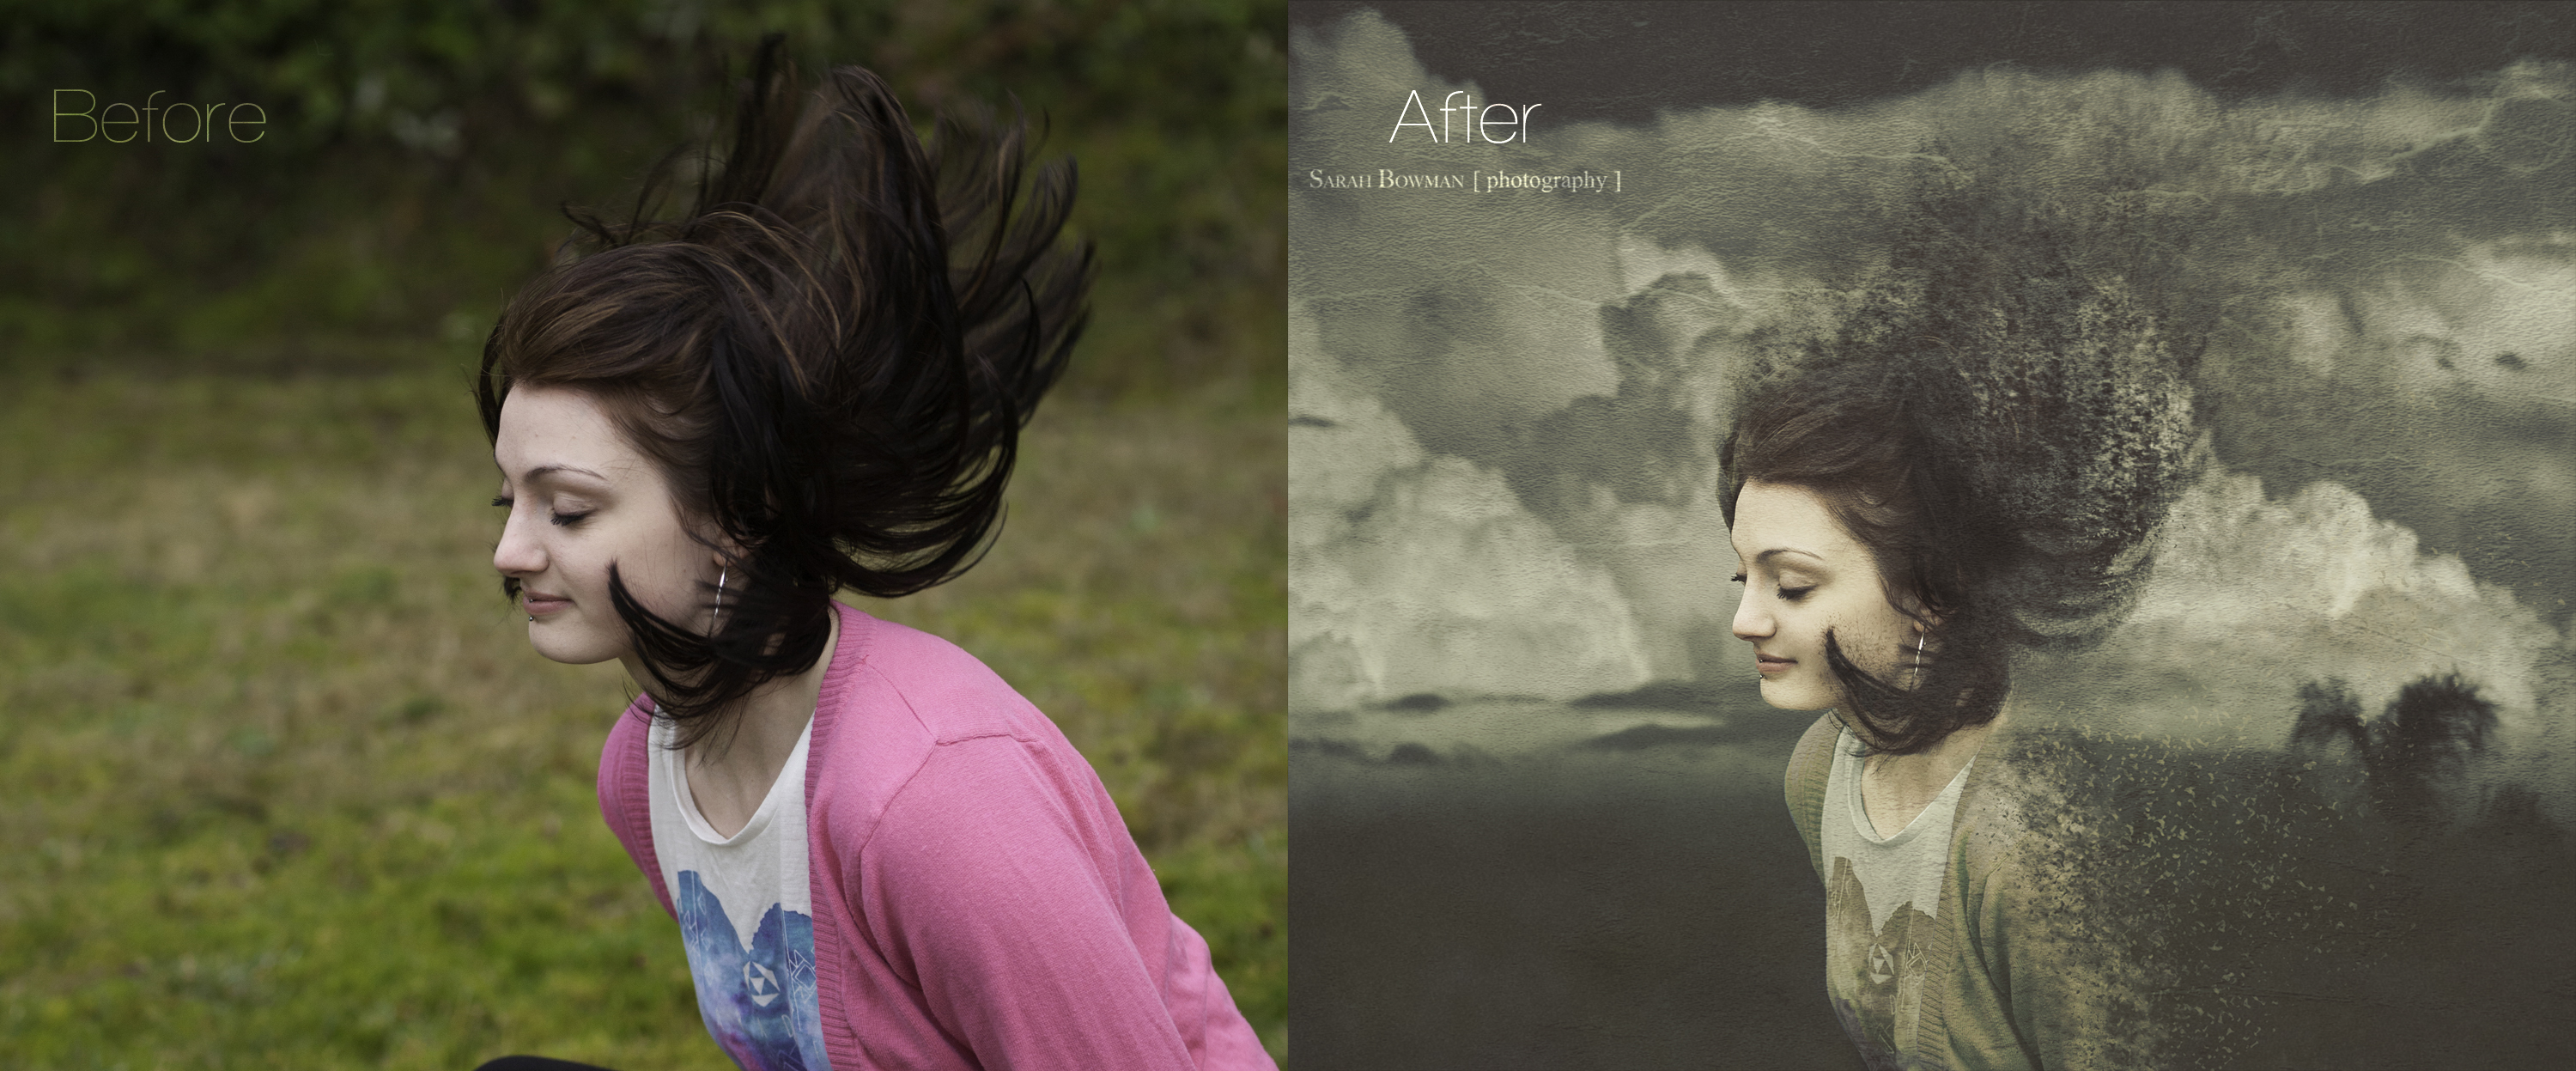
This image nearly ended up in my trash-can; however, I kept on playing around with ideas in Photoshop. Looking at the flow of her hair, I wondered if I could make it look as though she was fading away. The method is surprising simple and doesn’t take that many steps!
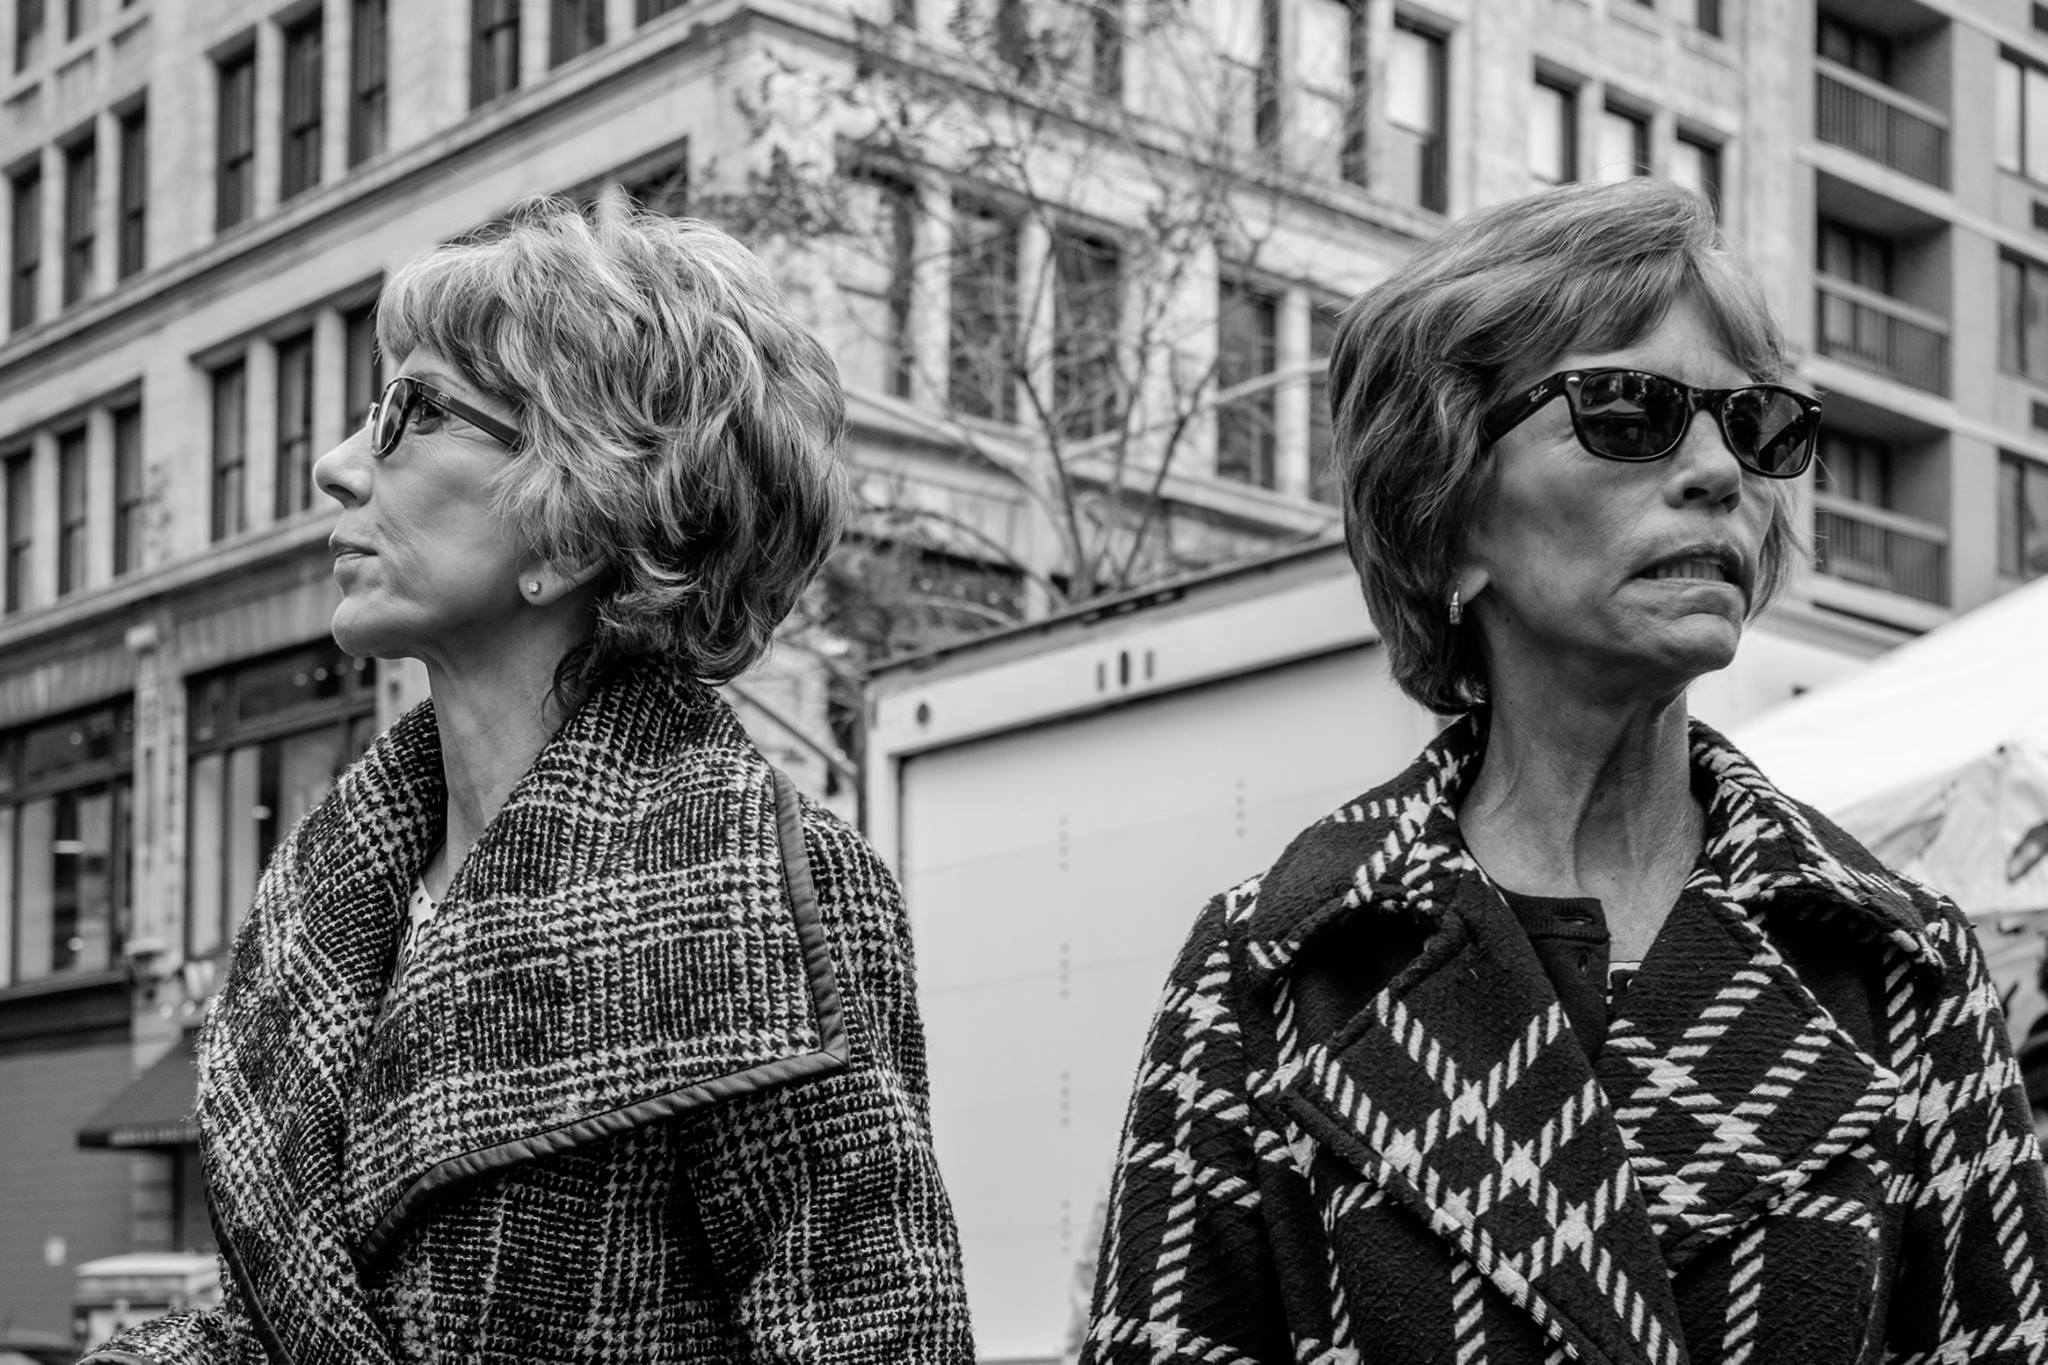
I discovered my love for photography much later than most photographers I know. It took some time to figure out my favorite subjects. Once I realized that I enjoyed taking candid shots of people, I knew that I had found my niche. Every chance I get, I can be found on the streets of NYC and beyond – whether in Chinatown, Coney Island or Brighton Beach, or shooting events such as the Mermaid Parade, Feast of San Gennaro, protest marches, and other cultural events.
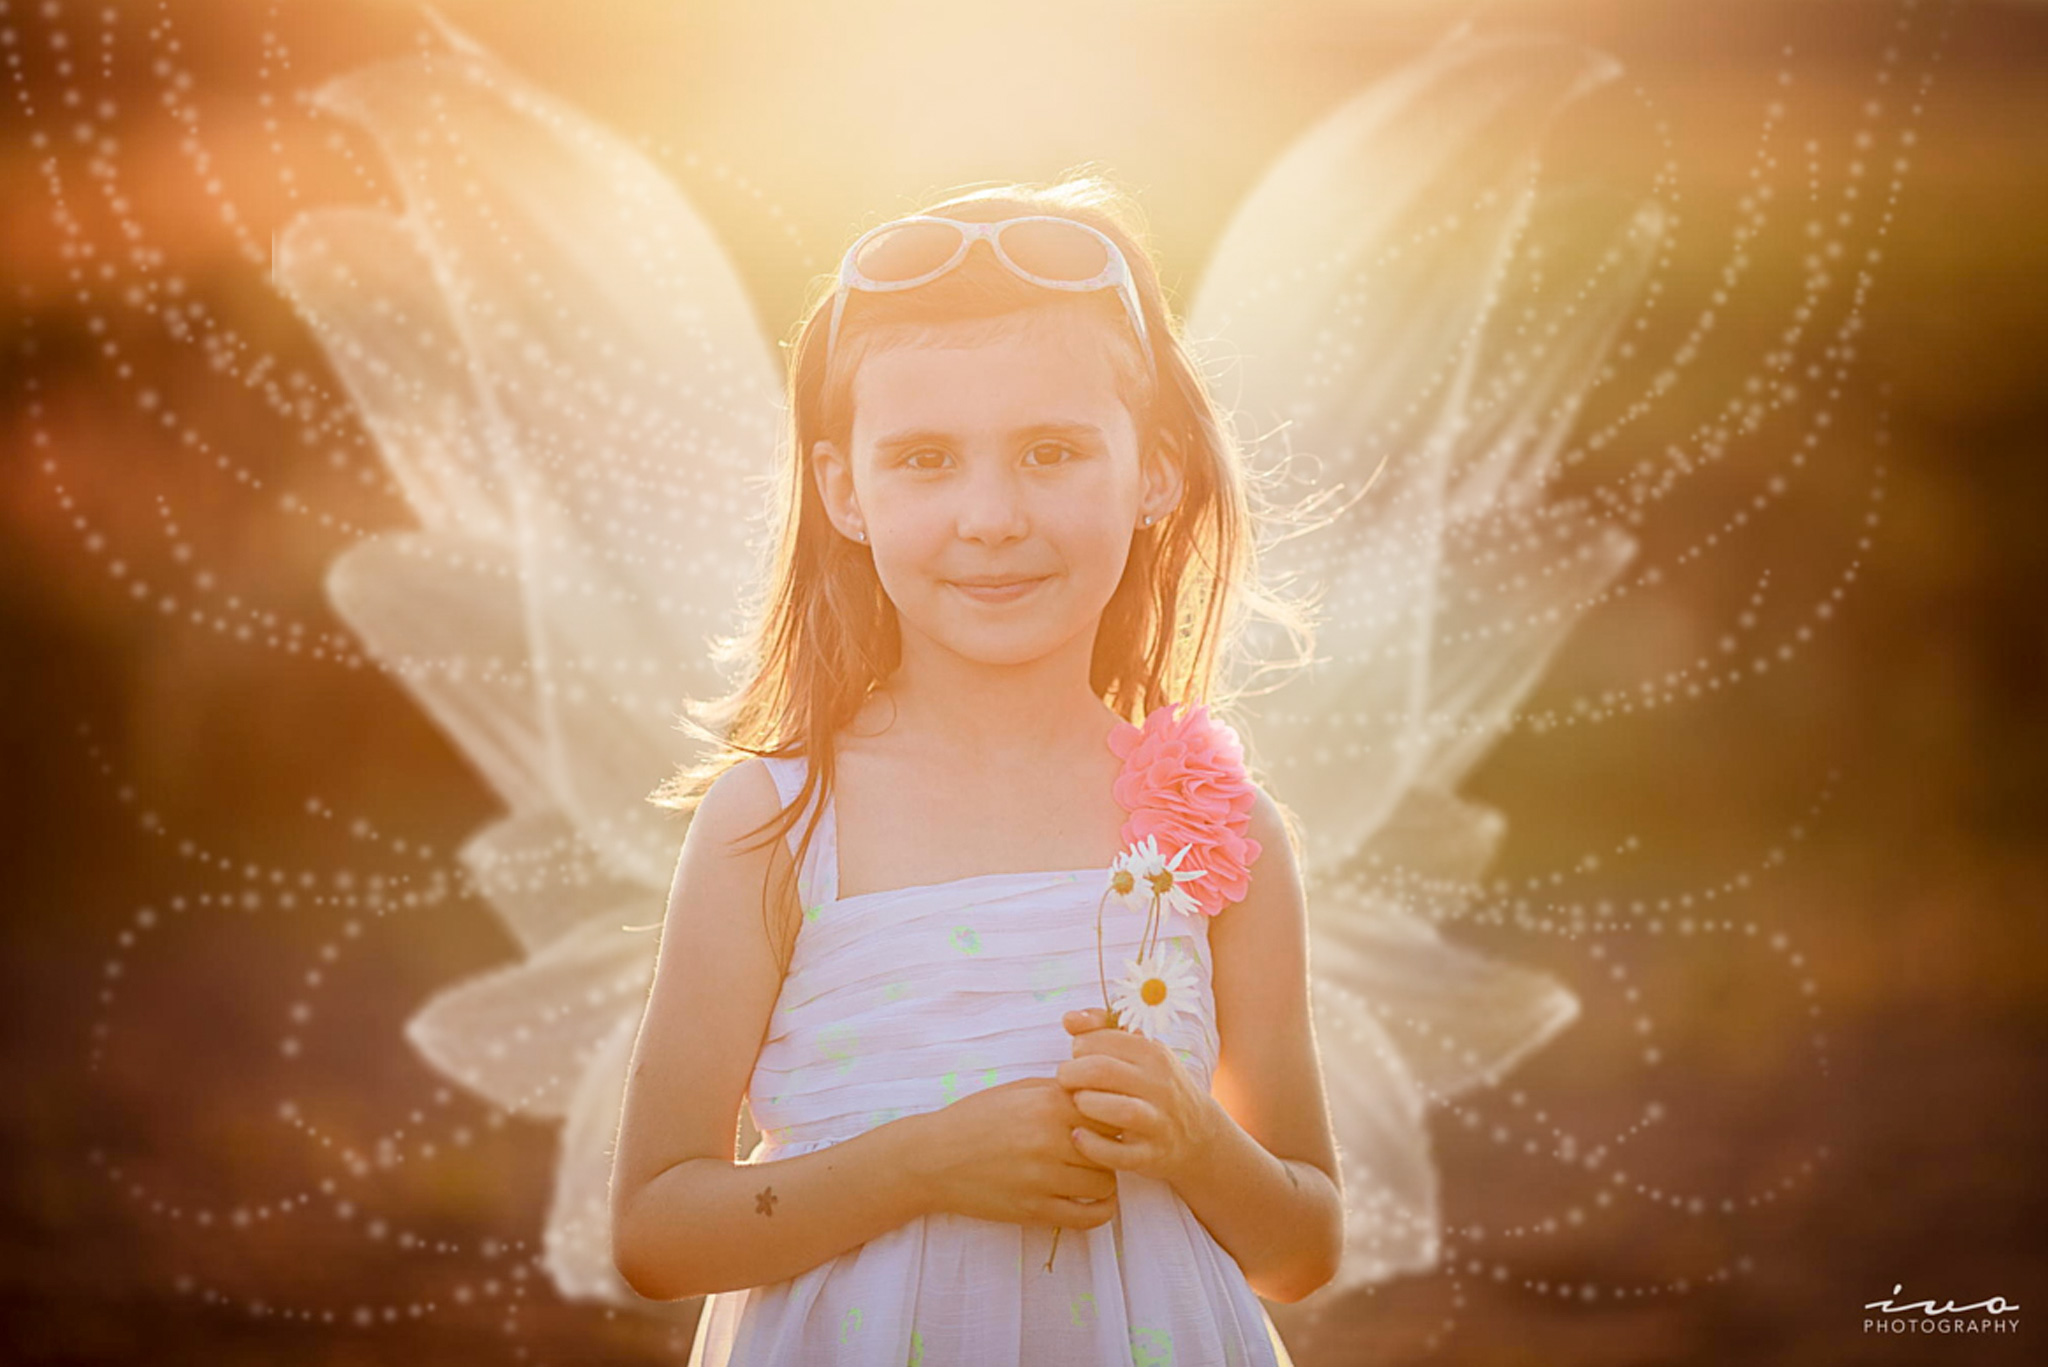
As the father of 3 beautiful kids I can tell you that kids LOVE a good story. My daughter Olivia is absolutely wild about fairies, princesses and all things magical. She often runs around dressed in her favorite Tinker Bell fairy dress with tiny little wings attached to the back, proudly showing it off to anyone and everyone willing to engage in a game of magical creatures and dance. So one day I thought, wouldn’t it be great to capture a golden hour portrait of her and paint on her some cute fairy wings using Photoshop? I had seen it done before online and set about making it happen.
Imagine the delight and joy on her little face when I showed her the finished photo and printed it out for her! So if you are parent who would like to do something similar for one of your kids or perhaps you are a photographer who wants to try something new when shooting family portraits with kids, then have a look at this short video tutorial. I hope that you find it helpful. The tutorial covers a simple technique on using brushes and layer masking to add a fairy wings effect to an existing photo.
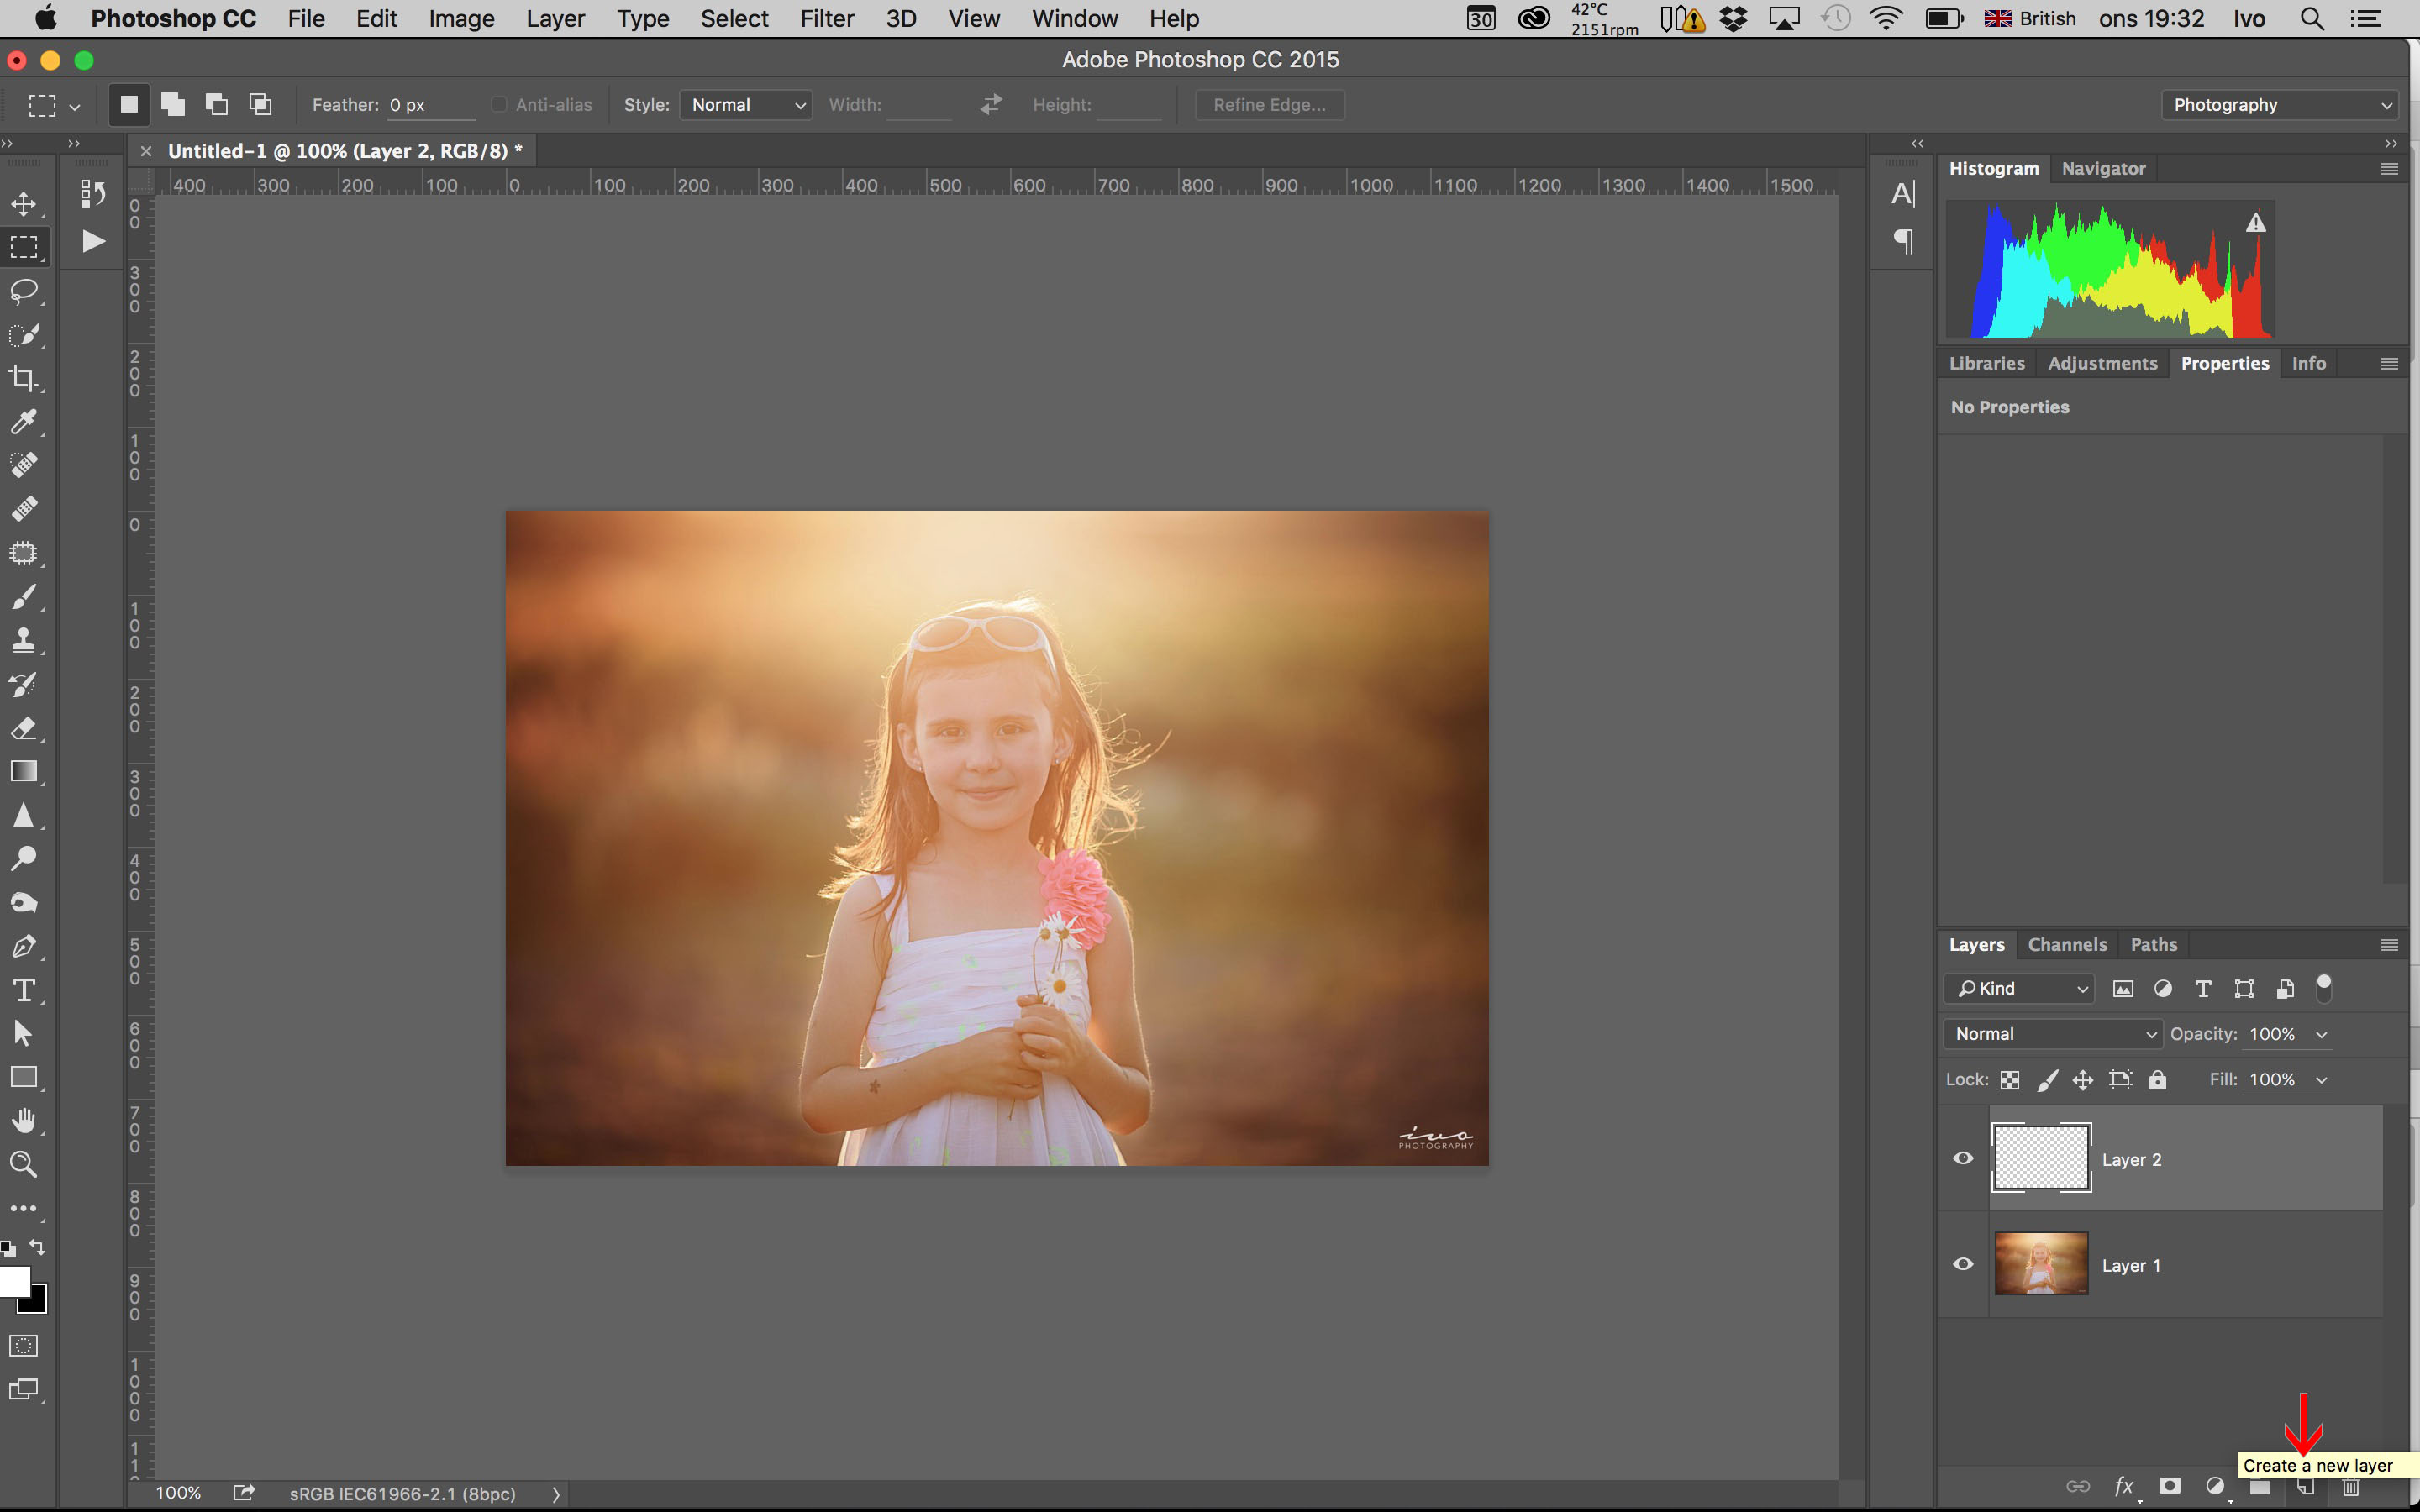
Step 1 – open image and create new layer
Open the image you wish to use in Photoshop. Tip: images with simple background work best.
Click the “Create a new layer” button in the bottom right of Photoshop (see red arrow)
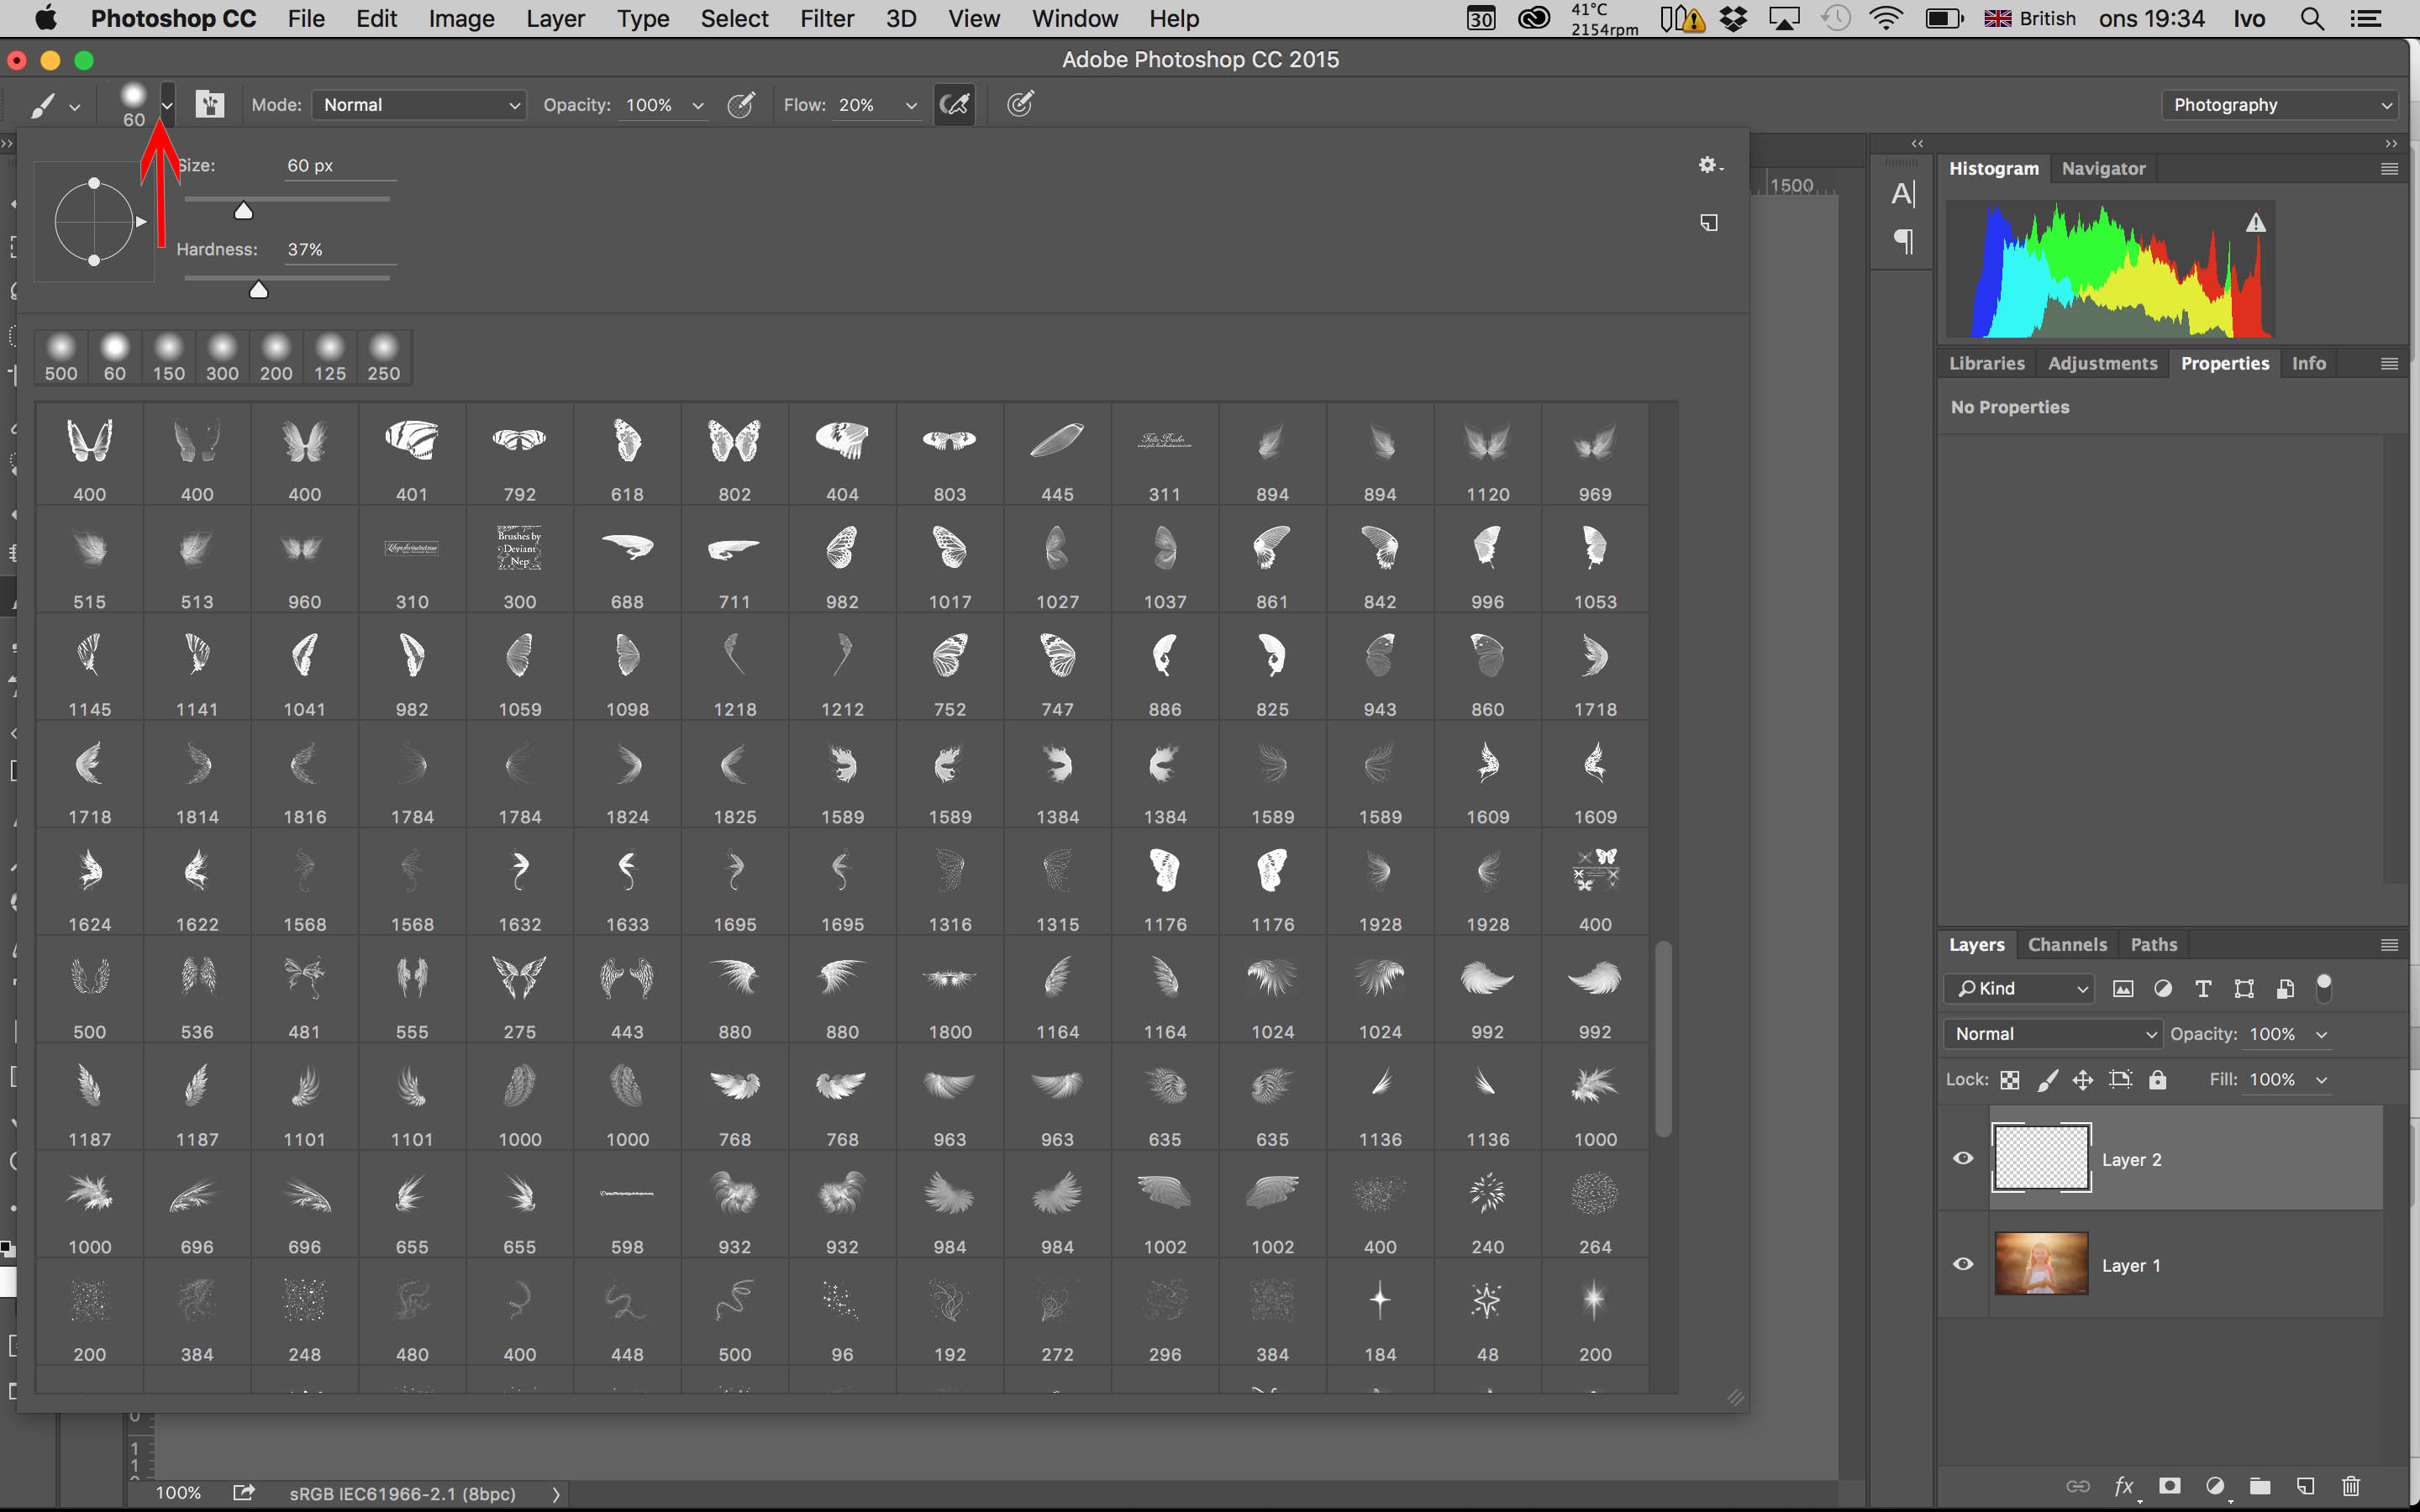
Step 2 – choose the right brush
Press (B) on your keyboard to select the brush tool. Then press on the brush selection drop down menu at the top right (see red arrow) and choose the fairy brush wings which you wish to use.
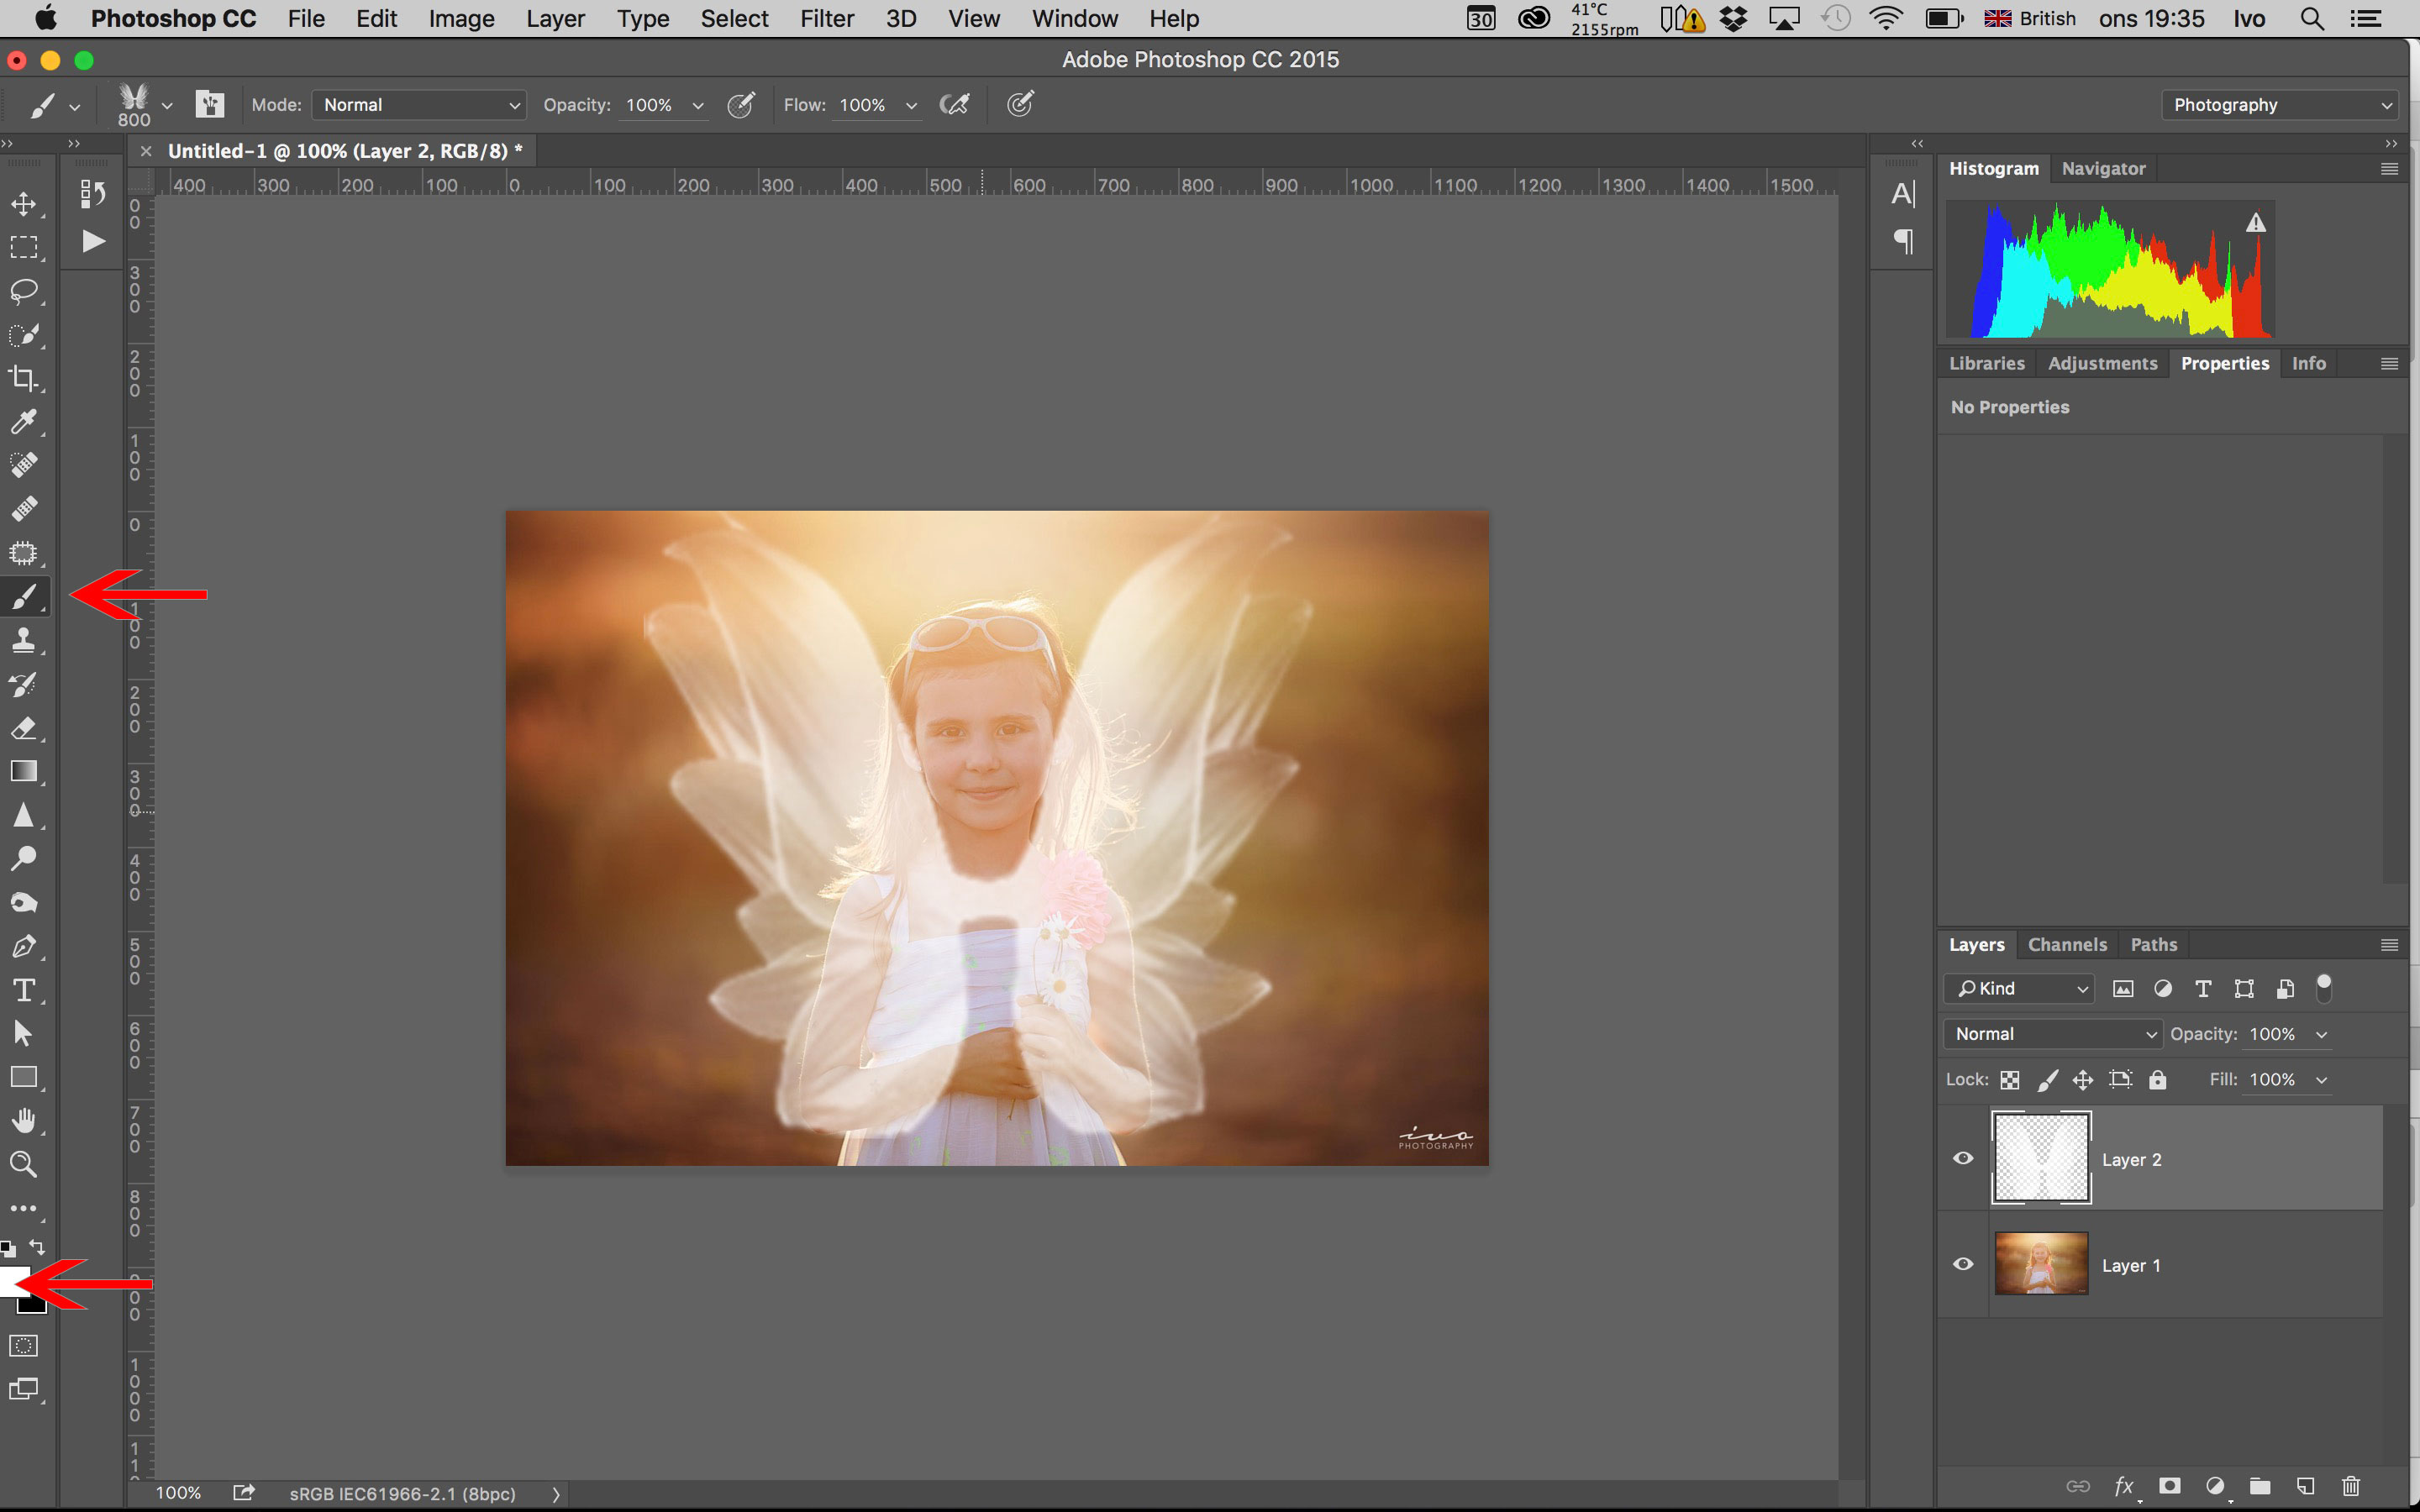
Step 3 – paint the wings
With the fairy wings brush selected, adjust the size of the brush by using ([) bracket keys (]) of your keyboard to suit the size of your canvas, then using a white mask at 100% opacity you paint the fairy wings on to Layer 2. Press (V) to move and position the wings so they sit symmetrically over the person. Press Cmd + T (on Apple) or Ctrl + T on (PC) to resize the wings if needed.
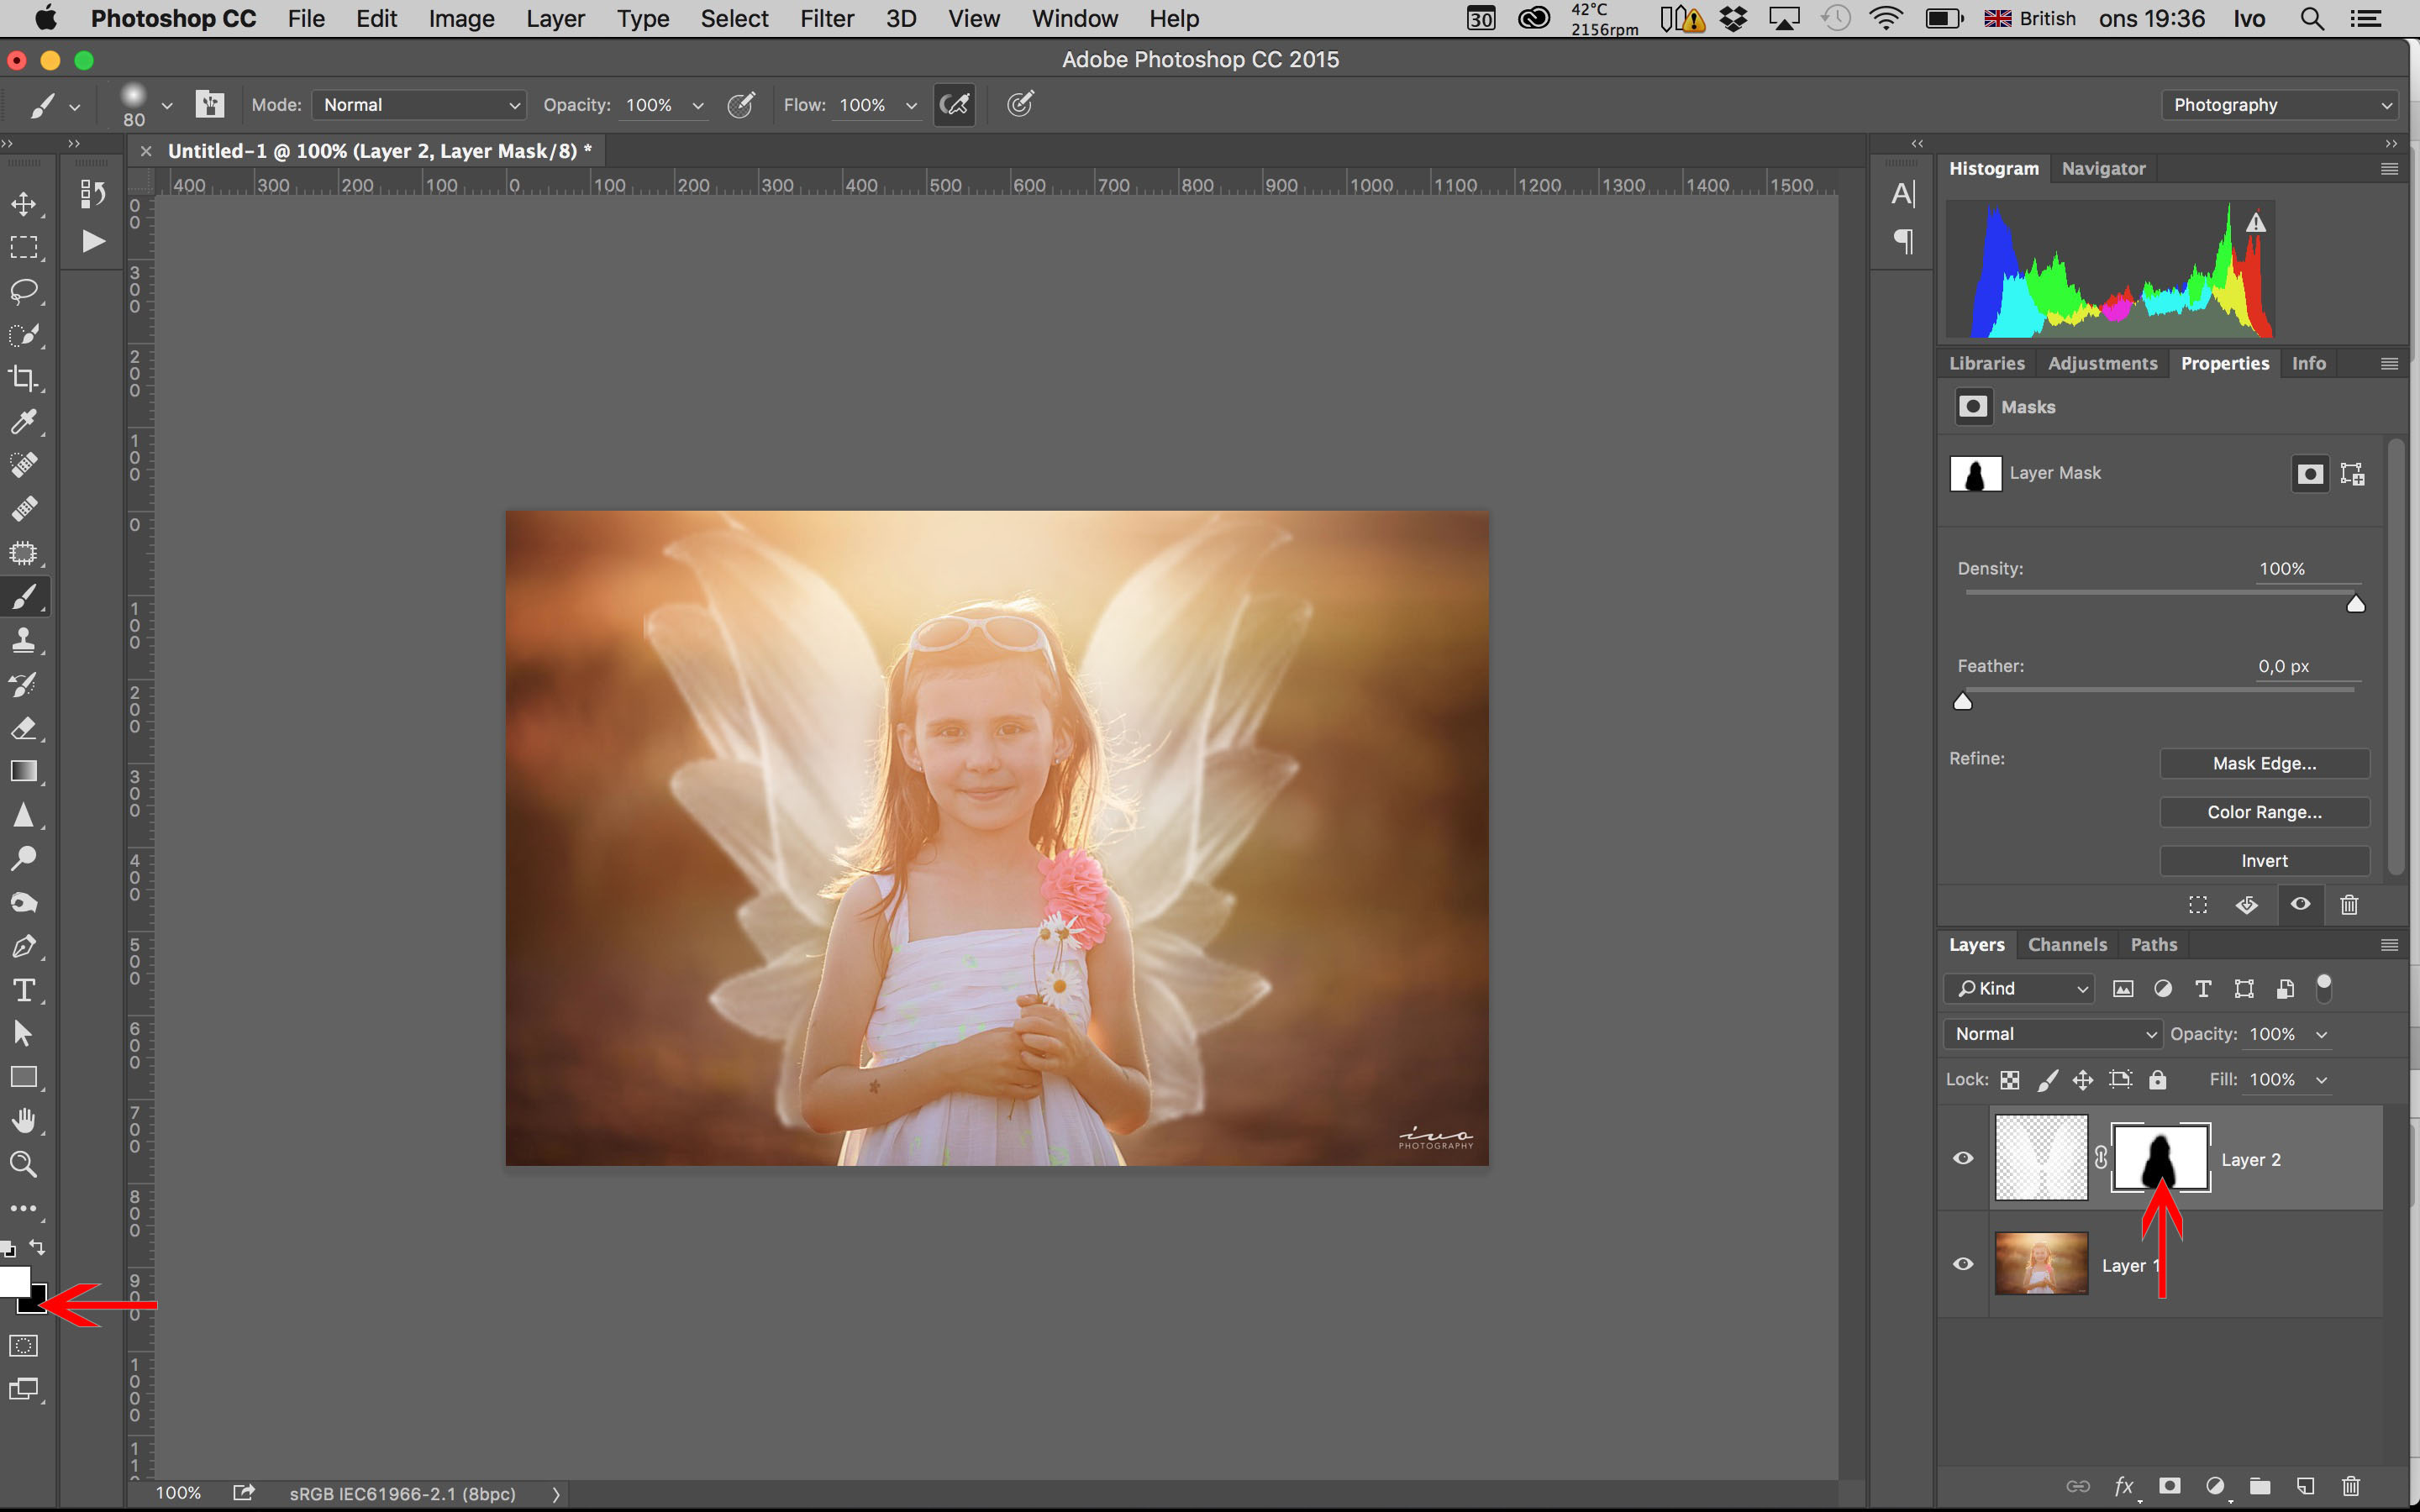
Step 4 – adding a layer mask
Chose a soft round brush at 100% opacity, select black color mask, click the layer mask to the right of Layer 2 and using the brush mask directly over the subject to remove and mask off the wings from the person’s face, arms and body. Remember that when you mask, black hides things and white reveals them. The beauty of using masking as opposed to the eraser tool is that this method is non destructive and can be reversed at any time.
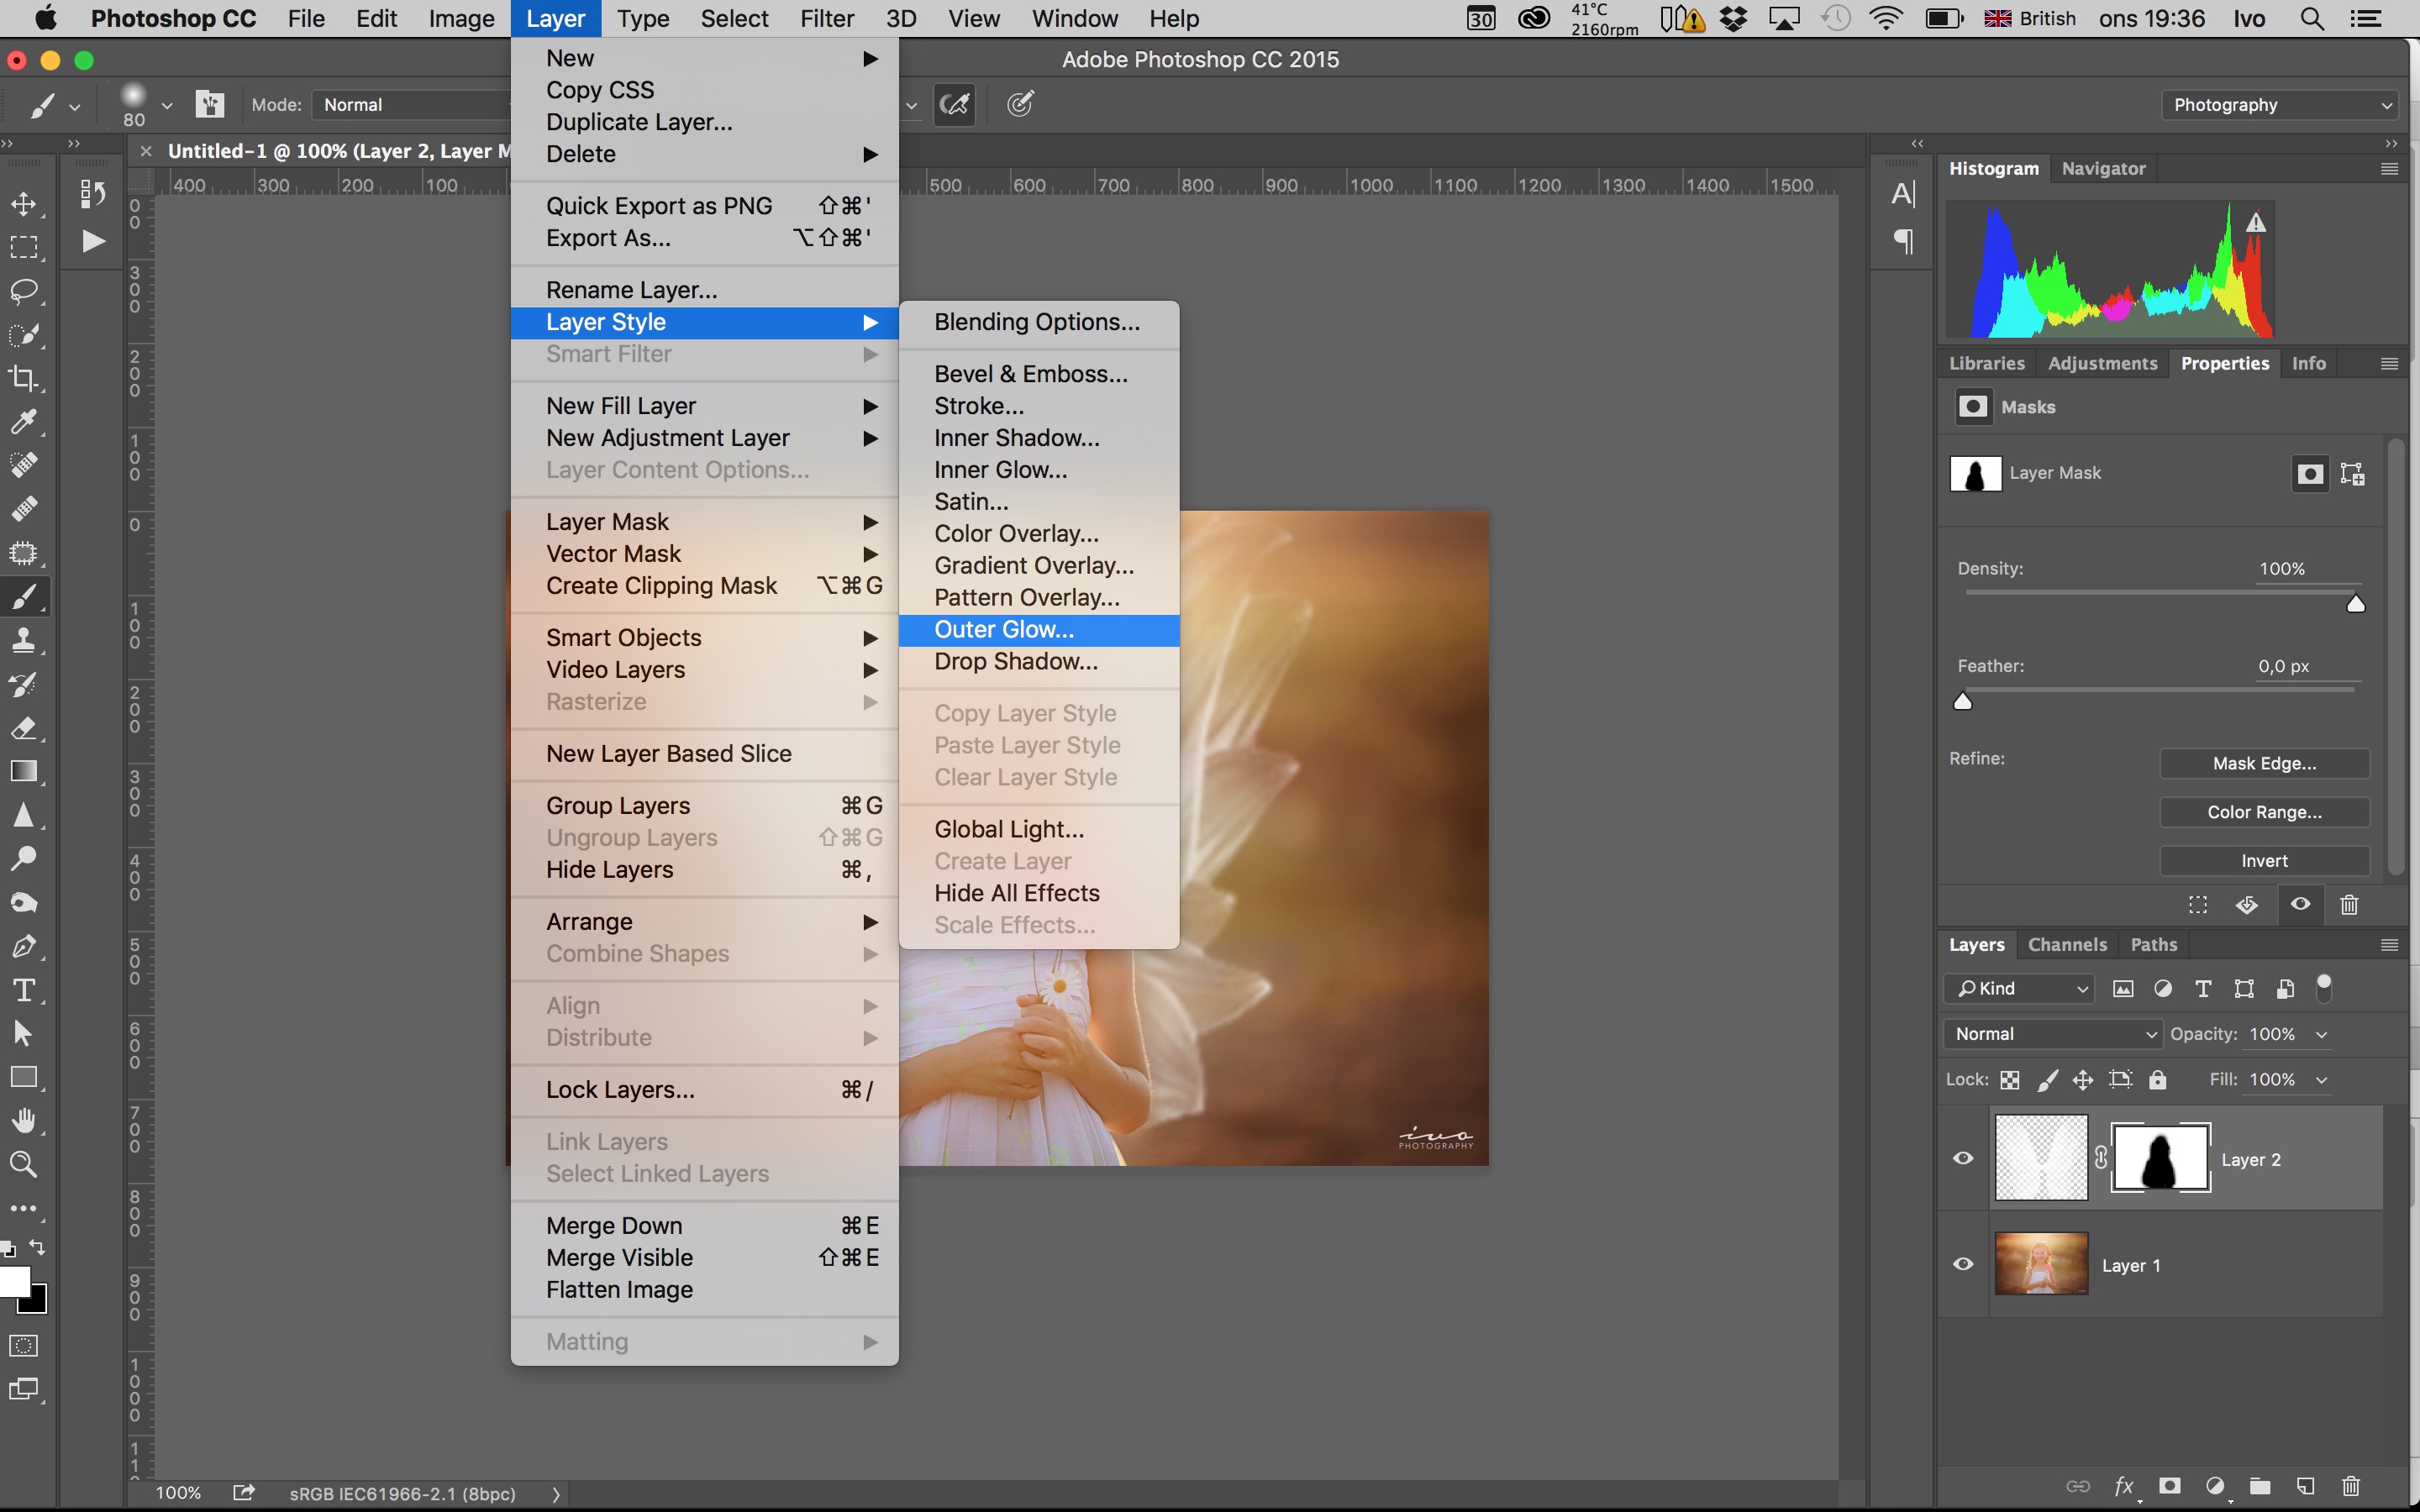
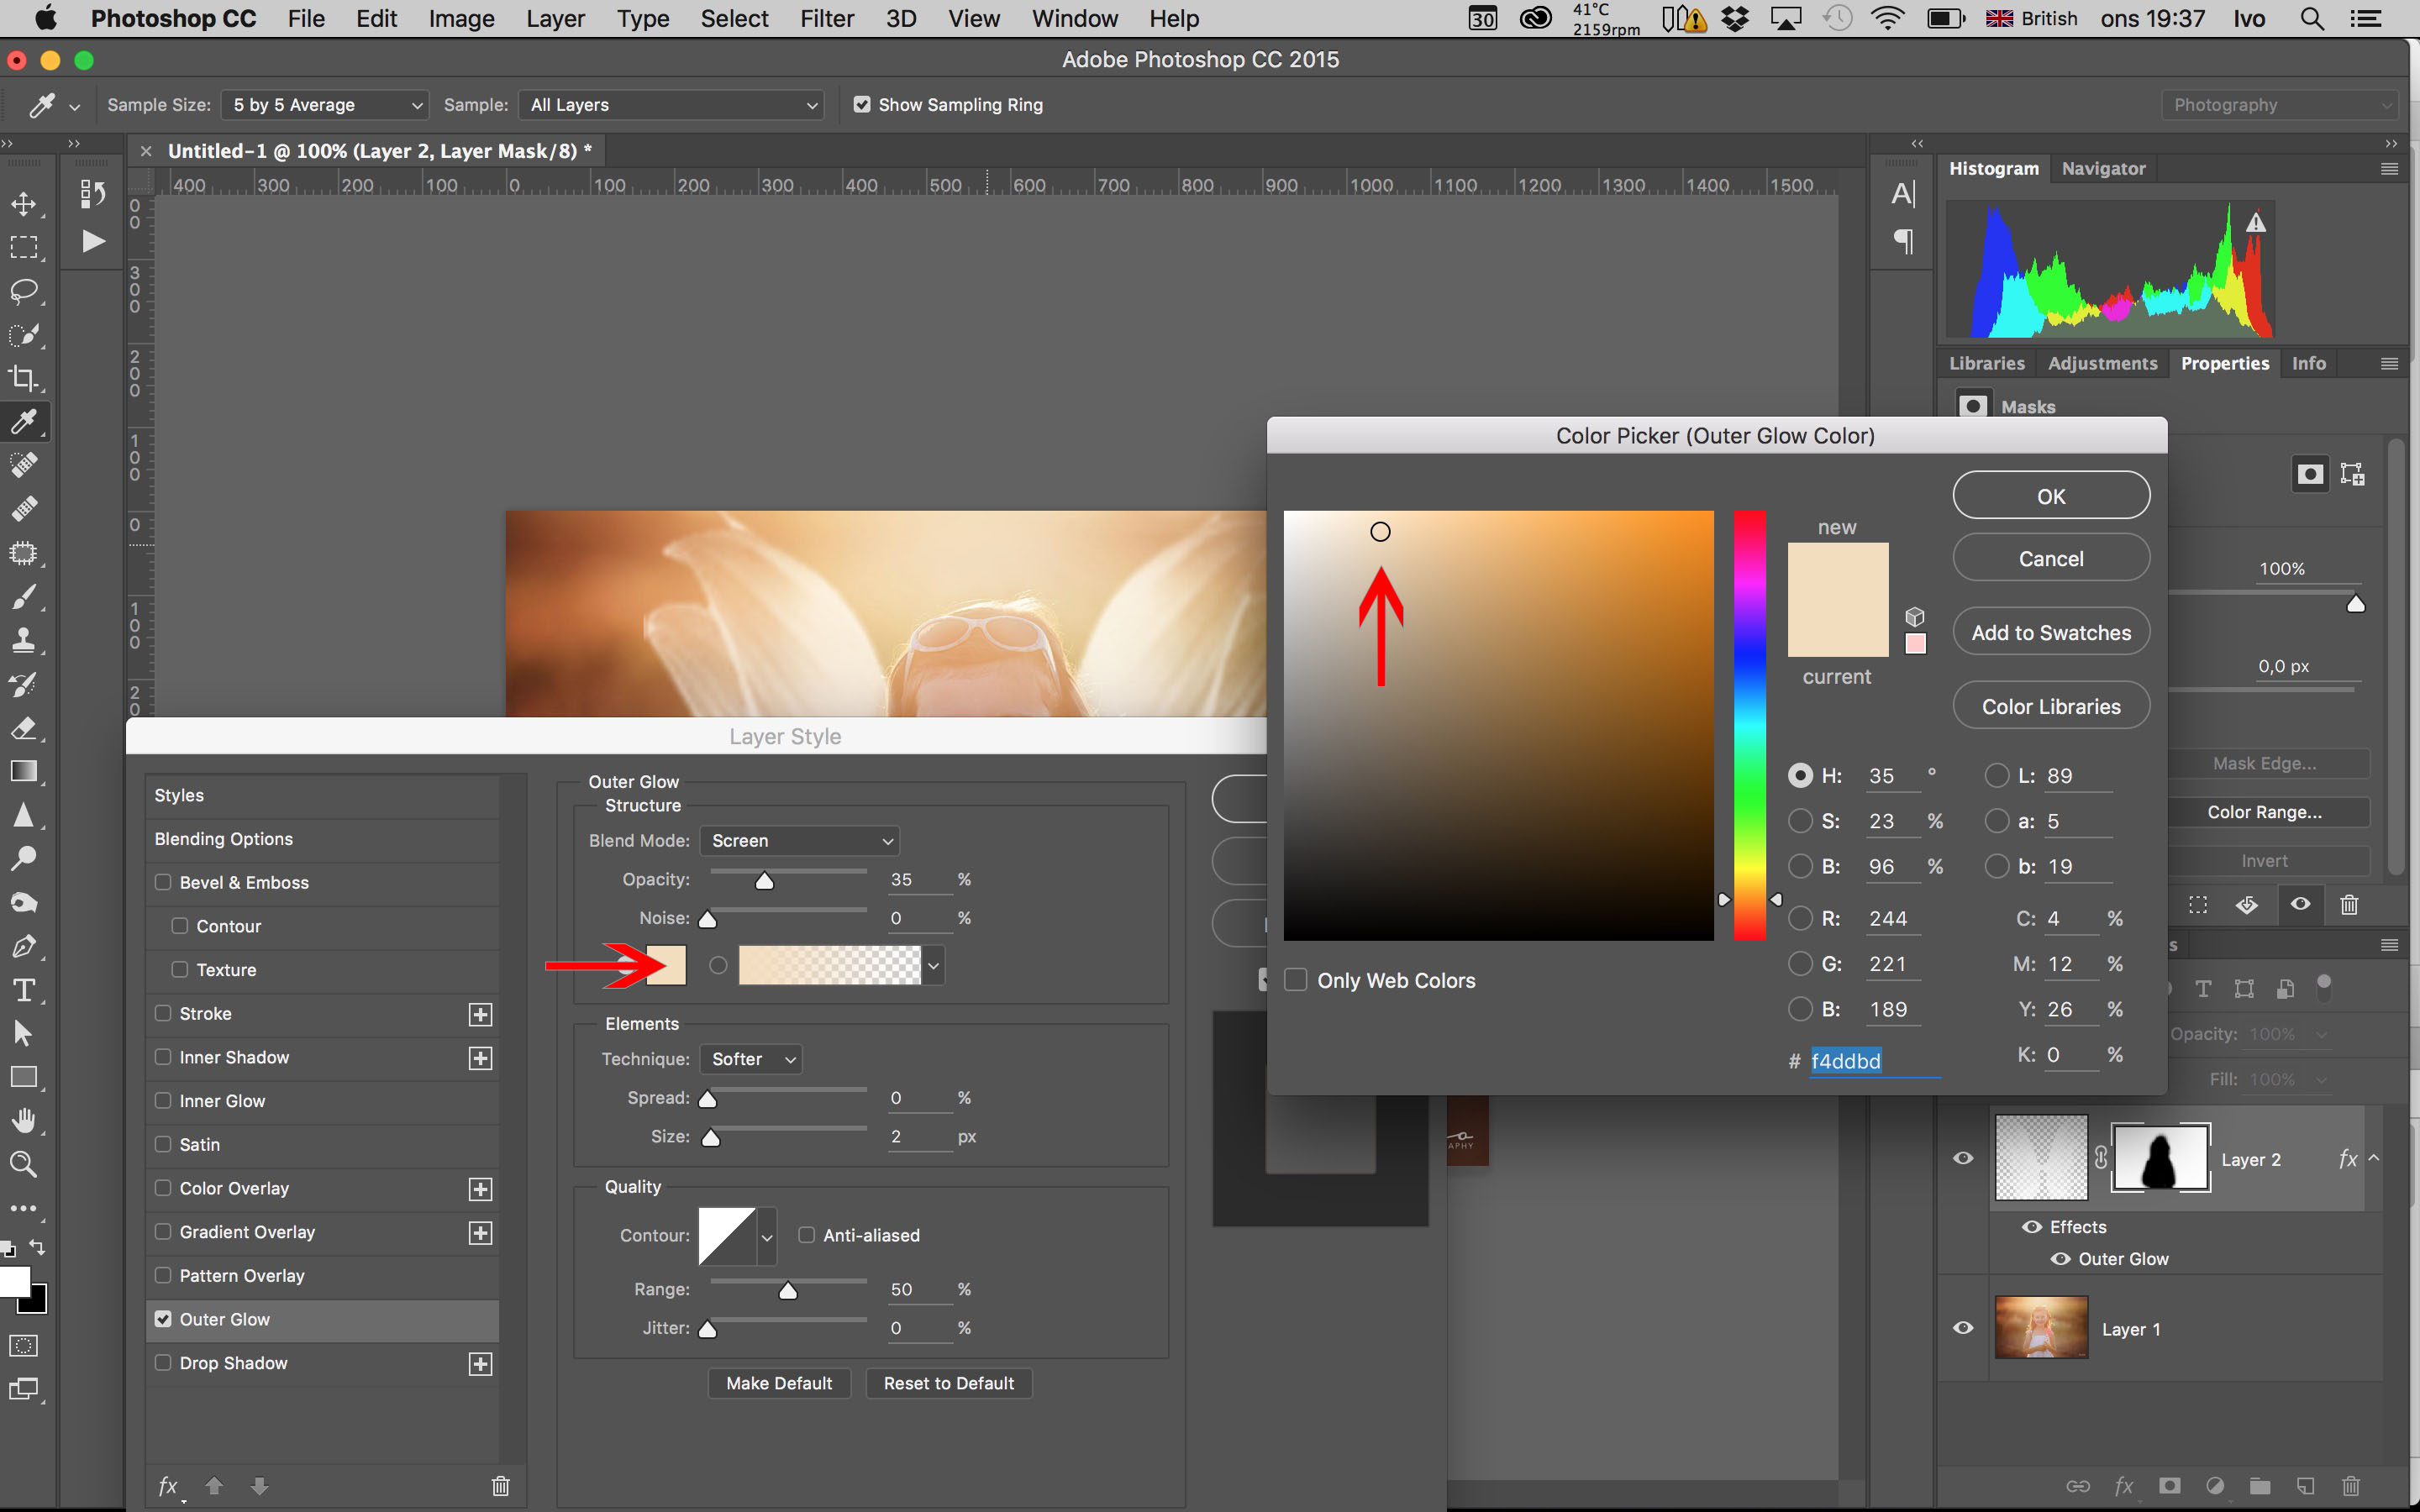
Step 5 – add layer glow
For some added whimsical effect you can go to the top menus and click on Layer -> Layer Style -> Outer Glow
Using the eye dropper tools choose a soft light color for the glow effect. Using a color already present in the image helps you blend things better.
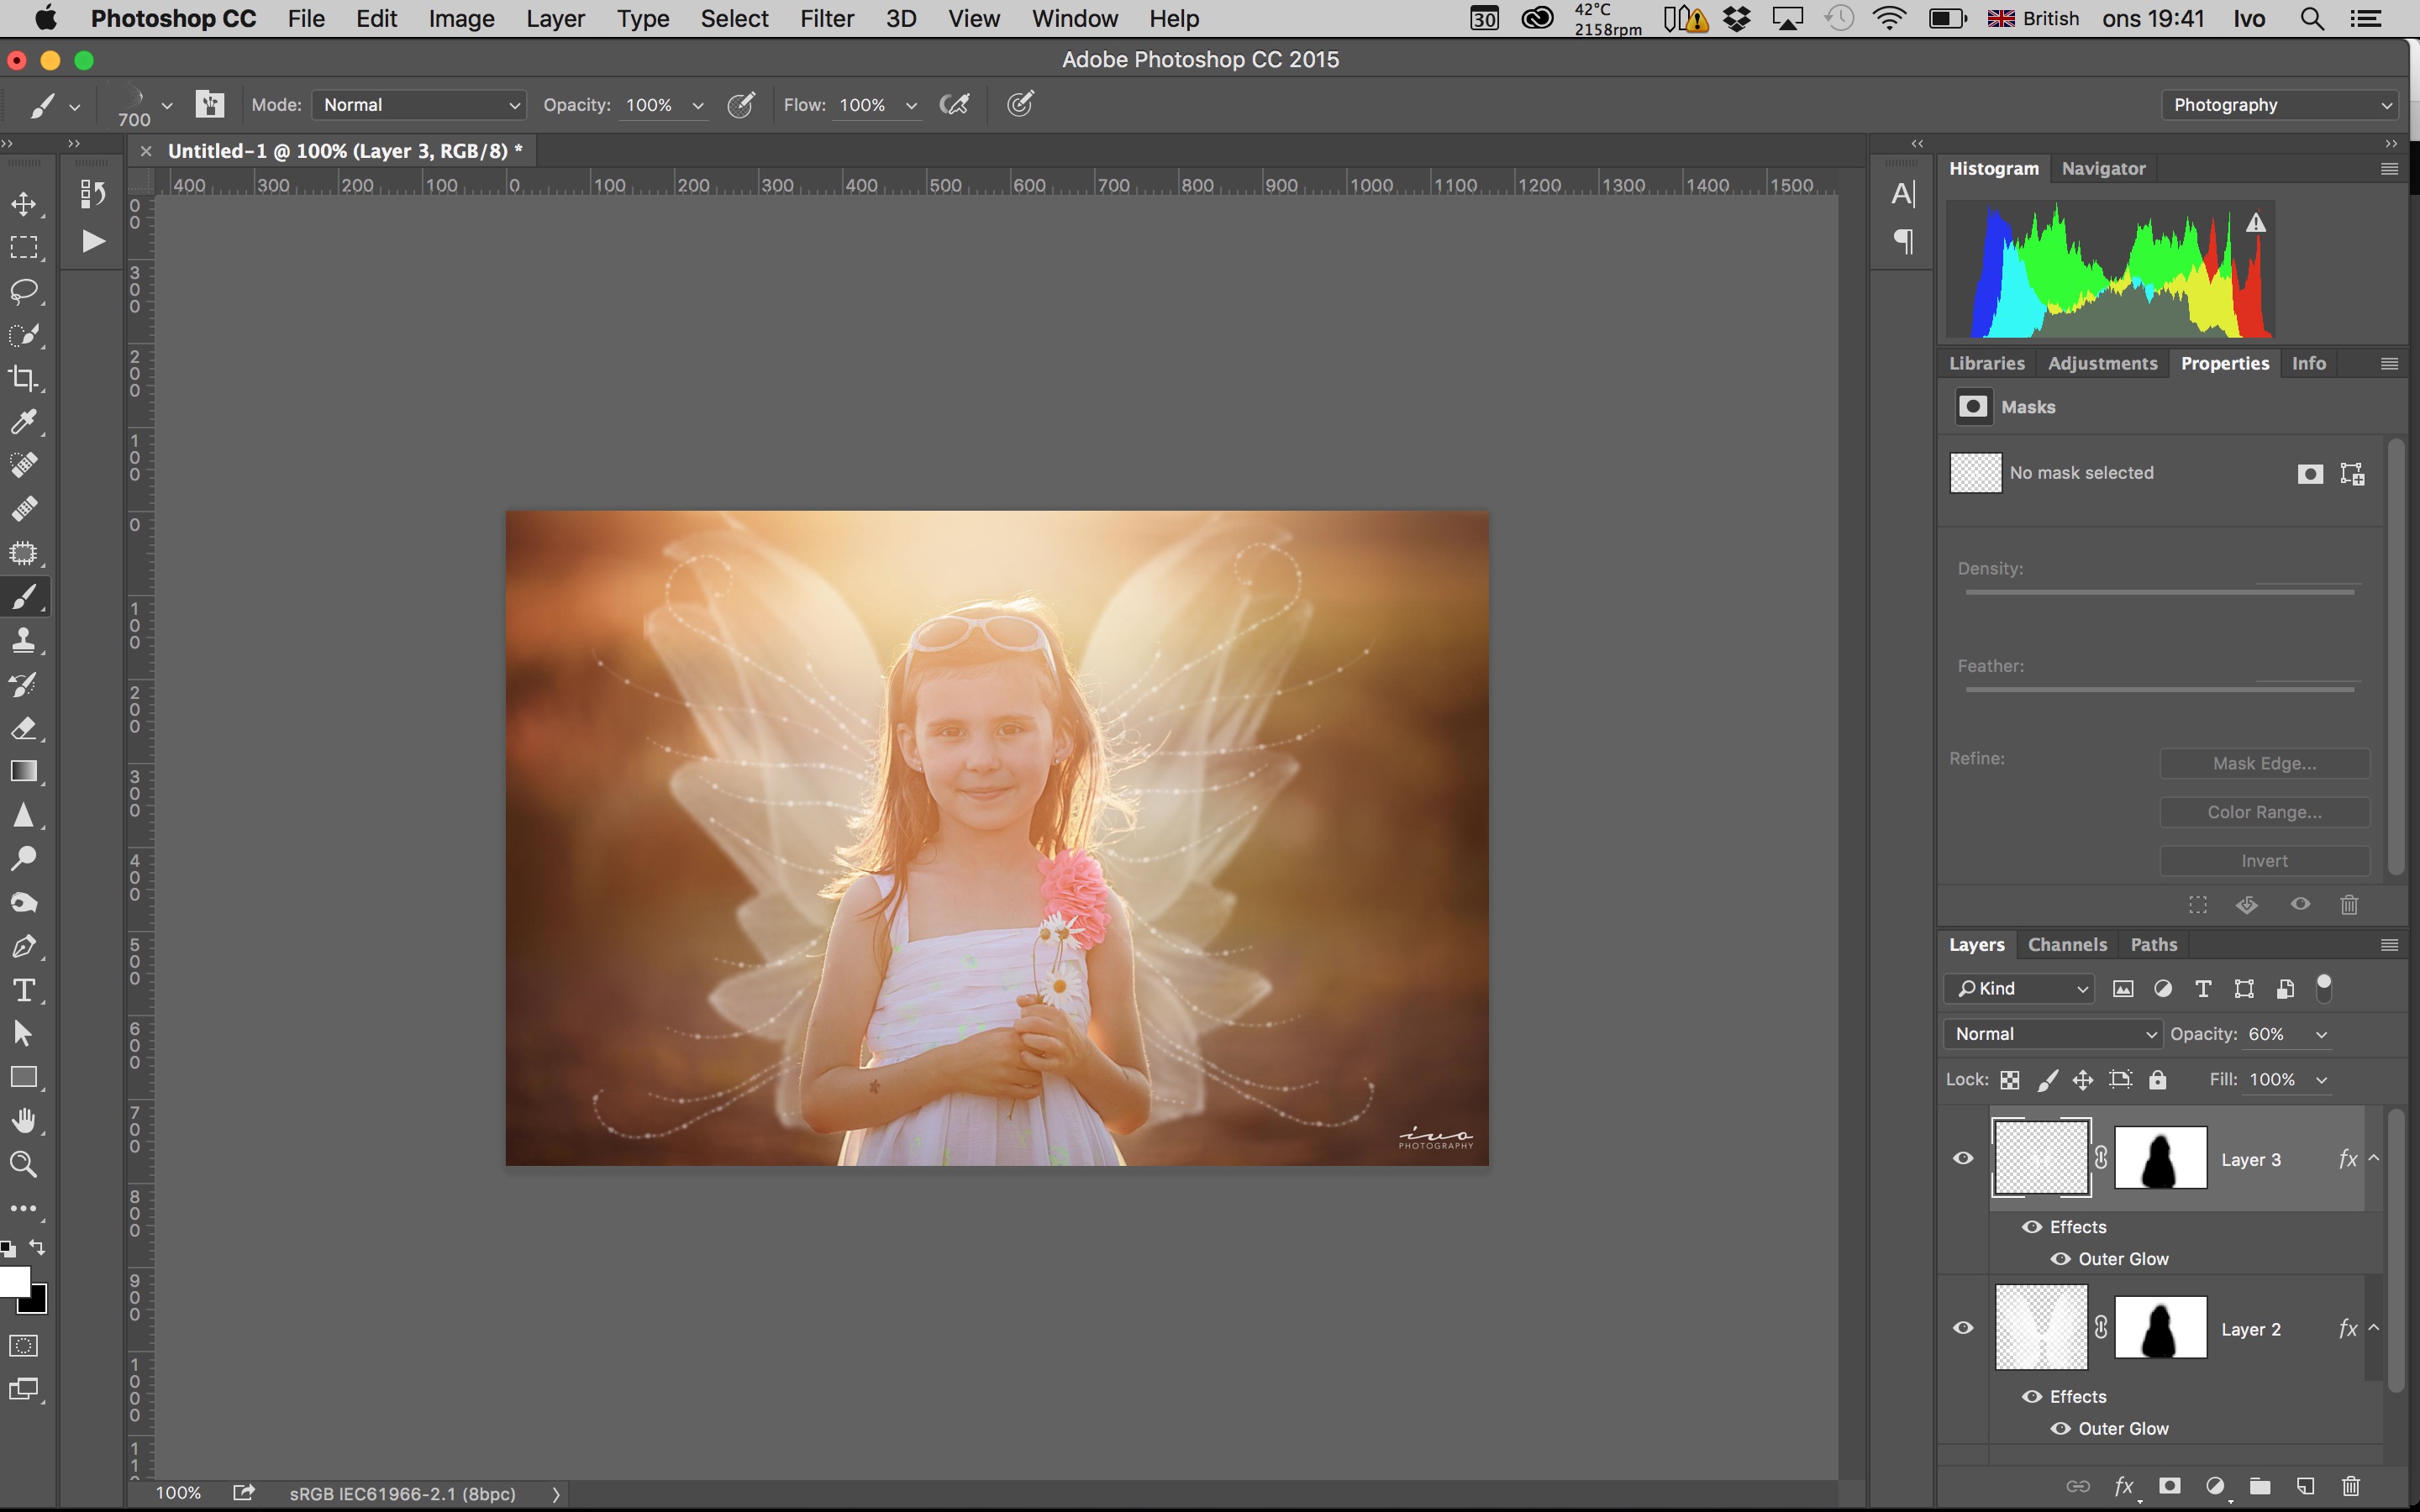
Step 6 – add more
Repeating the same methods outlined in steps 2-5 you can create even more layers of additional wings, glitter or other magical fairy effects to complete your image.
Finally
Save and export your finished masterpiece as a high resolution JPEG for printing or uploading to social media. Remember that for best results on Facebook you need to Save for Web as 100% quality JPEG with the sRGB color space selected and exported at 2048px on the longest edge of the image.
The fairy_wings_brushes were created by Obsidian Dawn (www.obsidiandawn.com)and are available as a free download from a great creative resources website called Deviant Art where many artists post their Photoshop brushes for others to use.
I hope you enjoyed the video and I’m looking forward to seeing the photos you produce using this method.
This was originally a shot of some girders from a parking garage overhang.
The Philosophy
I won’t take too long with this since my last post was all about artistic vision and philosophical ramblings. This post is meant more as a tutorial. However, there are a few things I would like to share here. Sometimes, my goal when I am out and about shooting is to capture something other than abstract ideas. That is, I may be out with the goal of doing some self portraits or a few landscapes at the beach. However, the light or weather refuses to cooperate. Sometimes, I lose the mood. Whatever the case may be, I feel that if I am out there with my camera, I need to find something to shoot so I can use the photos as a sort of “bank” I can draw from whenever I need to. I have thousands of images on my computer that I can turn to whenever I am in a creative “rut” because of this. (I am the photographic equivalent of those poor folks on the show ‘Hoarding : Buried Alive’ lol.) I shoot tons of “throw-away” images that, later on, prove to be very useful in creating some very interesting and at times, award-winning images. I take shots of geometric patterns, shadows, and architecture. When I am taking these shots, I try to keep in mind that they will be used to create an image that will look FAR different from the image my camera captured. They don’t look like much out of the camera, but hopefully the tutorial below will help make your photos look like a work of art 🙂
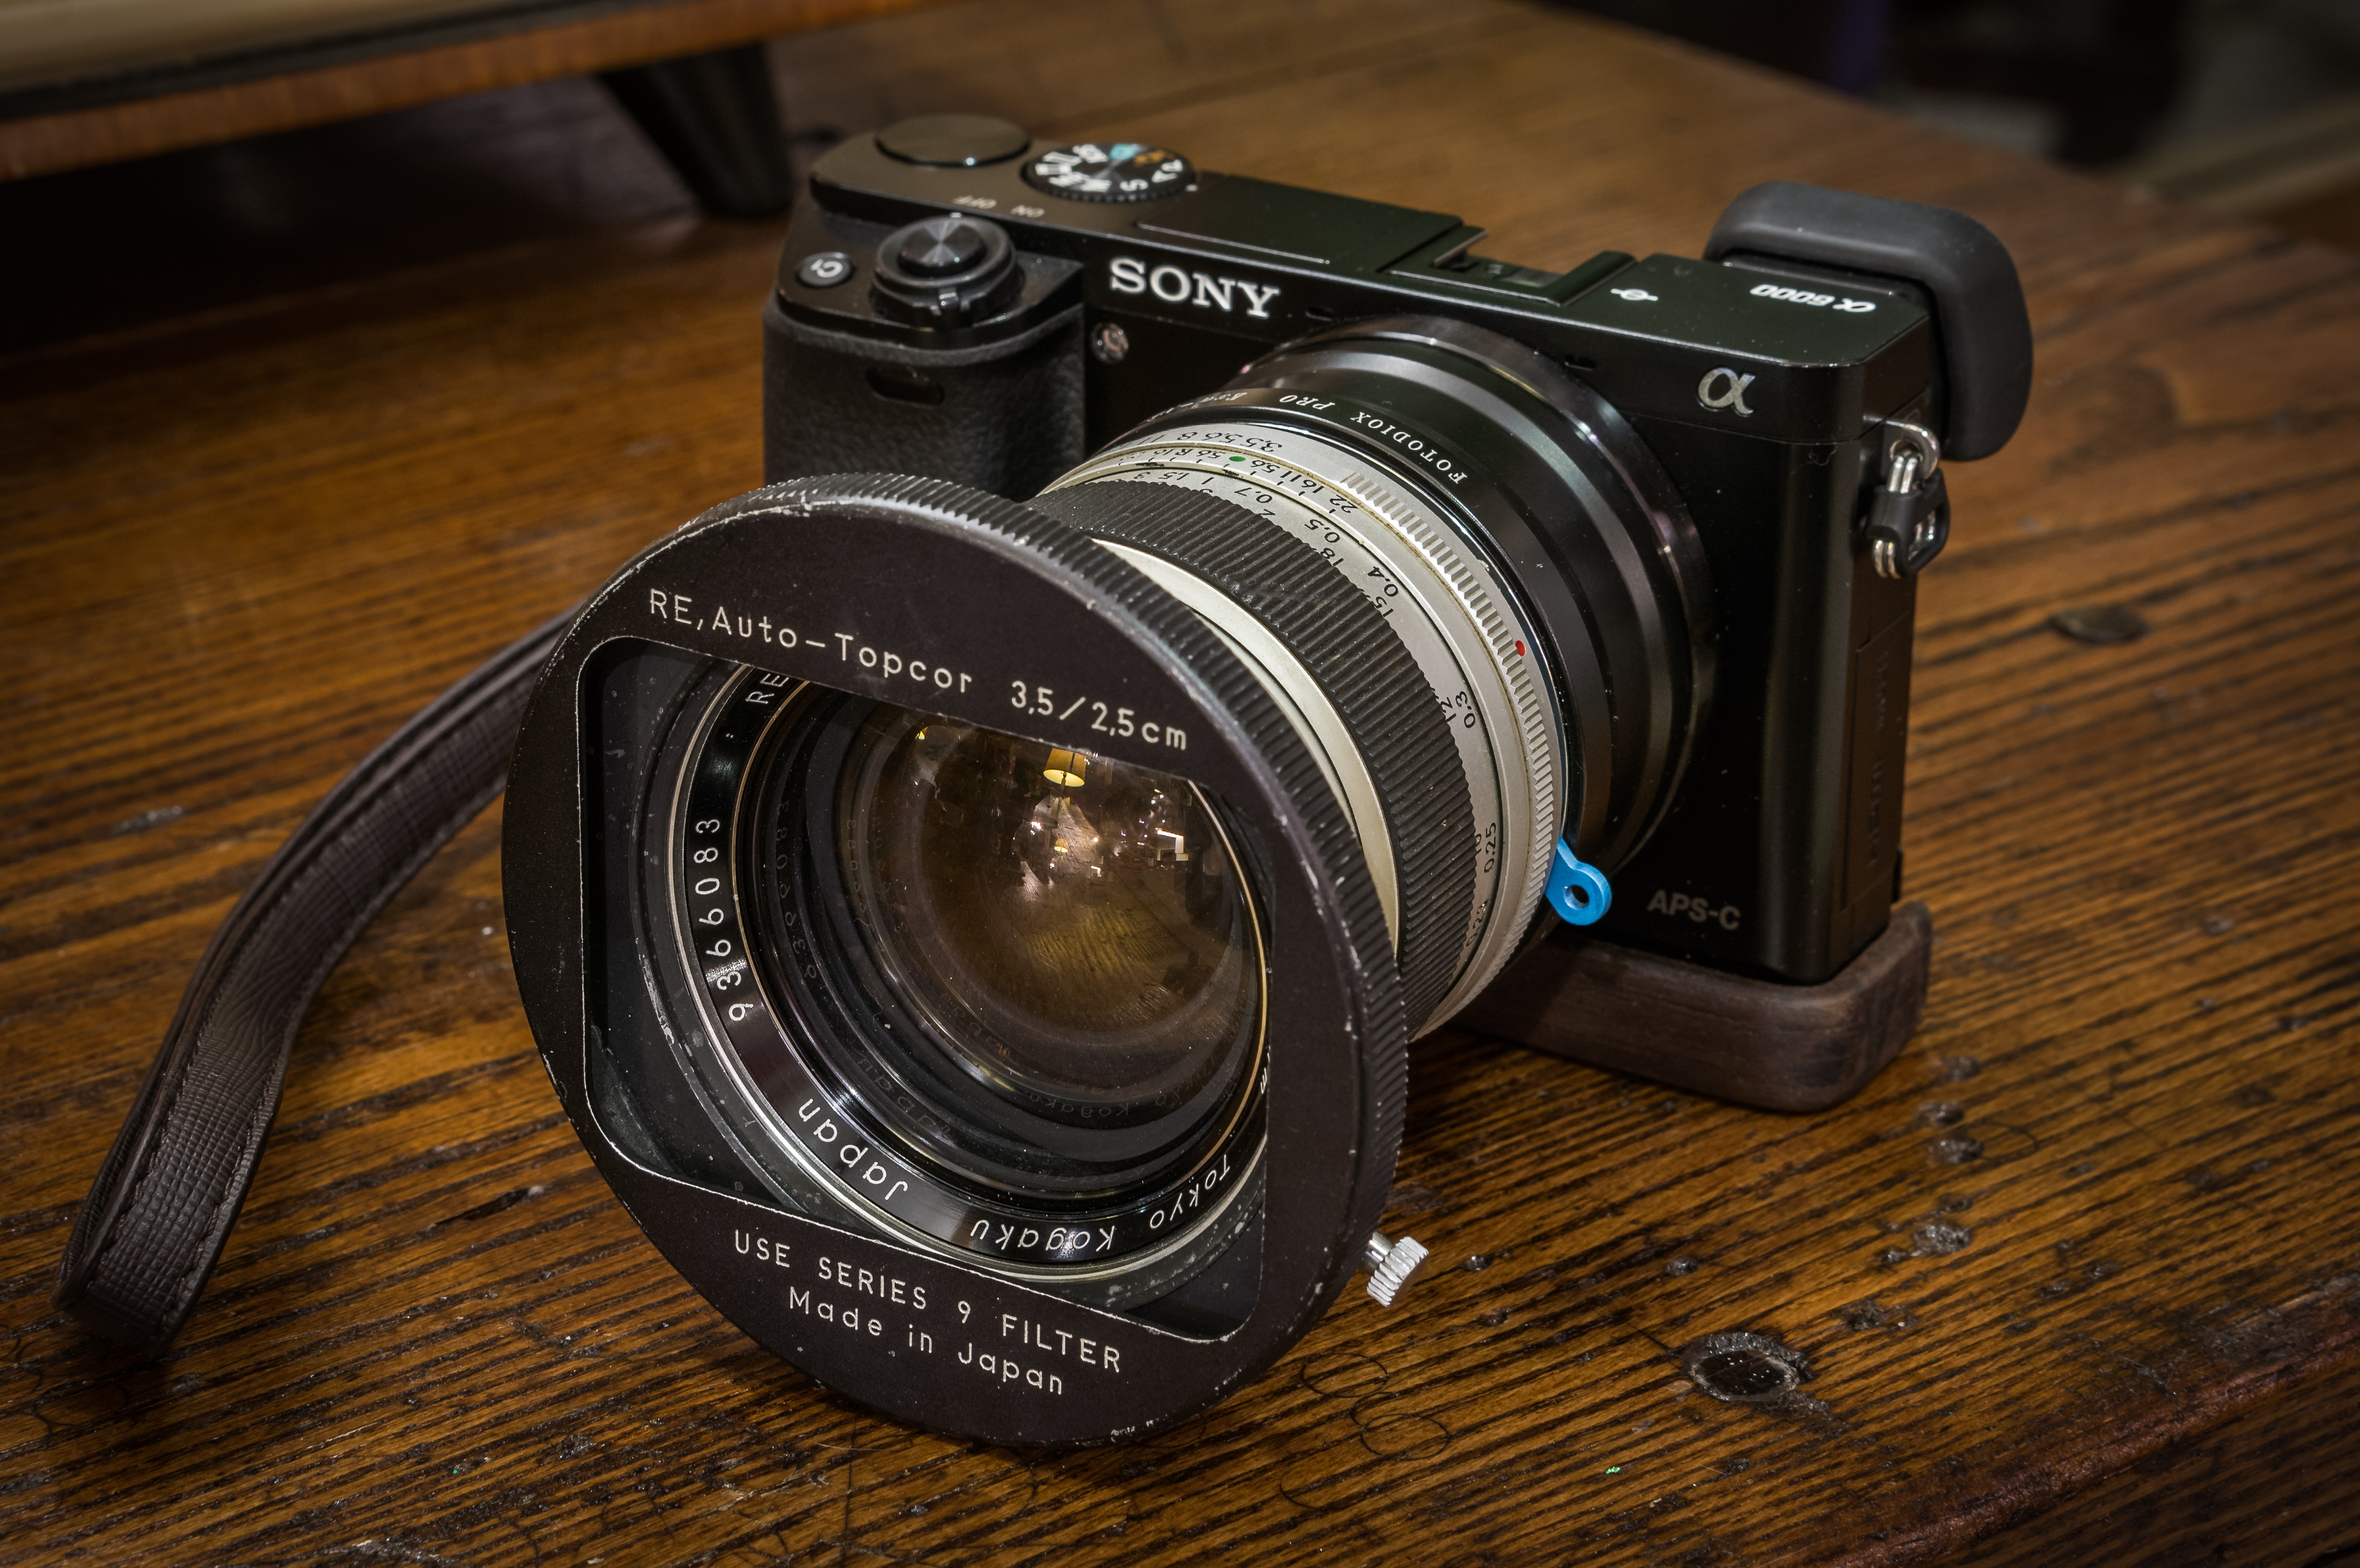
In the last couple of years vintage lenses have been showing up in image descriptions and hashtags all over the internet. But why now and why would anyone want to use yesteryear’s glass? With mirrorless systems and their adapter friendly designs bursting onto the scene, there has been a rebirth of sorts for the millions of classic lenses formally laid to rest in the earth’s collective attic. Read along as I make a case for relic glass in your camera bag.
It’s always frustrating when you have an idea but either don’t have a handy subject, are too shy to ask, or are just really impatient and want to try it ASAP! This is why self-portraiture is such a great option. Another good reason would be If you are interested in trying a few new techniques but aren’t confident with how it may turn out.
Have you ever come across a portrait that seems to reach out and grab you? For me, it’s National Geographic’s “Afghan Girl” cover photo by Steve McCurry—her haunting beauty, direct eye contact and the juxtaposition of complementary colors make an unforgettable and iconic portrait that’s difficult to turn away from.
Whether it’s strong eye contact, unusual composition or dramatic colors (or black and white), there are many ways to create your own eye catching and heart stopping portraits.
Model & actor Brittany Rose
Pick An Interesting Subject
The first step to an interesting photo is an interesting subject. The best subjects are comfortable in front of the camera and understand how to portray emotion. I often work with actors as they can express a wide range of emotions with their whole body.
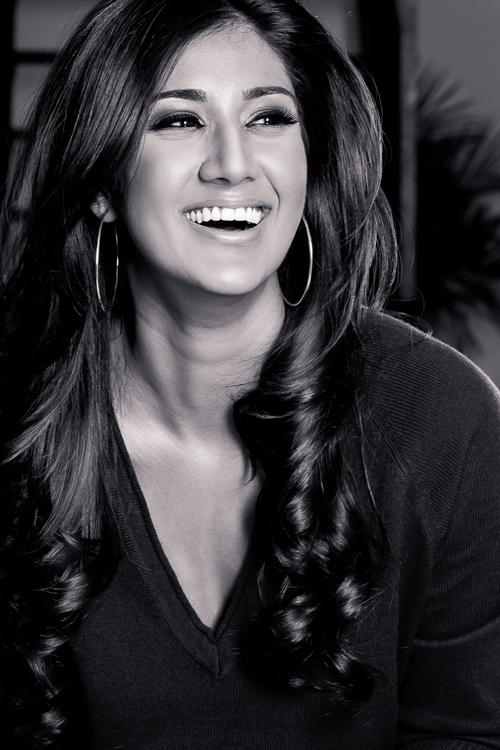
Blogger Preeya of Beauty Cubed. Preeya is a good friend and we talked and laughed throughout the shoot. I often photograph my models while we talk to capture nuanced and genuine expressions.
Once you find your model, identify a single eye-catching feature—a subject within a subject. I often look for beautiful eyes, unusual coloring or an engaging smile. Work with your model to create storyline for your shoot—this will guide your model’s posing and allow him or her to emote accordingly. Dramatic portraits convey real emotions that the viewer can connect with.
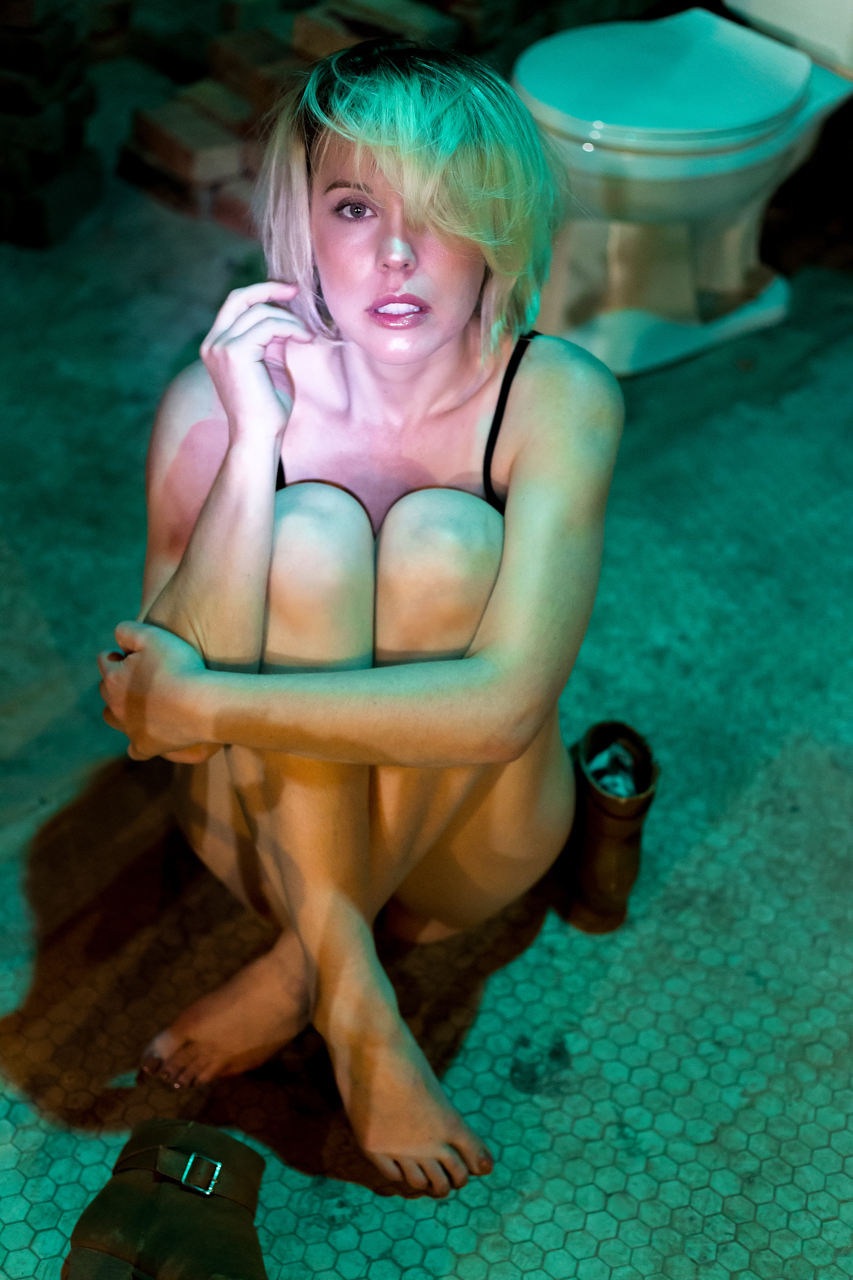
Model Gabrielle. We had a lot of fun at this shoot! Gabrielle and I came up with an elaborate backstory about her character, a young girl trapped alone in the strange basement we were shooting in. I surprised her by shining a flashlight on her and snapped this image as her head came up.
Focus Your Photography
In real estate they say it’s all about “location, location, location!” To create a dramatic portrait you need to “simplify, simplify, simplify!”
Get close to your subject—I tend to use relatively wide lenses, 50mm and 85mm focal length prime lenses on a full frame camera—and focus your mind and your camera on that single interesting feature you identified (the subject within your subject). Give your model plenty of direction, feedback and encouragement as you shoot. Because you will be very close to your model, watch for small changes in tension around his or her eyes and mouth for the Decisive Moment.
Meter your camera’s exposure for your subject. A blown out or shadowed background is your friend and will add to the dramatic and eye-catching nature of the portrait. If you choose to show the background, make it part of the story—have your model interact with an interesting setting.
My model, Brittany, titled this image “Cat on a Hot Tin Roof.” I loved it!
Finally, whether I’m using studio lights or natural light, I tend to find or create areas where shadow meets light and pose my model in the middle. Dramatic photos can benefit from strong, even harsh, lighting. In both the images below, my models are posed halfway between the dark and light parts of the frame; both are lit by a single studio strobe through a medium rectangular softbox.
Dan, a fellow photographer. I used a neutral density filter to shoot with an open aperture despite using a powerful studio strobe light. This allowed me to get close to my subject and use aperture to create a dramatic look.Model Madison (ILAND). This is an outtake from a colorful beauty shoot. I loved how the lighting created fluid-like shadows on my model.
Because of my lighting technique, my unprocessed RAW photos often already have powerful highlights, deep shadows and high contrast color.
The Post Processing
I process RAW images in Lightroom and Photoshop. First I import, review and select my favorite images in Lightroom. I use flags and the star rating system to divide my photos into three tiers (definitely yes, maybe later, probably not.) Next, I import my selected images into Photoshop for spot retouching.
I use the Healing and Spot Healing tool brushes to clean up small marks on the skin (acne, dust and stray hair); this is the most time-consuming task. A low flow and low opacity clone brush will easily handle distracting skin discoloration. I sample from many different spots around the effected area to create a natural result. Finally, I use two 50% grey curves layers to subtly dodge and burn. If you haven’t used dodging and burning before, here’s a tutorial Chelsea made:
However, it’s important to preserve the model’s unique features and imperfections. Freckles, moles, wrinkles and even scars are as much a part of the story in a portrait as a smile is.
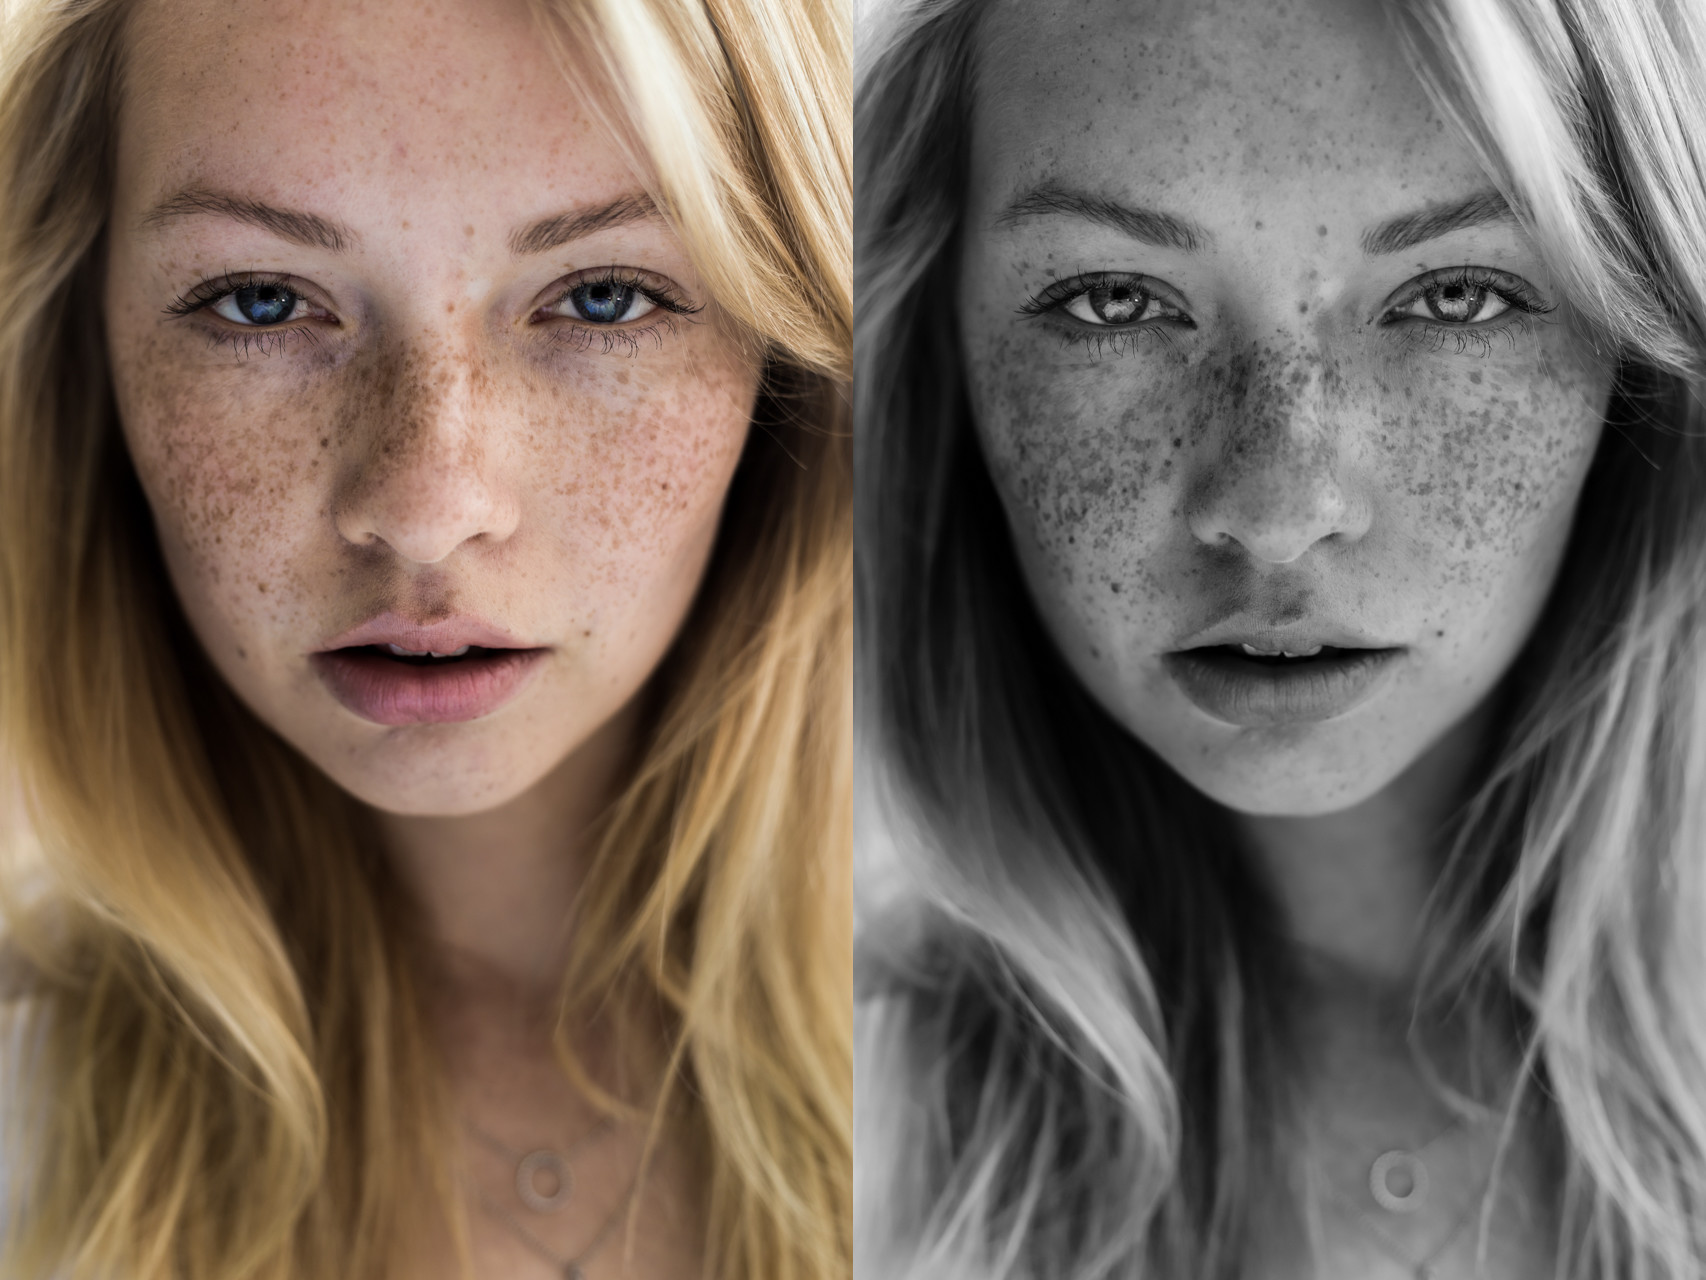
Finally, I import the partly edited image back into Lightroom for color grading or black and white conversion. When an image has interesting lines, shadows or textures I convert the photo to black and white. Images with bright and interesting colors will be processed in color. I often focus on just one color or two complementary colors and slightly desaturate all other colors in the image. This adds a dramatic effect while simplifying a color portrait.
Model & makeup artist Emma. The color image emphasizes Emma’s deep blue eyes. In comparison, the textures in Emma’s hair, skin and eyelashes are much more apparent in the black and white version. I often use a small silver reflector to create a catchlight when I’m shooting in natural, diffused light.
Finally, I crop my nearly finished image. I like tight crops and, as a fashion photographer, I frequently use a Fashion Crop. This cropping style cuts off the image near the model’s crown (but never crop the chin!) My pictures usually follow the Rule of Thirds’ vertical margins, but the model’s eyes are often well above the horizontal margins.
Actor & model Mike. This is a classic fashion crop.
And we’re done! I hope you enjoyed this glimpse into my process. I have loved shooting each of these images. Besides creating a beautiful final product, I thoroughly enjoyed each experience while working with my models and other creative professionals.
The thing that got me into sports photography is high school band. Before you chew too much on that non-sequitur, let me explain. See, I’m a marching band instructor with a small high school in Maryland. I wanted to make images of the kids performing and rehearsing for our various media outlets, and I wanted them to be dynamic and eye-catching, and I wanted them to look like the professional photos of sports and action that I saw in the magazines. I amassed all the camera gear I had (an iPhone) and literally all of my photographic knowledge (you point it at the thing you want to take a picture of and press the button, right?) and set out to make the perfect action shot.
I failed miserably.
I know- it’s shocking that the patented combination of no equipment and no knowledge didn’t yield professional-quality results. But I knew I could fix the lack of knowledge. Photography became my obsession, and I would read and watch every how-to, every tutorial, and every workshop I could get my hands on (including many of the ones on this site, thanks Chelsea and Tony!) I became very interested in shooting sports and action, but as I read about those fields I became more and more dismayed. Often I would hear how the type of photography I was most interested in was also the one that demanded the most from camera gear, and thus quickly became one of the most expensive.
Stubborn as I am, I thought that I could still approach the quality of pro action and sports shots without the crazy investment in gear. I spent about eight months doing just that. Here’s what I learned. Continue reading How to Shoot Action on a Budget
Adobe Photoshop is a great tool to edit your photos. I like to use it as a creative way to edit photos and alter them. My first project in Photoshop was a fun one: making clones of myself.
Taking the Pictures
To make clones of yourself, put your camera on a tripod and take multiple pictures of yourself in different spots within the same scene. If your camera has a timer (shown next), start the timer, and then move in front of the camera so it takes a picture of you.
Choose a different pose for each picture. you can take pictures and then move in front of the camera before the shutter clicks. try to make your “characters” look like they’re interacting with each other by their facial expressions. Click the below images to download them so you can try it yourself!
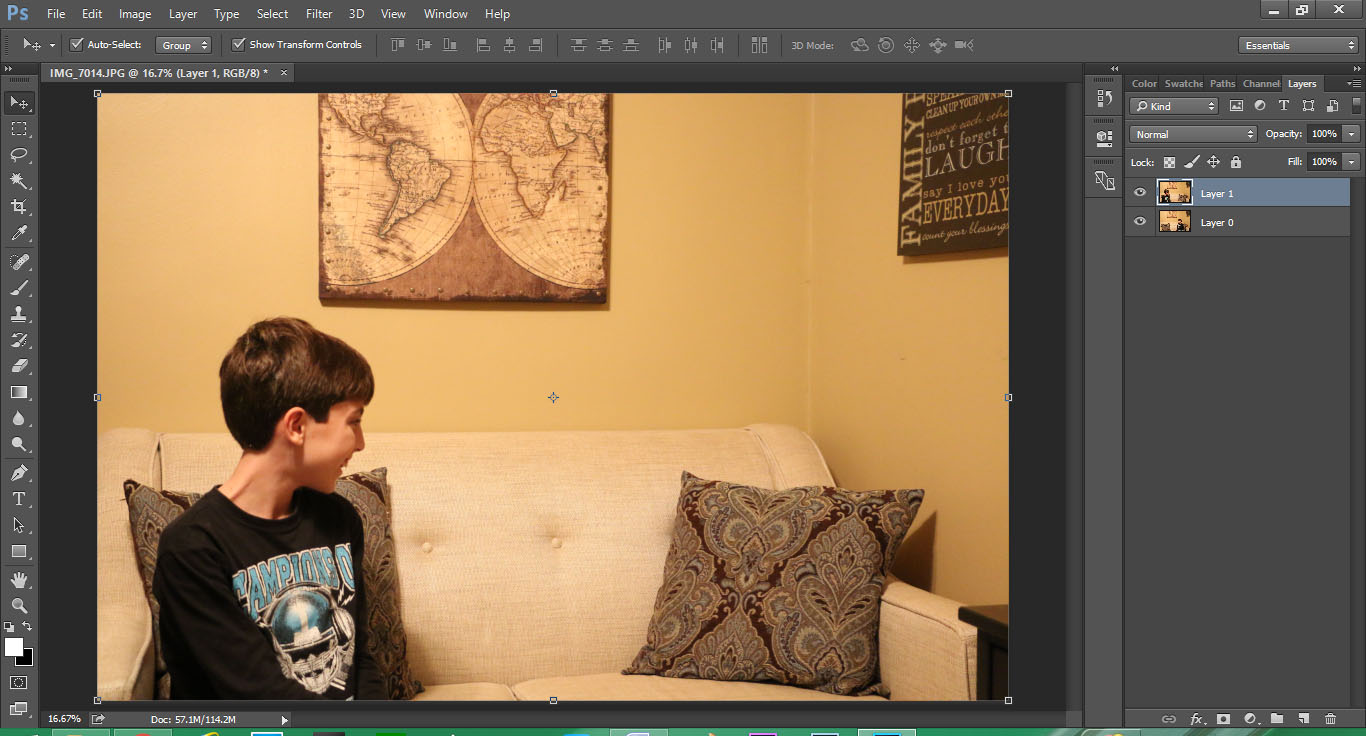
Opening the Pictures as Layers
If you want to edit the same files as me, you can download them above. Open the files in Photoshop as layers, with one on top of the other. You can open multiple pictures as layers by selecting File | Scripts | Load Files Into Stack. You’ll see your photos as multiple layers within a single picture, as shown next. You can use more than two pictures.
Using Layer Masks to Show Parts of Each Picture
Right now, the top layer is completely hiding the lower layer. We can use a layer mask to hide parts of the top layer, allowing the lower layer to show through. If you’re not familiar with layer masks, watch this video:
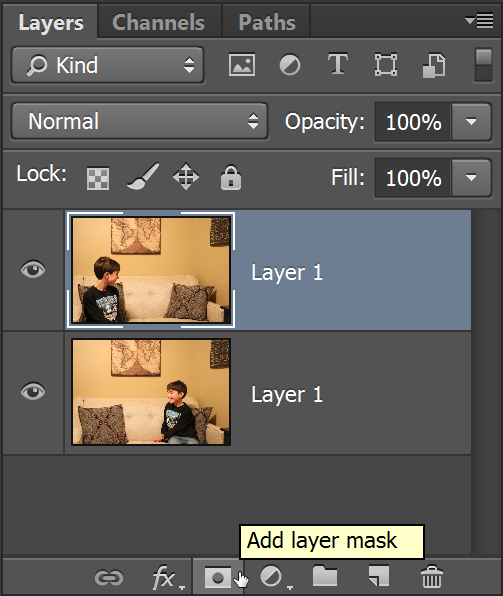
First, select the top layer and then click the Add Layer Mask button, shown next.
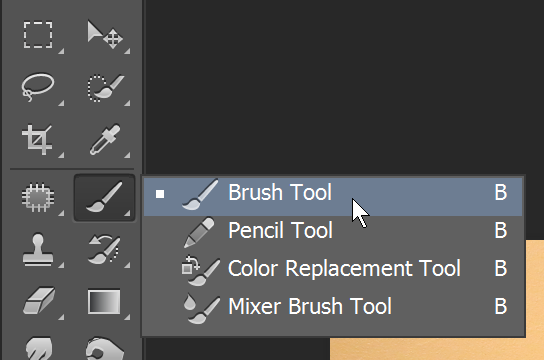
Now, select the Brush tool. You’ll use the Brush tool to paint black inside the layer mask, hiding parts of the top picture.
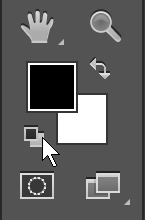
Set your foreground color to black, as shown next. The foreground color controls the color the brush paints.
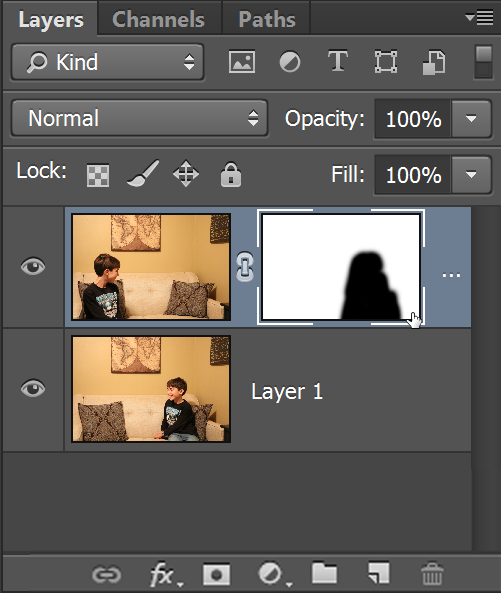
Now, select the layer mask and paint black within it. You can press the [ and ] keys on your keyboard to make your brush bigger or smaller. Every part of the layer mask that you paint black will hide that part of the top layer. To show the clone of myself on the lower layer, I painted black over that part of the picture. You don’t have to be exact!
Here is my final clone photo! Pretty cool! If you want to see the final PSD file, you can download it here and edit it. Thanks for reading! Keep shooting!
Here’s a video Chelsea made that uses some of the same techniques:
Creating ethereal images is what I absolutely love, and sometimes this means changing the subject’s garments into something more surreal. Making an image look believable can be a challenge though, so If you are interested in the process that I use to composite dresses then keep on reading!