These are really rough instructions on how to do wireless tethering between your camera and a computer. We’ll publish a video about this soon and add screenshots. BTW, while you’re here, you can get 30% anything in our store AND get your paperbacks signed if you use the coupon code ‘1M’.
Buy a Toshiba FlashAir W-04. The FlashAir is a special SD card that has a wireless access point built into it. It creates its own WiFi network that your computer can connect to and transfer images in real-time. Cool, right? We got the 64GB model, because you never have too much space. Technically, the W-03 or EyeFi cards do the same thing (and might be cheaper) but they’re SO SLOW that we found them to be too much trouble to use.
Configure the FlashAir memory card (one time)
Connect card to a memory card reader on your computer.
Optionally, if you’re using the tethering at home and want your computer to have Internet access while tethering, configure the pass-through wireless network. It doesn’t work 100% of the time; it only works sometimes.
Set a long timeout on the card so it doesn’t keep falling asleep while you’re shooting.
If your camera supports EyeFi, set Eye-Fi. Most modern, popular cameras do support WiFi. I suggest you Google “<camera model> manual PDF”, and then search the PDF of your camera’s manual for ‘EyeFi’. If it does, turn that feature on.
Apply your settings to the memory card.
Configure your camera
Lookup and see if your camera supports FlashAir or EyeFi (they’re the same). If not, no worries! If it does, look to see what your manual says about configuring them, and do that. This can be convenient because it can keep transferring files even if you turn your camera off.
Put the card in your camera, turn the camera on.
Configure the camera to shoot either JPGs or raw+JPG. I suggest shooting JPG either with or without raw because JPG files are much faster to transfer and usually good enough to preview your pictures. You can transfer raw, but they’ll be slower, it’s up to you. If your camera has two slots, you could write JPG to the FlashAir SD card and raw to the other card.
Set your camera’s timeout to be something higher than normal. It was 4 seconds on the D850 and I set it to 10 minutes so it woulnd’t keep dropping the network connection. This will burn through batteries faster.
Solar sunglasses. You won’t need glasses when you’re looking at your camera, but you’ll want to see the eclipse with your own eyes. Buy a reputable brand CE and ISO certifications DIRECTLY FROM THE MANUFACTURER; other solar sunglasses might block visible light, but still allow dangerous UV and infrared light through, which will damage your eyes even though you can’t see it! Some sunglasses at Amazon and other retailers are COUNTERFEIT and could damage your eyes, and there’s no way to know if they’re safe unless you buy directly from the manufacturer.
Solar filter. For the cheapest results, use a solar sheet big enough to cover the front of your lens, cut it to size, and tape it to the front of your lens. For most lenses, including the Opteka, you can use this universal filter. For best results, attach a screw-on solar film filter to the front of your telephoto lens. DO NOT USE standard ND filters; those might not block infrared light that will damage your sensor or eye.
Extra memory card(optional). Format your memory card beforehand. If your camera supports two memory cards, write to them both. Either way, carry an extra memory card with you in case one fails.
Extra battery(optional). Carry an extra battery, just in case!
Sunscreen(optional). You can’t see the eclipse from the shade, so be prepared to spend time in the direct sun.
Sun umbrella (optional). You can’t photograph the sun from the shade; you’ll get VERY hot waiting for the eclipse. If you’re uncomfortable, you won’t have the patience to get your pictures perfect. A sun umbrella, or any umbrella, will keep you more comfortable. In the very least, wear a hat.
Camera Settings
If you don’t know how to change these settings on your camera, watch our free tutorial. The description of each video includes a table of contents so you can jump directly to the part you’re interested in.
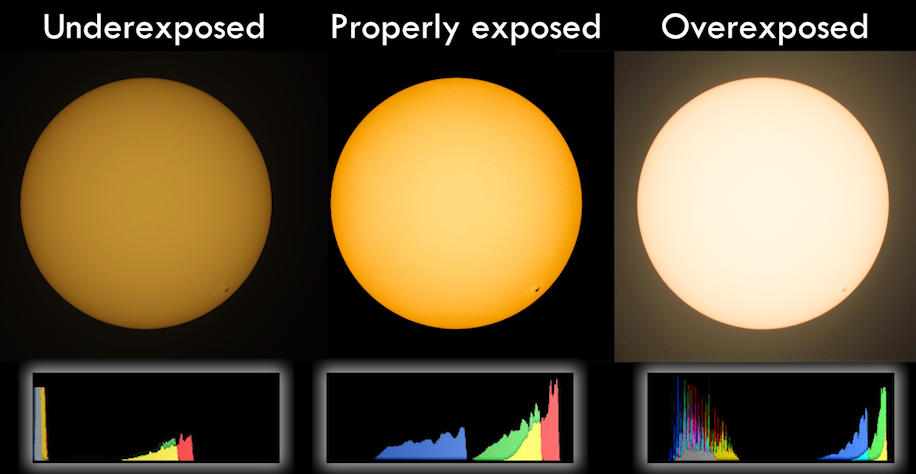
RAW (not JPG). Raw files let you recover some highlights and shadows, and you’ll need that during the totality to capture the dynamic range of the halo.
View your histogram. Display your histogram on your screen to prevent yourself from overexposing the sun.
Manual mode. Your camera’s autoexposure won’t work reliably; you’ll need manual mode to properly expose the sun.
ISO 100. Or your camera’s base ISO.
Lowest f/stop (or one stop over). The exact f/stop will vary based on your lens. However, I recommend using the lowest f/stop number possible, or raising it by one stop. Raising the f/stop higher will increase diffraction and reduce sharpness.
Shutter speed as needed for proper exposure. Depending on the intensity of your solar filter and the phase of the eclipse, your shutter speed might be anywhere from 1/8000 to 1/5. Check the histogram and make sure it’s peaking in the right 1/3, but not along the right side. If it peaks on the right side, choose a faster shutter speed. If the sun peaks in the middle, use a slower shutter speed.
Bracketing. During the totality, you should use +-3 stop bracketing to ensure you capture the dynamic range of the sun’s corona and to help you capture the perfect exposure without any guessing.
Live view. If you have an SLR, I do not recommend using the viewfinder. If the solar filter is damaged or you forget it, you might damage your eye.
Delayed shutter. A 5- or 10- second delay should be enough to eliminate the shake caused by you pressing the shutter button.
Practice Makes Perfect!
Weeks before the eclipse, you should practice shooting the sun on clear days. Setup your tripod, telephoto lens, solar filter, and solar sunglasses. Get comfortable examining the histogram, eliminating camera shake, and getting sharp shots.
Be sure you can quickly setup bracketing–you won’t need bracketing when the eclipse isn’t happening, but you will want to quickly turn it on during the totality when you remove the solar filter from your lens.
Shooting the Eclipse
The day of the eclipse, follow these steps, starting at least 30 minutes prior to the eclipse:
Optionally, clean your sensor so you won’t see dust in your pictures. Chapter 5 in Stunning Digital Photography has detailed instructions.
Setup your tripod in the sun. You’ll probably want to fully extend the legs, because the camera will be pointed almost straight up.
Attach the solar filter to the front of your telephoto lens, and attach the telephoto lens to your camera. The viewfinder will seem black unless you’re looking directly at the sun.
Attach your lens to your tripod, if the lens has a tripod mount. If not, attach the camera to the tripod.
Turn on the rear screen. If possible, tilt or flip the screen out.
Enable the histogram. The histogram will let you verify that you have the perfect exposure.
Point the camera at the sun and tighten your tripod head. Locating the sun is surprisingly hard; for best results, position yourself so that the camera is shading your eyes from the sun. Look down the barrel of your lens to align it with the sun.
Focus your lens. DO NOT use “infinity focus” because it’s not precise enough. Autofocus if you can, but switch to manual focus since you won’t need to refocus throughout the eclipse. Zoom in using live view to precisely adjust focusing.
Set your exposure. Manual mode, base ISO (usually ISO 100), lowest f/stop (or one stop higher). Then, adjust the shutter speed so that the sun is properly exposed.
Set a 5- to 10-second delayed shutter. This will eliminate camera shake. Alternatively, use a remote trigger, or trigger your camera with Wi-Fi.
Take a picture. Review the photo and verify that it is as sharp as possible. Check the histogram to make sure it’s not overexposed.
Repeat steps 9-10 until the totality begins.
If you experience a total eclipse where you are, temporarily remove the solar filter while it’s dark, and turn on +-3 stops bracketing. Replace the solar filter when you require a shutter speed of higher than 1/2000th.
You don’t have to shoot constantly; one shot every 30 seconds or so should be plenty. In-between shots, put on your CE/ISO-certified solar sunglasses and directly view the eclipse, just for your own pleasure.
If something goes wrong with your camera, don’t waste the experience trying to troubleshoot it. Just move your camera out of the sun, put on your solar sunglasses, and enjoy the eclipse. Enjoy!
This study guide is a companion for my video guide. These resources, plus the links I include, should be all you need to pass the test and get your sUAS FAA certification so you can fly drones commercially in the US.
Jacob Lamon was kind enough to save this study guide in a nicely formatted PDF – so you can continue to study on your hand-held device, even if you don’t have WiFi access. Thanks, Jacob!
Numbers
1. The number of drones you can fly simultaneously.
400 feet. The maximum height you can fly AGL or above a taller building within a 400-foot radius.
100 MPH/87 Knots. Fastest you can fly.
0.55 lbs. The lightest drone that must be registered (must be more than, not equal to, .55 lbs).
55 lbs. Heaviest legal drone (must be less than, not equal to, 55 lbs).
0.04. Maximum blood alcohol level.
8 hours. The time that must pass since you have had alcohol.
10 days. The maximum time you can take to file an FAA accident report.
30 days. The time you have to notify the FAA if you move.
90 days. The lead time required when requesting an FAA waiver.
1 year. Time that must pass after a final narcotics conviction.
13 years old. The youngest person who can register a drone.
24 months. How long this certification is good for.
30 minutes. The twilight time before sunrise or after sunset when you can still fly.
3 statute miles. The distance your anti-collision lights must be visible from when flying during twilight. Also the minimum visibility you must have while flying.
500 feet. Minimum number of feet below a cloud you must fly.
2,000 feet. Minimum number of feet horizontally from a cloud you must fly.
$500. The repair cost of accident damage that requires you to report an accident to the FAA
Level 3. The “serious injury” AIS level that requires you to file an accident report.
122.9. The MULTICOM frequency for self-announce procedures.
2000 feet. The distance you should operate from a tower to avoid hitting guy wires.
Facts
Stalls. Occurs when the wing exceeds its critical angle of attack.
Center of Gravity (CG) Limits. Supposed to be defined in the Pilot’s Operating Handbook or UAS Flight Manual, but those don’t exist for drones.
Angle of attack. Determines when the craft stalls. This doesn’t change if the vehicle weight changes.
Load Factor. Increases during any maneuver.
Remote PIC. This is the answer to any question about who is responsible.
Left. Aircraft always turn left when circling a runway, because drivers sit on the left side of the car in the US, and pilots sit on the left of the plane, too. It’s easier for them to look out the left window to see the tower.
Maintenance schedule. You’re supposed to have one, even though most drones can’t be user-repaired and don’t provide a schedule.
Risk Management. Helps to prevent an accident chain.
Personality factors.
Machismo. Taking risks to impress others
Impulsivity. Doing something without thinking about it.
Invulnerability. Thinking accidents won’t happen to you.
Resignation. What’s the use? They don’t control their destiny.
Anti-authority. Nobody can tell me what to do.
Crew Resource Management (CRM). It’s how you manage your “crew” and you should integrate it into all phases of the operation.
Systematically focus on different segments of the sky for short intervals. That’s how you should scan for traffic–let your eyes rest in different areas for a while, rather than continuously scanning.
Latitude is like climbing a ladder (north-south)
Longitude is the long way around the planet (the Earth is fat cuz it spins).
Standard briefing. Contains the weather forecast.
CTAF vs UNICOM vs MULTICOM vs AWOS. AWOS is weather. CTAF is for pilots to talk to each other when there’s no tower. UNICOM is a base station that broadcasts to pilots when there’s no tower. MULTICOM is used as the CTAF when there’s no CTAF (122.9 or 122.95).
Weather
Temperature inversion. Warm air on top of cold air. Fog, haze, low clouds, poor visibility, but smooth air.
Moist, unstable air. Turbulence (because the air is unstable), showery precipitation.
Stable air. Smooth air, poor visibility, and steady (not showery) precipitation (because stable air is usually humid).
Unstable air. Intermittent precipitation.
Cool + Dry = Stable
Hot + Humid = Unstable
High density altitude. Just means “high altitude”. Air is thinner, so lift is decreased.
Nimbus. Means a rain cloud.
METAR Reports
18004KT: Wind is 180 degrees at 4 knots. The first three digits (180) are the compass heading (180). The last two #s are the wind speed (04).
Compass headings are always relative to true North in print, not magnetic North. If it’s in print, it must be true.
OVC007: Sky is overcast at 700 feet. Remember, #s are always in hundreds.
1 1/2SM: Visibility is 1 ½ statute miles (SM).
METAR Weather Abbreviations
You don’t need to memorize these, just be able to recognize them and match them to an answer. The test will probably only use the common abbreviations.
BLPYBlowing spray
BRMist
DSDust Storm
DUWidespread Dust
DZDrizzle
FCFunnel Cloud
+FCTornado/Water Spout
FGFog
FUSmoke
GRHail
GSSmall Hail/Snow Pellets
HZHaze
ICIce Crystals
PLIce Pellets
PODust/Sand Whirls
RARain
SASand
SGSnow Grains
SNSnow
SQSquall
SSSandstorm
UPUnknown Precipitation
VAVolcanic Ash
CHARTS
They give you this supplement to use during the test. It has answers to most of the test questions, so don’t sweat it too much.
CTAF (Common Traffic Advisory Frequency) is marked with a C.
AWOS is for the weather.
Red flags mark VFR checkpoints which mean more planes might be there.
Tick marks. Measure minutes between latitude and longitude degrees. Each tick is one minute. Bigger ticks mark 5 minutes.
Charts include measurements AGL, not MSL.
Controlled Airspace
Class B is the most restricted, class E is the least restricted. Must get ATC (Air Traffic Control) authorization for class B, C, and D.
Class A. From 18,000 feet to 60,000 feet, all over the US.
Class B. Surrounding major airports, 0-10,000 feet. Consists of multiple layers, like an upside-down wedding cake.
Class C. Surrounding airports with a control tower, radar, and over a specific amount of traffic. Usually 5 NM (nautical mile) radius from 0-4,000 feet, and a 10 NM radius from 1,200-4,000 feet.
Class D. Surrounding airports with a control tower. 0-2,500 feet, no specific radius, just shaped around flight patterns. Outside control tower hours, Class D airspace is Class G.
Class E. Usually it starts at 1,200 feet and goes up to 18,000 feet.
Class G. Uncontrolled airspace (below class E airspace).
Special Use Airspace
Airspace with various restrictions.
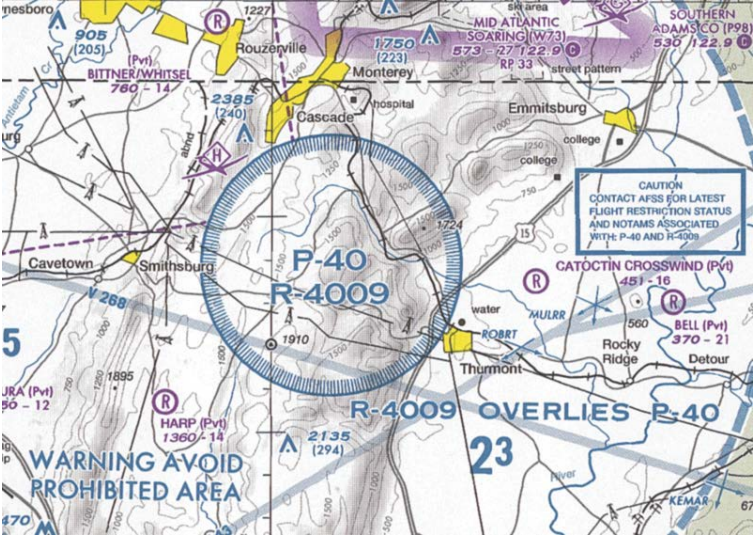
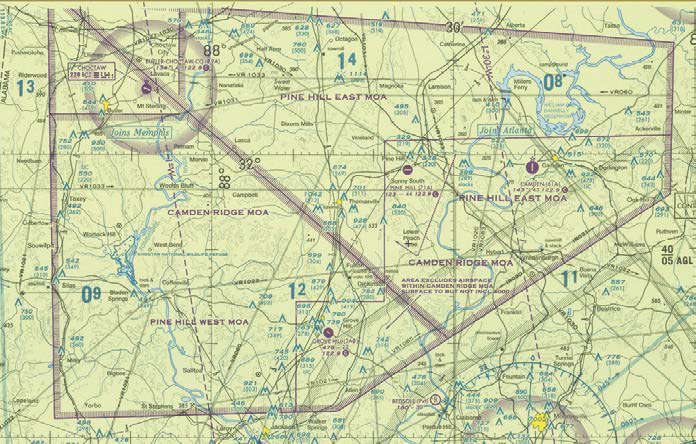
Prohibited Areas (P-###). Places like Camp David and the White House.
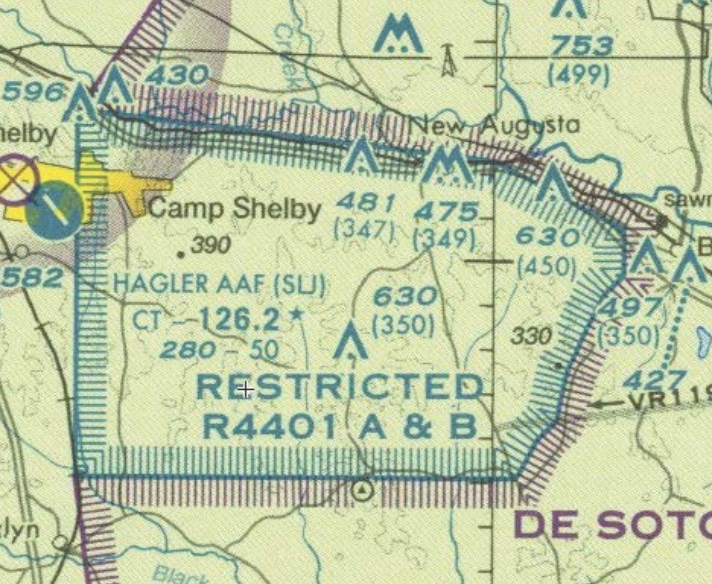
Restricted Areas (R-###). It’s not prohibited, but if you fly here, it could be dangerous. The government might be testing artillery or missiles or UFOs.
Warning Areas (W-###). Domestic and international waters, from NM outward from the US coast. It’s cool to fly there it’s just not really managed by the US.
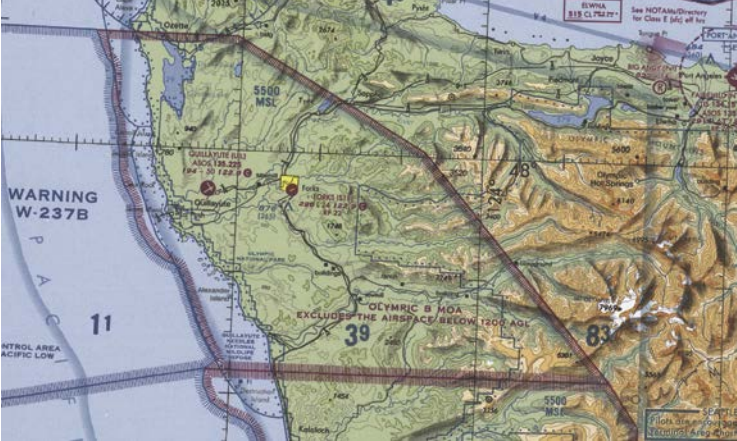
Military Operations Areas (MOAs). MOAs consist of airspace with defined limits established for the purpose of separating certain military training activities from IFR traffic. Whenever an MOA is being used, nonparticipating IFR traffic may be cleared through an MOA if IFR separation can be provided by ATC. Otherwise, ATC reroutes or restricts nonparticipating IFR traffic. Will often consist of multiple Restricted Areas (R-###). An example of this is Chocolate Mountain Impact Area (R-2507) and Chocolate Mountain Aerial Gunnery Range (R-2507), which we drove through in California.
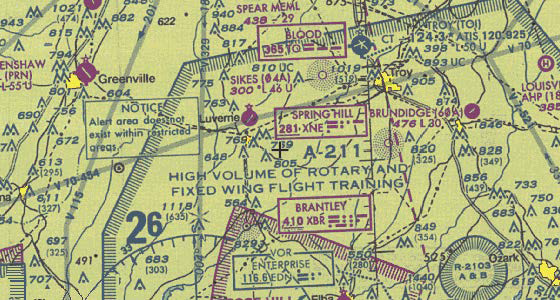
Alert Areas. Depicted on aeronautical charts with an “A” followed by a number (e.g., A-211) to inform nonparticipating pilots of areas that may contain a high volume of pilot training or an unusual type of aerial activity. Think skydiving training facility.
Chart-Reading Tips
Numbers (like 41/12) are written in 100s of feet above sea level (MSL). So, 41/12 means 4100 ft, 1200 ft. SFC = Surface
When you’re ready to take the test, call the test coordinator, not the testing center. The FAA lists two services. I used CATS:
Computer Assisted Testing Service (CATS): 1-800-947-4228
PSI / LaserGrade Computer Testing: 1-800-211-2753
When you call them, the process is:
You give your name, birth date, birth location, address, etc.
You tell them when and where you want to take the test.
They call the testing center, which is probably some small office located next to a small airport. They need to talk to the actual proctor who administers the test, so if they’re on vacation, you can’t schedule your test. I called twice to schedule a test at my closest testing center, but the proctor wasn’t personally available either time, so I gave up and scheduled my test further away at a center where the proctor actually answered the phone.
They charge your credit card $150.
They confirm your testing time and send you an email with the testing location and details.
You’ll get about 60 questions on your test. My test had 64, but it’s possible that 4 of those questions were ungraded questions that were added to my test to see if they were meaningful questions.
You need 70% to pass, so you can miss about 18 questions and still pass. All questions are multiple choice with three options (A, B, C) so even if you have to guess, you have a 33% chance of getting it correct.
Therefore, statistically, you can probably still pass if you have to guess on 27/60 questions.
However, of the three possible answers, one of them can almost always be quickly eliminated as a possible option because the answer is just stupid. Therefore, if you are unsure about a question, use logic to eliminate one of the answers, and give yourself a 50/50 chance of guessing correctly. If you can do that, you can guess at 36/60 questions and still pass.
So, you only need to be confident about 40% of the questions, and 40% of the questions are definitely really, really easy. Indeed, ~88% of testers pass, and this was the easiest certification test I’ve ever taken.
I recommend showing up to the test 30 minutes early and reviewing your notes, so the information is fresh in your mind.
Lock your phone in your car, because you can’t bring electronics into the test. Use the restroom before you go into the test, because they don’t want you to leave.
You need to bring:
A valid photo ID (like your driver’s license)
That’s it. The FAA tells you to bring a simple four-function calculator, but my proctor offered to loan me a calculator, and my test didn’t have any questions that required any math. So you probably don’t need to bring the calculator.
You’ll take the test in a private room sitting on an outdated computer with a dirty mouse and keyboard and a webcam pointed at you, recording everything you do. There might be other people taking tests at the same time.
Some testing tips:
You have two hours. That’s 2 minutes per question. It only took me about 45 minutes.
You can increase the font size in the testing software.
You can go back and change the answer to any question, until you choose to finish your test.
If you’re unsure about any question, take your best guess, and then click the Mark button. Marked questions show up in the index with a question mark.
Before you submit your final test, carefully review all your marked questions. Use the process of elimination to reduce the possible answers.
When you submit your test, you’ll see your score immediately. You’ll almost certainly pass it, because you’re reading this study guide, which means you’re taking it seriously and preparing… and the test is really easy.
They’ll give you some stuff to take into the test with you:
Maybe a calculator if they want to loan one to you, but they’re not required to do this
After You’ve Passed
The proctor will print out a sheet of paper with an official stamp that includes your test score, a list of the questions you missed, and a test ID. When you get back to your smartphone, take a picture of this paper, because it has the Exam ID you need and you don’t want to lose it.
YOU’RE NOT YET CERTIFIED. This is the government, so you have more paperwork to do. You need to:
Create an FAA account.
Submit an application that includes your Exam ID.
Wait 7 days for the FAA to email you a temporary certificate. You can now fly with that temporary certificate.
Wait longer for the TSA to do a background check on you and mail you your official certificate.
Wait 48 hours for the FAA to receive your test results, because even computer test results travel slower than snail mail. Don’t wait more than 10 days, however, or your test results will expire.
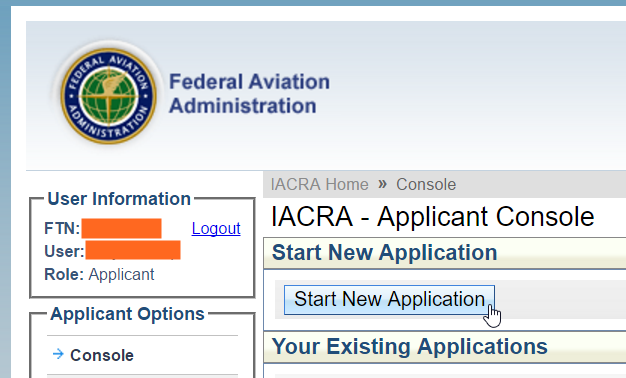
So, 2-10 days after you pass your test, visit http://iacra.faa.gov. Click the Register link and setup an account for yourself.
Click the Start New Application button, and fill in all the info.
The form has a pretty weird user interface… at the bottom there are three buttons, and you’ll need to agree to terms and review a privacy agreement before you can review your application. After you review it, you need to officially submit it. It would be easy to think you were done submitting the form without actually submitting it, so be sure you actually submit it.
YOU’RE NOT YET CERTIFIED. You can’t legally fly commercially until they email you a temporary certificate.
What if you Fail
Before you leave the testing center, you can take a few minutes to review the questions you got wrong… not the answers, but the questions. Do that so you know what to study up on.
The testing center also gives you a paper listing every question you got wrong. The codes look like PLT124, PLT161, PLT173. You can look up what the codes mean here and link to the official FAA documentation for every question, which should have the answers you’re looking for (and WAY more). They don’t give you the actual question, but just the area of knowledge.
You can take the test in another two weeks… you’ll have to pay the $150 fee again, however.
One More Thing…
We’re giving away this study guide and video training material, but it definitely wasn’t free for us to make. To help us out, you could:
Subscribe to our YouTube channel. Visit that link and click Subscribe. It’s free, and we bring you several new drone & photography videos every week.
Watch our free drone videos. We teach you how to safely fly a drone, how to use cool 3D mapping software, and give you drone reviews to pick the best UAS.
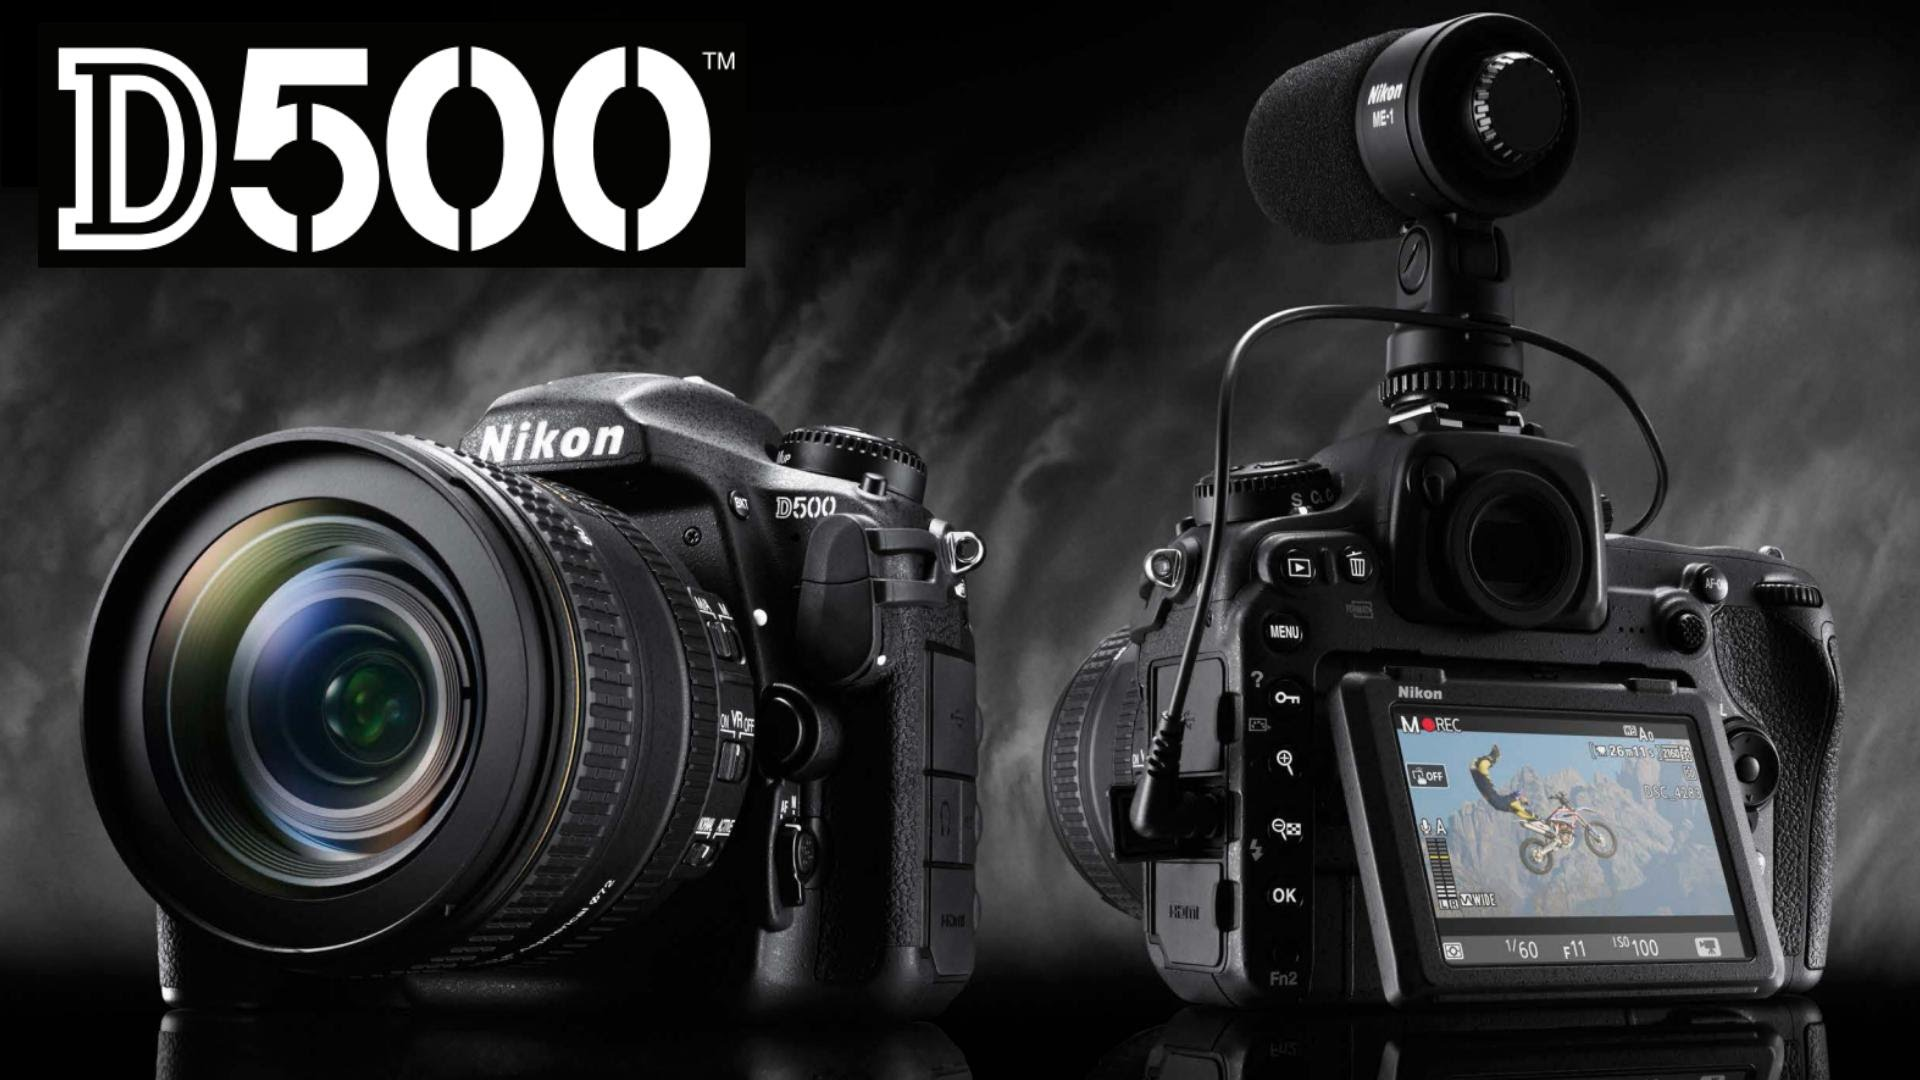
The Nikon D500 is Nikon’s $2,000 sports and wildlife camera. Watch the video for complete details, but here’s a quick summary:
Better than the Canon’s 7D Mark II. It solidly beats Canon’s APS-C flagship camera, and the D500 is now our recommendation for the ultimate wildlife camera. It focuses better and faster, it’s images are sharper because the sensor lacks an AA filter, the tilting touchscreen makes 4K video easy to record, and SnapBridge makes pictures easy to share.
Better than Nikon D7200. As expected, it outperforms the less-expensive D7200 in every way.
Mostly better than the $6,500 Nikon D5. The D5 gets 16% more shots in focus when tracking action, thanks to its higher frame rate. The D500 wins in every other way: better usability, a full 30 minutes of 4K recording time, focusing points spread to the edge of the frame, a tilting touch screen, and SnapBridge.
In short, it’s the best wildlife and sports camera available, for most photographers. Landscape and portrait photographers might be better served with a full-frame camera, such as the Nikon D750 or Nikon D810.
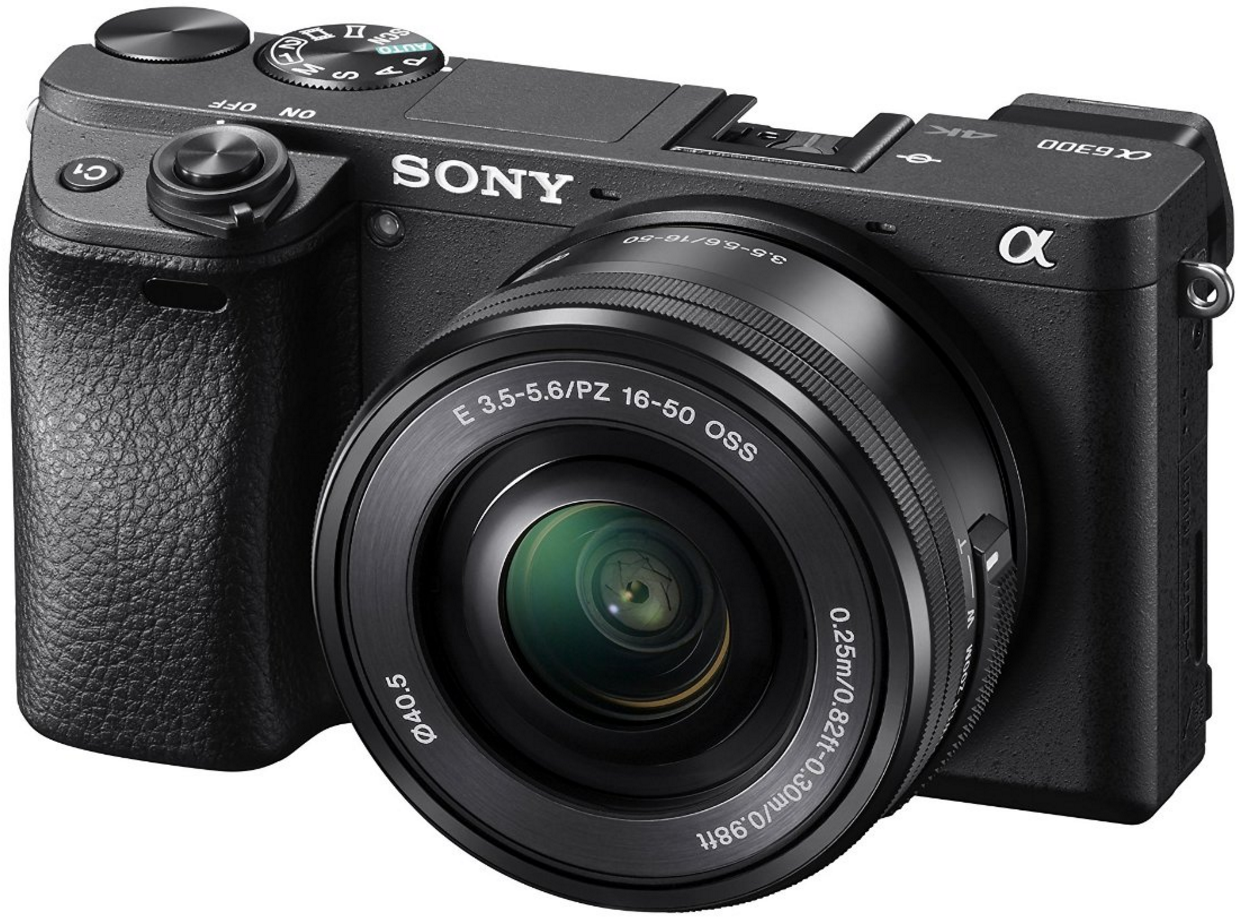
The $1,000 a6300 ($1,150 with a lens) is a compact camera that can do it all: landscapes, sports, low-light events, and portraits. In the Sony lineup, it’s the best choice for sports, and it’s the cheapest Sony to give you 4k and slow motion video. It’s the best all-around camera we’ve ever used, and it will be our top recommendation for beginning photographers who have the budget.
If you’re a DSLR shooter who is reluctant to bring a big DSLR everywhere, the a6300 can get great images without the burden. It has class-leading focusing, video, and still image quality.
While the a6300 is a jack-of-all-trades, it’s also a master of none. If you specialize in sports, landscapes, wildlife, portraits, or video, you might get more bang-for-your-buck with a different body. I’ll make alternate suggestions throughout this review.
Here’s a quick summary:
a6000 UPGRADE: If you’re an existing a6000 owner, you should upgrade only if you’re struggling with focusing or if you want better quality video. The updated 2.35 megapixel viewfinder with 120 fps is twice as sharp and looks much better, and it’s a huge advantage over DSLRs for most types of photography. The high ISO raw image quality of the a6300 was very slightly better than the a6000, but most people won’t see a difference. if you want a noticeably cleaner and sharper images, save up for one of the full-frame a7 models.
LANDSCAPES: If you’re a dedicated landscapes shooter, the a6300 is the best APS-C camera you can buy. However, you could also buy a full-frame Sony a7 used for about $800, get half the noise, and fully utilize full-frame lenses.
SPORTS: If you want a compact camera and occasionally shoot sports, the a6300 is the best mirrorless camera. If you’re a serious sports shooter, you might be happier with a used original Canon 7D for half the price, because it has a dedicated focus point selector, a bigger buffer, no viewfinder lag, and more telephoto lens options. If budget were no concern, we’d grab a Canon 7D Mark II for sports.
LOW-LIGHT EVENTS: The a6300 is a capable events camera. However, Sony doesn’t currently offer any native f/2.8 or f/1.8 APS-C zooms.
PORTRAITS: In good light, eye-detect autofocus worked great for casual portraits, even with shallow depth-of-field. However, once you factor in the cost of the lenses and flashes, you could more bang-for-your-buck from a Canon or Nikon DSLR.
WILDLIFE: If you’re hoping to shoot wildlife, there simply aren’t any native Sony E-mount big telephoto lenses, and we found adapted lenses didn’t autofocus well enough. You’ll be happier with a DSLR for birding.
VIDEO: The 4K video quality and 5x slow-motion blows away everything else we’ve tested except for the $3,000 a7S II. However, the ergonomics of the Panasonic GH4 are much better, and the Panasonic G7 is quite capable, $400 cheaper, and also has better ergonomics.
Image Quality
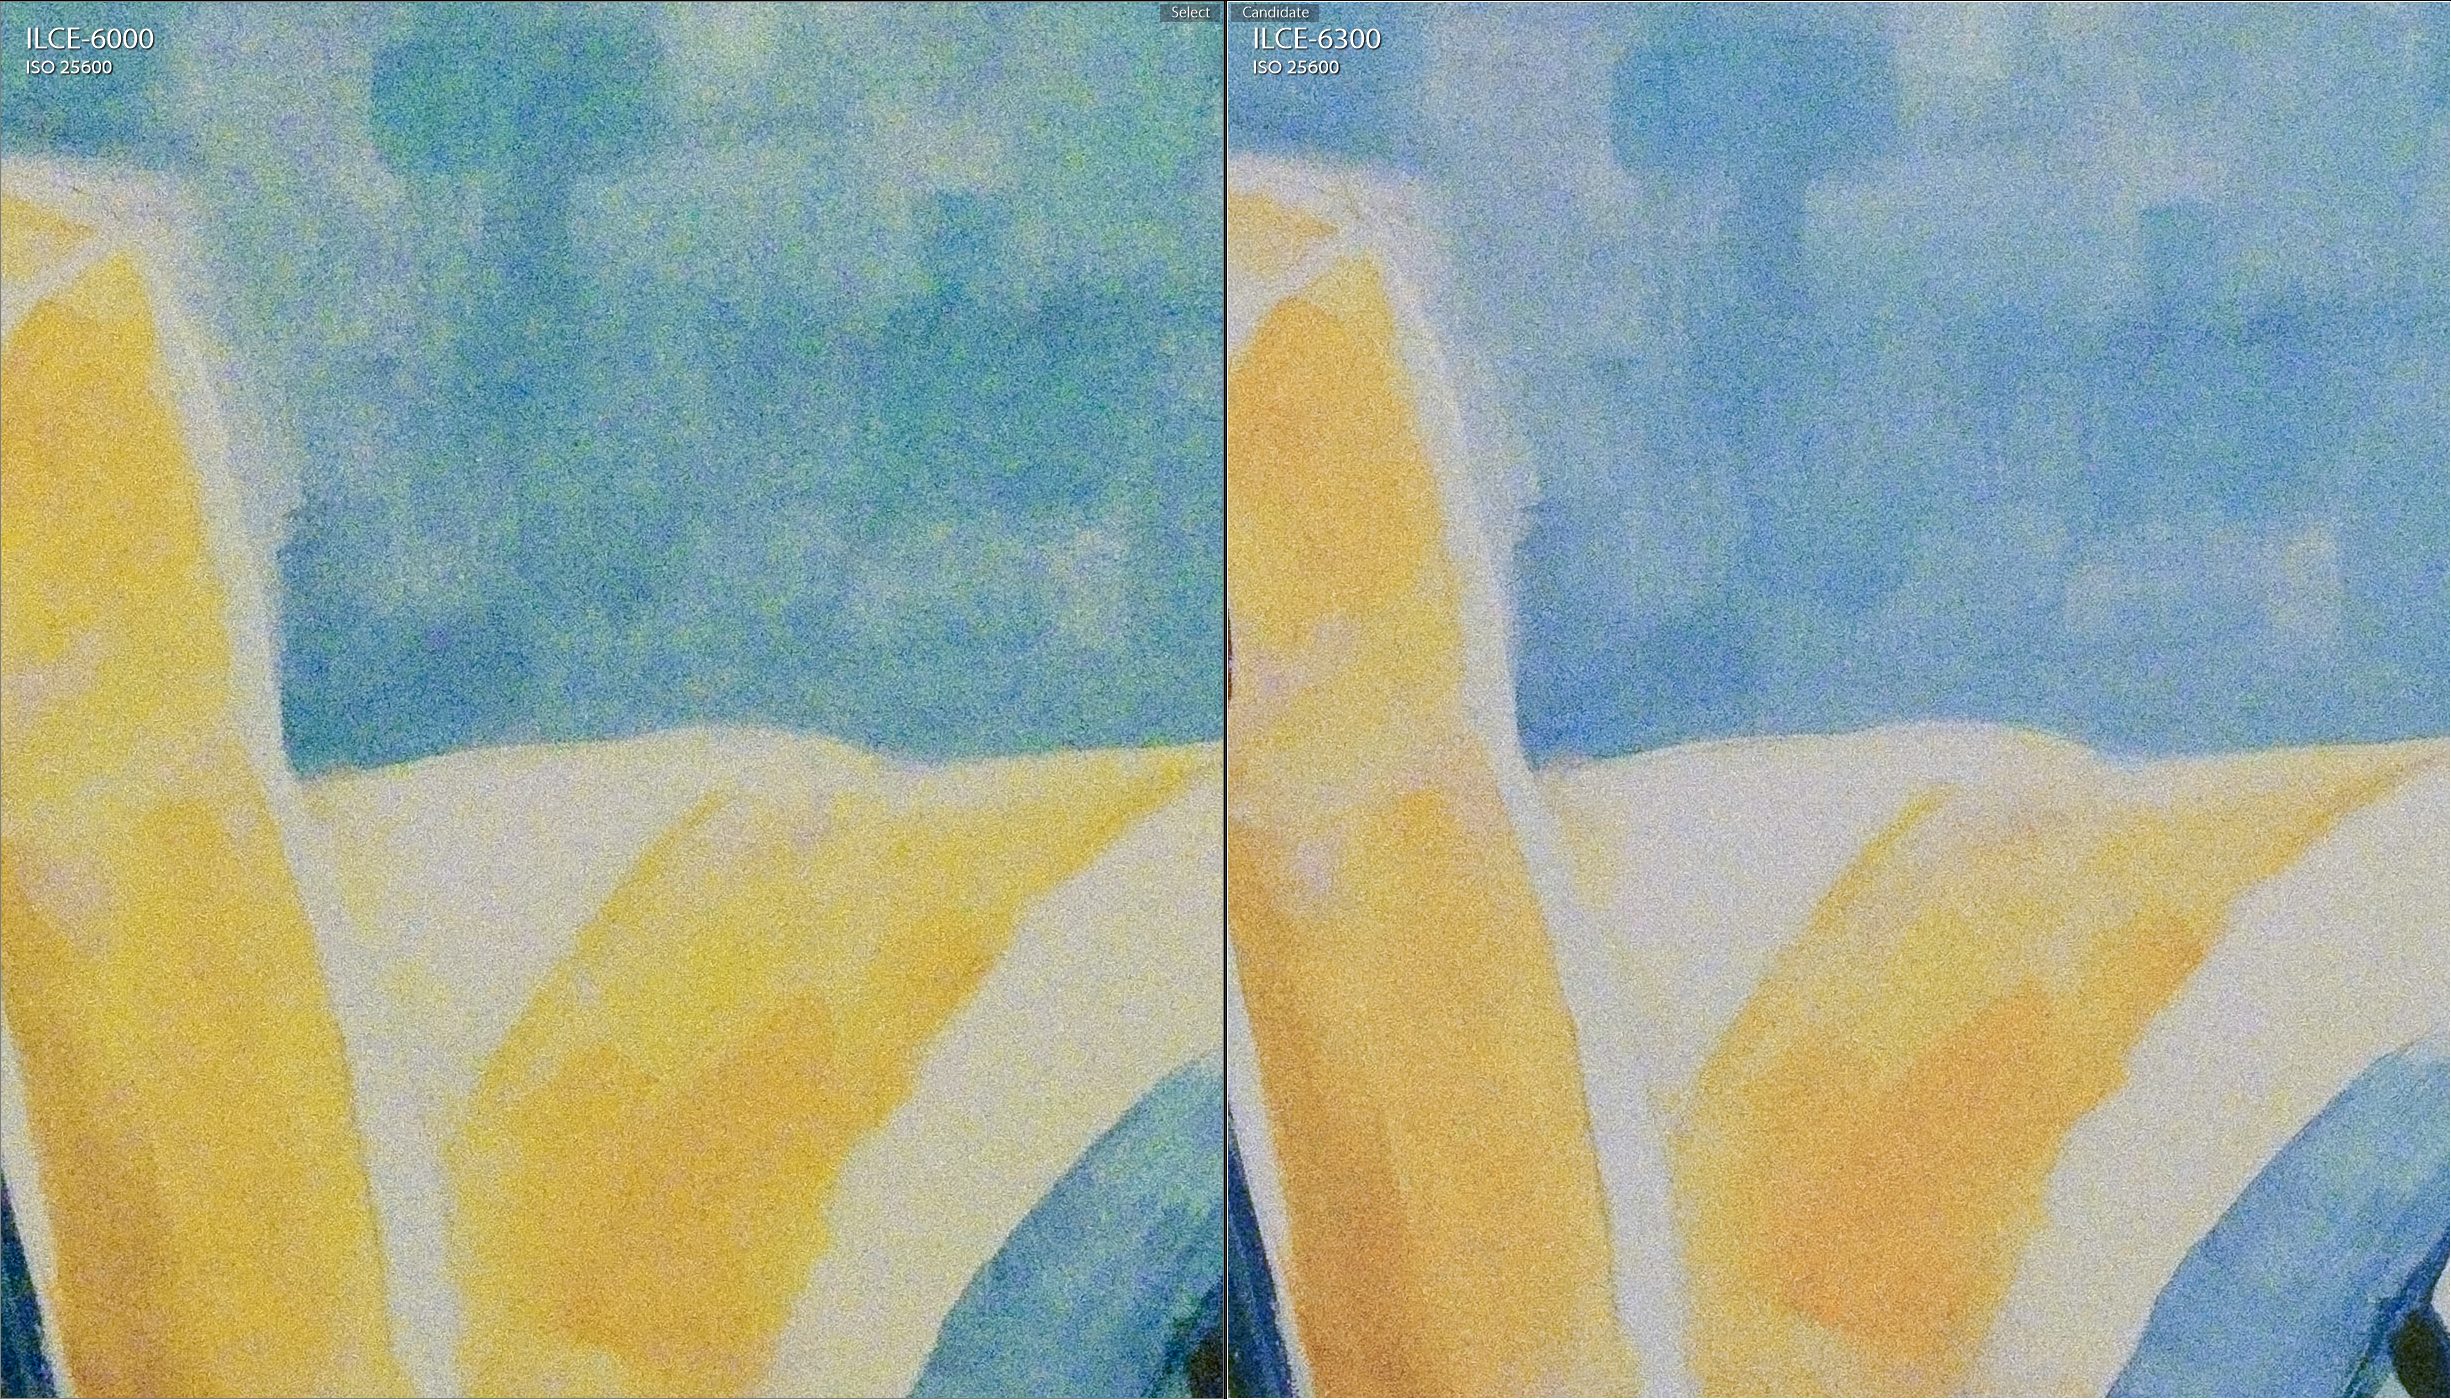
The a6000 had class-leading image quality, and the a6300 is basically the same. Throughout the ISO range, if you look really closely, you can see just a bit less noise in the a6300’s raw files. Here’s a 1:1 closeup (if you click the image) with the a6000 on the left and the a6300 on the right at ISO 25,600. These images were processed with Sony’s raw processing software but they had the same amount of noise reduction applied. You can disregard the differences in color.
Every time a new generation of a camera is released, photographers hope to see 1-2 stops of image quality improvement. Based on our reviews and data from third parties, raw image quality improves by 1 stop every 8 years or so. Manufacturers often brag about bigger improvements, but they’re generally referring to JPG quality… and if you care at all about image quality, you’re probably shooting raw, anyway.
If you were hoping for a bigger jump in image quality, your best bet is to upgrade to a full-frame camera, like the Sony a7. If you have the budget, the a7R II has remarkable image quality.
For low-light shooting, you’ll see the most improvement by using faster lenses. For example, switching to an f/1.8 lens from an f/5.6 lens. That’ll give you about 3 stops of image quality improvement, and 8 times less noise in low-light environments.
Casual Photography
Casual photography is where the a6300 excels. It locks into focus fast in any conditions, including low light. The tilt screen means you can easily hold it low to the ground or over your head.
The raw files are as clean as any APS-C camera we’ve tested, and the dynamic range allows you to recover details in shadows and highlights, or fix exposure problems in post with very little penalty. The next pictures so the same shot straight out of camera, and after raising the exposure in post-processing. You can see that the raw file contains detail that you might think were completely lost. If you messed up your exposure settings, this can save your shot.
Click any picture to view the full JPG image, (usually) straight out of the camera.
At night and in low light, like when you’re with friends at a restaurant, detail drops but the noise is tolerable, especially for sharing pictures online. These next two pictures were taken handheld at ISO 6400.
The best camera is the one you have with you, and the a6300 is the best camera to grab when you don’t want something more cumbersome.
Sports
We never recommended the a6000 as a sports camera because we just got better results with DSLRs. The a6300 is the first mirrorless camera we can recommend for people who want to shoot sports; the focus tracking is great, the 8 frames per second is very fast, and the viewfinder blackout and lag are much reduced.
The focusing in the a6300 is MUCH improved, thanks to its phase detect focusing system. While the focus tracking isn’t as fast or accurate as big DSLRs like the 7d Mark II, At 8 frames per second, it’s faster than comparably priced DSLRs.
For best results, just put the camera in Sports mode…that’s the best way to ensure the fairly complex focusing system is correctly configured.
If you’re serious about shooting sports, you’ll still probably be happier with a Canon or Nikon DSLR. The optical viewfinder of a DSLR completely eliminates lag, and higher-end models have much bigger buffers that let you take more consecutive photos.
The high frame rate helps you capture that decisive moment. You can choose between 8 fps with continuous autofocus, or 11 without it. For the water skiing, we needed the autofocus to keep up with subjects moving towards us. For volleyball, or times when the subject was moving only side-to-side, the higher frame rate improved our odds of getting the perfect moment.
Check out this sequences of photos and notice how the last photos are so poorly composed.
With practice, it’s definitely possible to keep a fast-moving subject in frame. However, the display isn’t quite real-time as you’re shooting, so tracking a fast-moving subject is still more difficult than with an SLR.
As a result, I often lost track of the subject in the viewfinder after a long sequence of shots. With practice, you can learn to lead the subject.
Every reviewer was frustrated with the “Writing to Memory Card” message. You can’t do anything with the camera until the entire buffer is written to the memory card, and when you’re shooting rapidly, it never seems to stop writing. For some reason, Sony put the memory card write indicator on the bottom of the camera, where you can’t easily see it.
The buffer is too small to shoot action in RAW, so you’ll need to use JPG, and even with the fastest memory card available, we missed shots because the buffer was full.
In sports, you often need to manually control the focusing point to stay focused on the key player. Often, you need to manually move the focusing point to the other side of the frame as the direction of the action changes. Manually controlling the focusing point on the a6300 is slower than on comparably priced DSLRs, which have dedicated thumbsticks.
You’ll need to carry multiple batteries to get you through most sporting events, or even a day of casual shooting. We really hope the next generation of Sony cameras adopts a bigger battery.
Portraits
The a6300 is very workable for portraits, but less than ideal in several ways.
Portraits often have very shallow depth-of-field, and that requires very fast and precise focusing on the model’s closest eye. Face & eye detection are GREAT for this when they work, because you don’t have to worry about selecting a focusing point on the eye. It requies an extra button press, which delays your shot by a fraction of a second–a critical amount of time in a fast-moving shoot.
But it doesn’t always work… it totally depends on the lighting condition. In a backlit model shoot, it completely failed to detect the model’s eyes.
Other times, it might be 80% or 90% accurate. If you shoot with a fast pace, it can be really frustrating. At slower paces, it’s good, as is manual focusing with magnification & focus peaking.
We’d like eye-detect to work automatically, without requiring another button press. We’d also like a joystick to select a small, precise focusing point for rapid shooting, like every DSLR at this price point has. A touch screen would help, too.
The a6300 only syncs with studio lights to 1/160th, which is slower than many cameras. In the studio, this means your subjects might have a bit more motion blur. In sunlight, you’ll need to use an ND filter to shoot wide open if your flash doesn’t support high-speed sync.
Street Photography
The a6300 is the perfect camera for street photography. It’s small, discreet, and can be completely silent. When you’re shooting blind, you can trust the autofocus system to lock on quickly.
Landscapes
Like other Sony cameras, the image quality is just fantastic. It’s unbeatable at this price point….but you’re also within reach of the full frame a7, which offers much better image quality, especially with full frame lenses.
Wi-Fi
We used the WiFi constantly to post pics to Twitter & Instagram. This feature is critical to many modern photogs.
Sony’s WiFi system is one of the better ones. Sharing still takes a minute or two, so we often just grab a snapshot with our phone, which has proper apps and a touchscreen. We’d like Sony to take their smartphone expertise and put full versions of the Instagram and Twitter apps on the camera, and add a touchscreen for tagging and labeling.
Video
Note: Justin’s still editing the a6300 video review, so view samples demonstrating these points will be coming soon.
The a6300 offers 4k video at 30 fps, and 1080p video at 120 fps. Both look gorgeous. S-Log3 provides unbeatable dynamic range for those experienced with color grading who are also shooting in extremely contrasty situations.
While the video quality is unbeatable at this price, the a6300 has some serious weaknesses as a video camera:
It desperately needs a flippy touch screen. Many people, especially YouTubers, need to film themselves, and flipping a screen towards them is extremely convenient. You could, theoretically, accomplish something similar by connecting over WiFi from your smartphone, but that process is more time consuming.
Continuous focus during video is still pretty useless for subjects that stop moving; it constantly hunts in and out and completely ruins the shot.
The a6300 does have a mic jack, but it doesn’t have a headphone jack! Therefore, you need to buy an external device to monitor your own sound. WTH?!
You get the best IQ at 4k & 24p… the standard for film. If you jump up to 30p, the smoother standard for video, you’ll see more noise at higher ISOs.
Our friend Max Yuryev (you should subscribe to his channel), tested the a6300 for video overheating with every frame rate, and it never overheated while outdoors in the shade at around 75-80F. Our a6300 did overheat in the hot Miami sun, however, and we weren’t even shooting video, just stills. As long as you keep it out of direct sun, it should be fine.
Continuous autofocusing was often great at tracking moving subjects, but it often hunted or focused on the background, ruining the shot. With still subjects, the hunting made continuous autofocus unusable. The lack of a touch screen means you’ll be manually pulling focus when you want to switch focus between subjects.
Nonetheless, at this price point, it’s your best bet for getting 4k video of your kids sports.
Our friend Jordan over at The Camera Store found the rolling shutter to be a problem, and it might be if you’re shooting action, but it didn’t hurt any of our shots.
If you’re serious about 4k video, you might be happier with the GH4, which has a headphone jack, a touch screen that can flip forward, and access to the wide variety of nicely priced micro four-thirds lenses. We still prefer the much more expensive a7R II because it has a headphone jack, a stabilized sensor, and can switch between full-frame and Super 35 recording modes, giving us an option of crops. However, when I handed the footage to Justin, he thought it was from the a7R II. The a6300 is as good as the $3,200 a7R II.
Summary
The a6300 improves on a great camera. It’s the best mirrorless sports camera ever, and a great, compact, all-around camera.
Our advice: get the a6300 if you shoot action or video, prefer mirrorless, and the Sony lens lineup has everything you might need. If you don’t shoot action or video, the a6000 should be just fine, and it’s half the price.
If you want to see our recommendations for different styles of photography at any price point, check sdp.io/whichcamera.
TL;DR: Finally, a zoom worthy of the amazing a7R II. The combination of the a7R II and the Sony 24-70 f/2.8 GM match the Canon and Nikon equivalents for image quality, and you get the benefits of 4k video, sensor stabilization, a tilt screen, and an electronic viewfinder. If the 70-200 f/2.8 is as good as this lens, pros will be selling their DSLRs.
We’ll have a full video review out soon, but in the meantime, here are our thoughts and some sample images.
We’ll have a full video coming soon, but in the meantime, here’s a quick review after spending three days with the $1,800 Sony FE 85mm f1/4 GM, with sample pictures.
Sharpness
First, sharpness isn’t a concern here. It’s impressively sharp. That’s not something I would normally say unless I’d compared it side-by-side to the competition to, say, the Batis 1/8 or the Nikon 85mm f/1.4.
I can say this lens is sharp enough because it’s a portrait lens, designed specifically to give flattering proportions and blur the background. For typical portrait use, the vast majority of the picture will be blurred, anyway, so sharpness is irrelevant. The eyes and eyelashes are sharp, but the tip of the nose and the ears are blurred.
Does it Match your Camera?
SHORT ANSWER: Get the 85mm G-Master for the a6300 or a7R II. For any other body, buy the Rokinon 85mm f/1.4 and manually focus.
You’ll be happy with the sharpness on APS-C bodies like the a6300, where it takes pictures similar to those taken with a 128mm f/2.1 lens. On those APS-C bodies, you’ll have more working distance than you do on full-frame bodies like the a7R II, and facial features will be a bit more compressed. Either way, you’ll have plenty of background blur at your disposal.
I can’t recommend this lens with a body like the a7S, a7 II, or a6000, because they lack the powerful phase detect focusing features of the a6300 and a7R II. The a6000 and a7 II do have phase detect, but it’s less dense than the a7R II and a6300, and doesn’t work as effectively in our testing.
Without phase detect, the focusing accuracy on this lens is going to be very low at f/1.4, and this is a lens that you’ll want to be shooting at f/1.4. Before you spend $1,800 on this lens, you might choose to put that money towards upgrading your body for improved focusing.
If you don’t have phase detect, your best bet is probably to manually focus the lens, and for work like tight headshots wide-open (which this lens is designed for) you’ll have a low-percentage of your shots that are perfectly focused on the eyes. There are definitely people who manually focus an 85mm f/1.4 with good results (our Lightroom book cover was photographed with manual focus). It’s a fun challenge. But manually focusing an 85mm f/1.4 isn’t something I’d recommend to photographers who want to quickly get a shot that is perfectly in focus.
If you are planning to manually focus this lens, buy the Rokinon 85mm f/1.4 instead (which I used to make the Lightroom book cover). It’s not as nicely built, but it’s $270 and still “sharp enough.” It’s also lighter.
Another reason this lens is best matched to the a7R II is that the a7R II has SteadyShot Inside, which reduces hand shake. Without that feature (for example, if you were using the a6300), you’d want to shoot with shutter speeds of 1/200 or higher. That won’t at all be a problem with sunlight or studio lights, but in lower light, that requirement will push you to use higher ISOs and thus reduce your image quality.
Handling
Handling is more important to me than sharpness for this lens. On APS-C bodies, the camera will be extremely front-heavy. This is a big lens; you’ll be placing the camera on the lens, and not the other way around. If you were to mount the camera to a tripod, it would be tough to keep it from tilting forward.
That didn’t bother me, but photographers always ask me if a lens balances well. It’s fine, but it’s definitely not balanced.
I absolutely adore having the aperture ring on the lens. It’s definitely not a necessity; I never minded changing the aperture with the main dial on the camera. Either are equally functional but I just enjoy having the aperture ring on the lens.
The focusing ring is perfect.
Autofocusing
The best way I found to use the lens is with eye-detect autofocus. If you use any of the standard methods of autofocus, like face detect, it will focus on the forehead or nose, and your picture will be noticeably out-of-focus.
Unfortunately, eye-detect AF is still not 100%. In backlit situations, like shooting into a setting sun, eye-detect failed completely, requiring me to manually focus or auto-focus on the face, rather than the eye. Both techniques produced a lower percentage of sharp shots, which is frustrating.
In well-lit situations, eye-detect AF occasionally failed to find the eye (perhaps the model turned her head or was blinking) and would need to hunt. The camera would take an extra second or so while it hunted. That might not be a problem for your style of shooting; if you’re shooting a family portrait, you can probably wait. But when you photograph a skilled model, you tend to develop a rhythm with the model, like pose-shoot-pose-shoot-pose-shoot, with around a second of delay between shots. When you don’t fire because eye-detect AF has failed, there’s an awkward delay while the model tries to hold her pose, or wonders whether you simply don’t like it and don’t want to waste the frame.
In other words, using this lens in the way it’s intended requires fast, precise, and consistent autofocus. I had the best luck with eye-detect AF, which was fast and precise, but not quite consistent. Nonetheless, it got the job done. It’s definitely not a deal-breaker, and I talked to the folks at Sony about the challenge I had, so perhaps we’ll see a firmware update that improves eye-detect.
Using single-point AF also worked, but that requires you to keep the AF point on the model’s eye. It’s a more primitive focusing system, and closely resembles the system used by DSLRs. With my favorite portrait DSLRs, the Canon 5DS-R and Nikon D810, I use the joystick to place the focusing point on the model’s eye.
Unfortunately, Sony cameras lack a way to specify a focusing joystick, so manually selecting a focusing point takes longer. On DSLR’s, it might take 1/4 to 1/2 a second. On the Sony, it’s more like 3/4 to 1 second. That one second might not impact your style of shooting, but it does break the rhythm of my fast-paced portrait shooting style.
This is not a sports lens, according to a Sony rep I talked to. The focusing system just isn’t up for fast-paced focus tracking. You’ll be happier with the 70-200 f/2.8 G-Master when it’s available.
Note that Sony’s releasing a firmware update for the a6300 and a7R II to help with these cameras. It’s not yet publicly available, but neither is the lens. Make sure you install it for best results with this lens.
Images
An 85mm f/1.4 lens creates a distinct look that many portrait photographers, including us, just love. The bokeh on this particular lens is nice and round, exactly as I prefer it.
Contrast when shooting into a bright background is a common problem with lower-quality lenses. However, even with a completely blown-out background, contrast seemed perfect. That’s the sign of really high-quality glass.
Click the images to get the full-sized version.
Here’s the original and (lightly) edited versions of another high-contrast shot:
Here are some sample images that Chelsea & I took with the 85mm f/1.4 GM and the Sony a7R II.
Here are example shots at f/1.4, f/9, and f/16:
Should You Buy the Otus or Batis Instead?
Here’s a summary of the four most popular native 85mm lenses for Sony E-Mount:
Rokinon 85mm f/1.4 ($270). It’s manual-focus only, but it’s only $270, and the image quality is great. You’ll miss many shots without autofocus, but it’s a great way to determine if you like the focal range. If you have a slower-paced style, it might be the only lens you need.
Batis 85mm f/1.8 ($1,200). This lens isn’t yet available to us, but from the early reviews I’ve seen, it’s a great lens. It won’t have quite as much background blur as the faster f/1.8 lens, but it’s smaller, cheaper, and lighter. It also lacks that great aperture ring.
Sony 85mm f/1.4 G-Master ($1,800). If you aren’t phased by the price tag, this is currently my favorite lens in the Sony lineup. It’s expensive, but worth it.
Zeiss Otus 85mm f/1.4 ($3,750). My friend Matt Granger loves this lens, and DxOMark says it’s one of the sharpest lenses ever made. I wouldn’t use it, however, because it lacks autofocus, and if you even slightly miss focus, all that sharpness is meaningless. Most photographers will get sharper results by autofocusing with the G-Master lens. Also, this lens is extremely heavy, and hand-holding it for longer shoots will tire you out (and possibly introduce more camera shake, further reducing sharpness). It’s a great lens, but it’s not as practical as the G-Master.
Summary
Before this lens existed, Chelsea and I never enjoyed the experience of shooting portraits with a Sony camera. Sure, it was possible, and many people get great results with Sony portraits. But the lack of an autofocusing 85mm f/1.4 and 70-200 f/2.8, our two favorite portrait lenses, meant we just grabbed a Canon or Nikon instead.
Now, I’d happily grab the Sony a7R II and 85mm f/1.4 instead of a Canon or Nikon. It gets the job done and is fun to use. We’re still waiting to review the G-Master 70-200 f/2.8, which will determine whether the Sony lineup is really ready to completely displace Canon and Nikon for traditional professional portraiture. Stay tuned for that review!
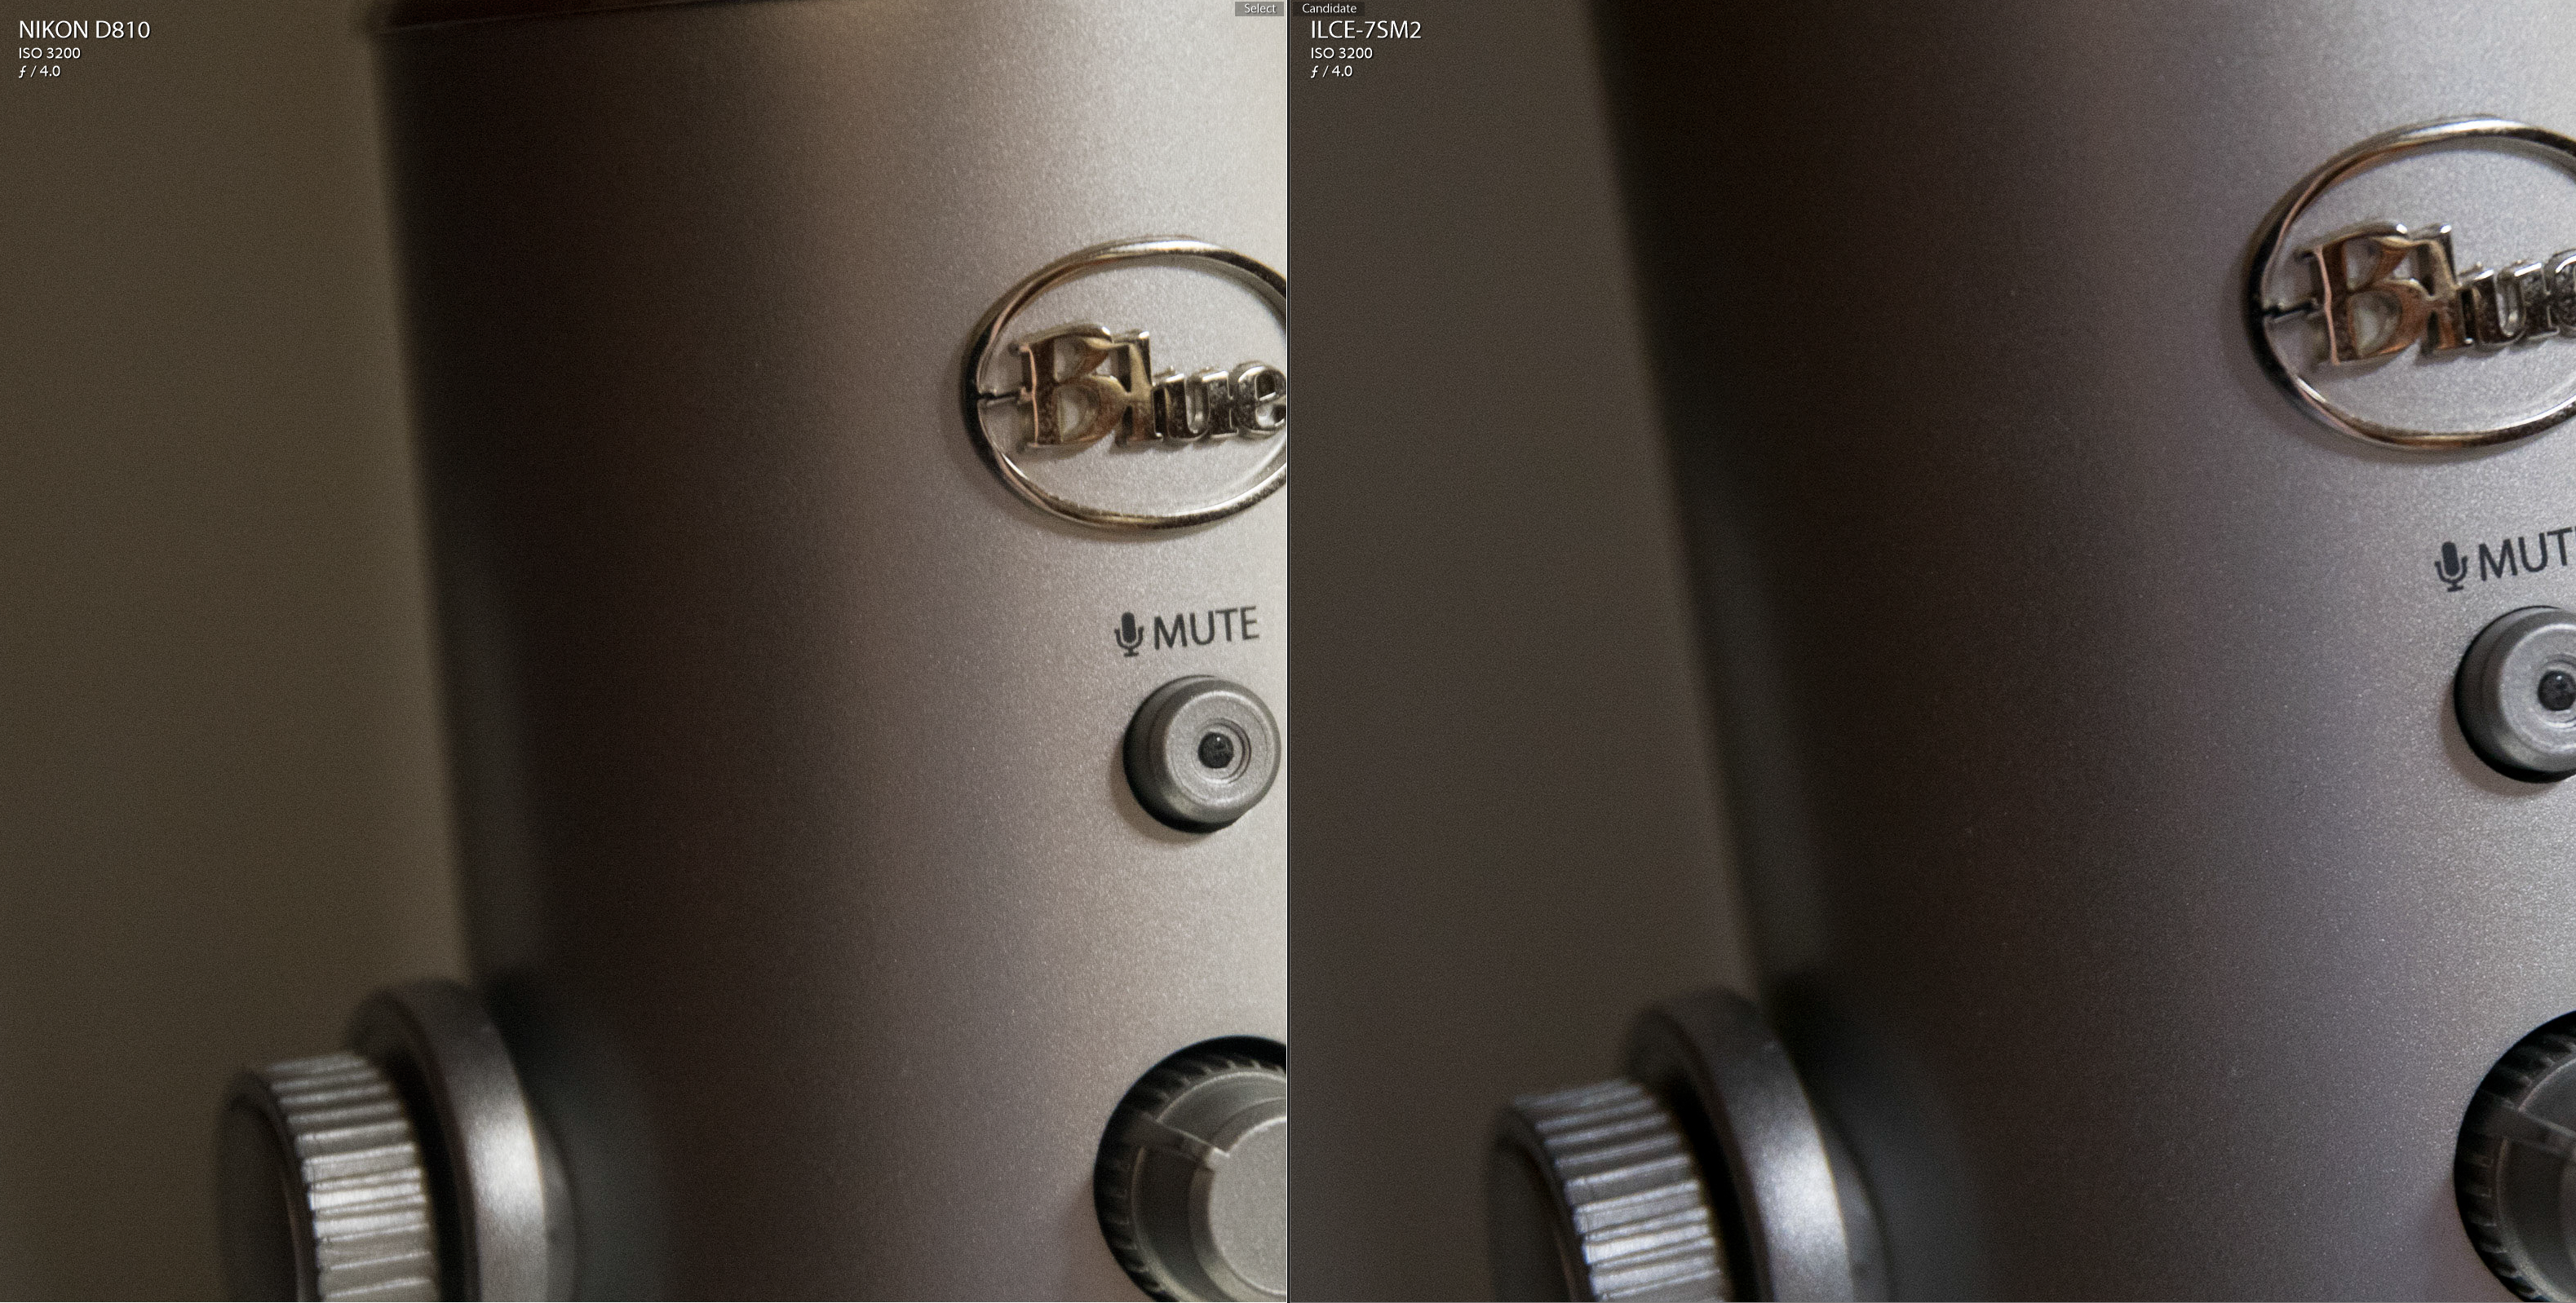
The Sony a7S II is Sony’s full-frame, low-light camera. It’s 12 megapixels, which means it doesn’t provide the most detail for still images. It’s true capabilities are seen once you begin shooting video, but we’ll get to that a little later.
When compared to the less expensive, 36-megapixel D810, the Sony images are cleaner in low light when we scale the D810 images down to the same resolution.
This same shows the images 1:1 (if you click it) at ISO 3200, with the Nikon’s scaled-down image on the left.
As you can see, the difference is subtle, and if we were to raise the noise reduction before scaling the Nikon’s image down, any differences would disappear. For that reason, it’s hard to recommend the a7S II just for stills.
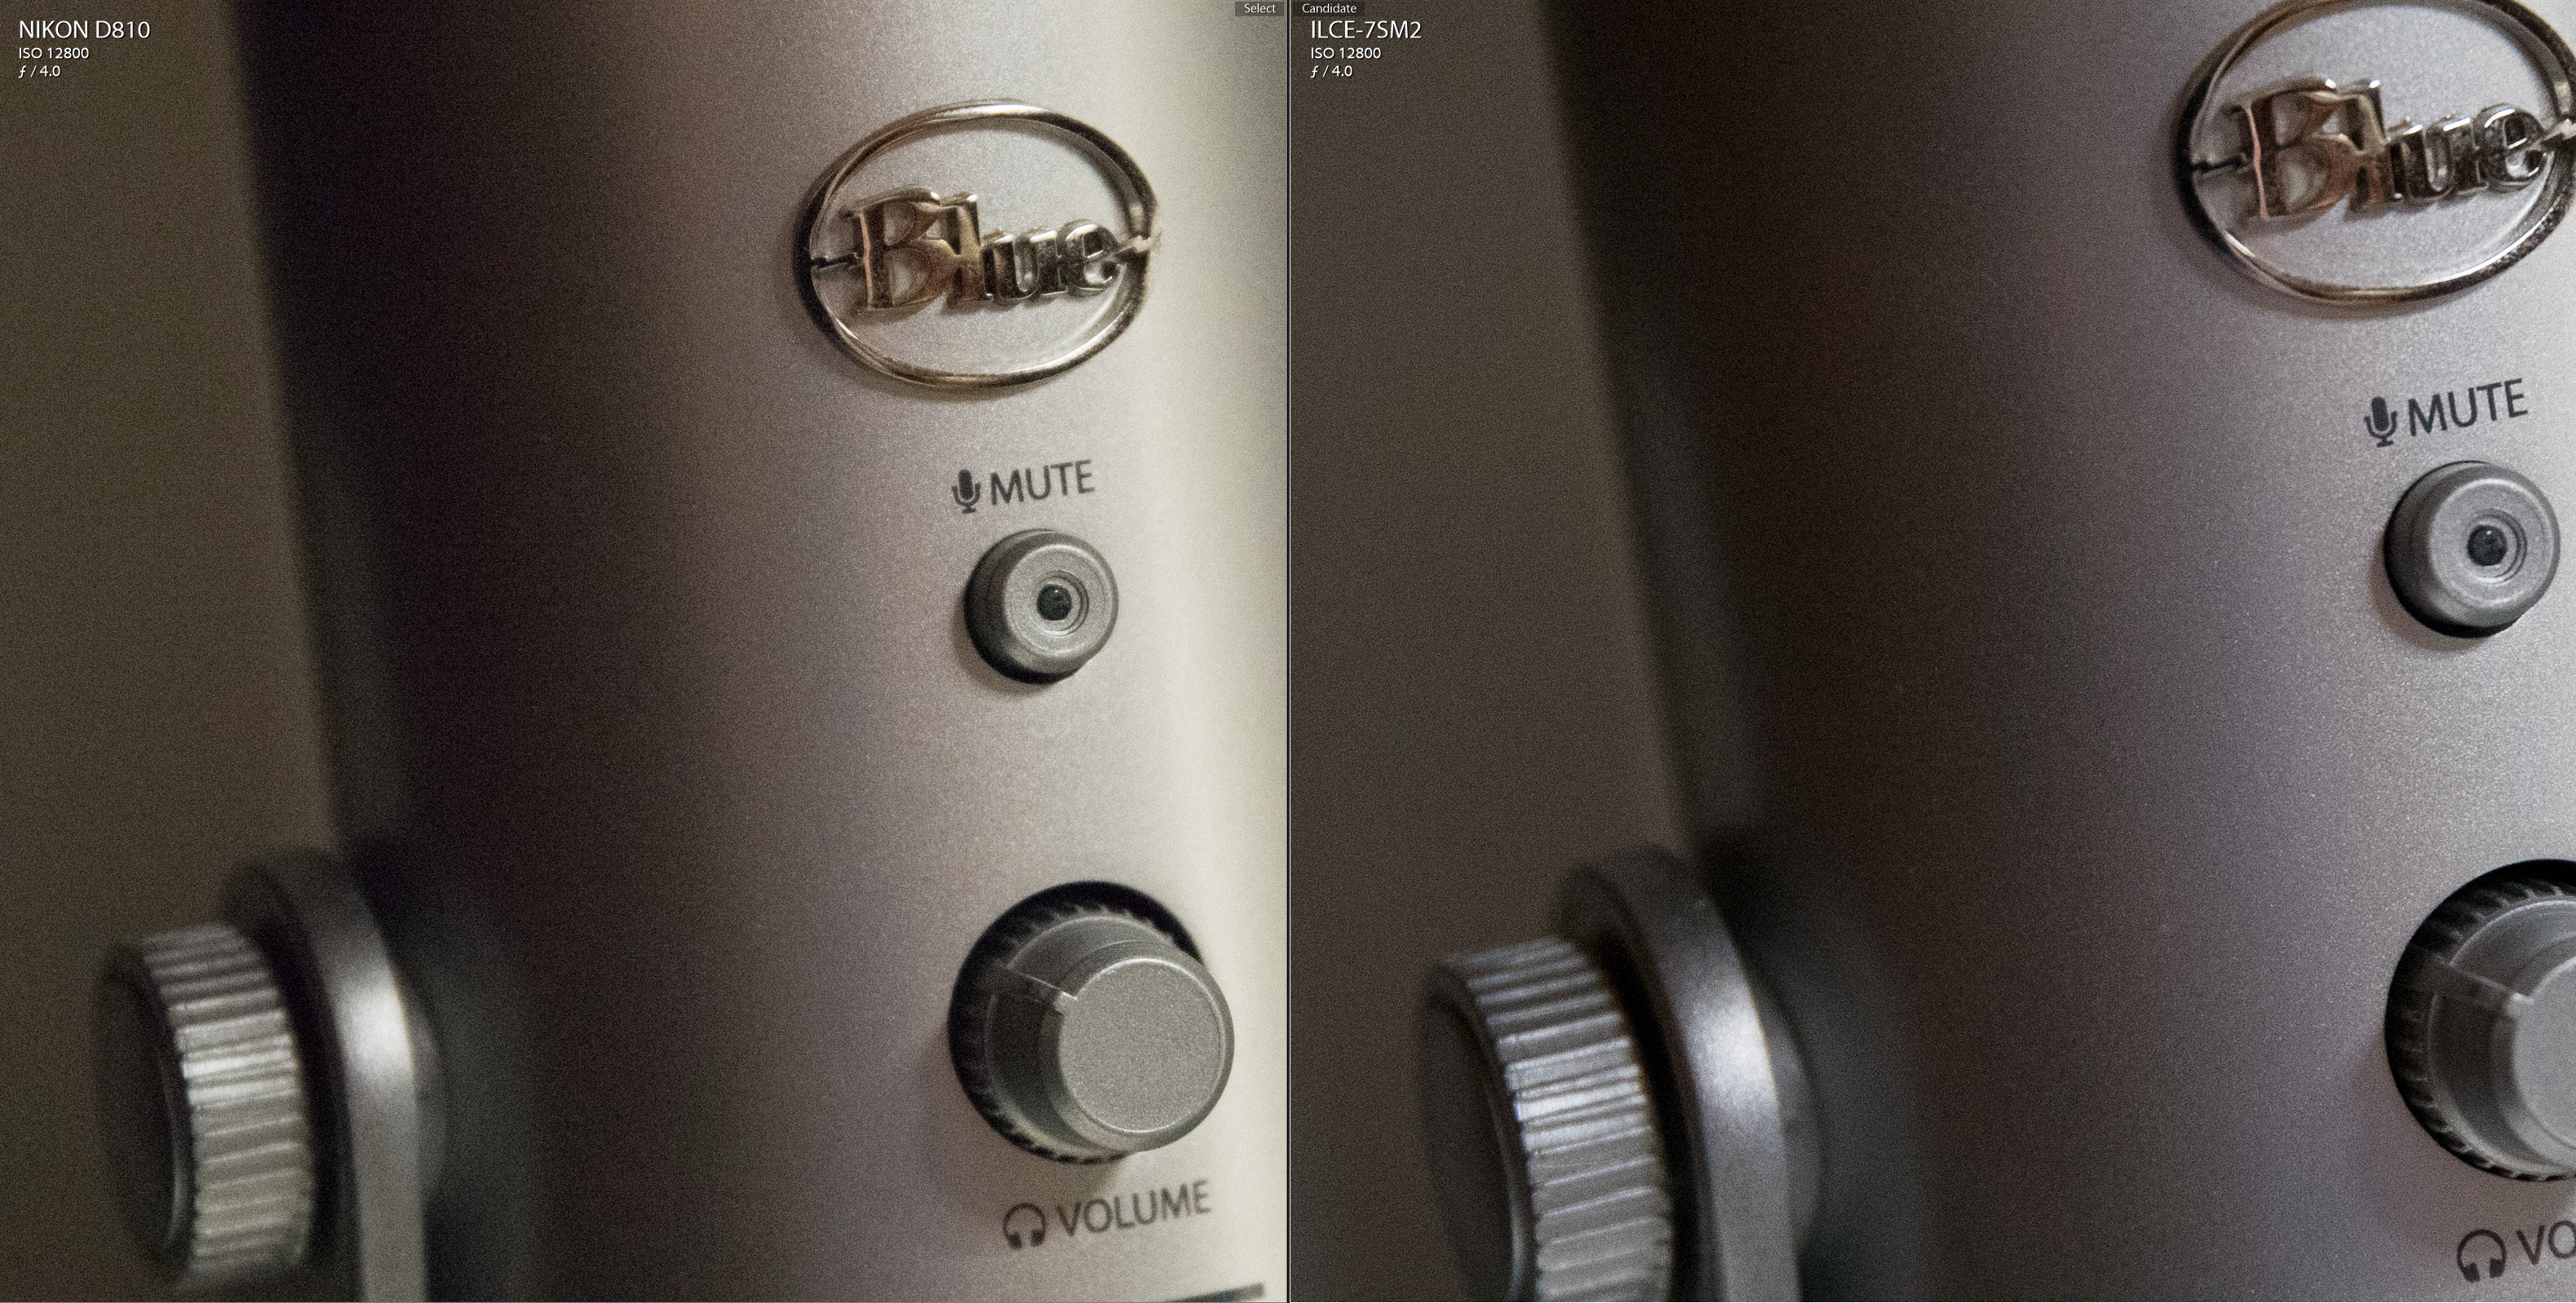
Here’s a side-by-side comparison at ISO 12,800, where the differences are more obvious:
However, that’s fairly easy to overcome with D810 raw files. Because they have so much more detail, we can raise the noise reduction to virtually eliminate noise, while still retaining more detail than the a7S II is capable of capturing. Additionally, the D810 has a vastly better autofocus system than the a7S II’s contrast-based autofocus system, which is better suited to manual focus.
Where the a7S II shines is video. Indeed, the video quality is better than any camera we’ve ever tested, and the full-frame sensor means you get the shallowest depth-of-field from readily available 35mm lenses. It’s remarkable. It can literally see in the dark, especially when paired with a fast prime lens.
Compared to the original a7S, the a7S II has several advantages for video:
Internal 4k recording. With the a7S, you can only record 4k if you use an external recorder.
1080/120 FPS. Recording 120 frames per second at full HD gives you the ability to do 4x slow motion at 30 frames per second. If you render your video at 24 frames per second, you can slow down to 5x slow motion.
Stabilized sensor. The a7S II can reduce your handshake with any lens, including fast primes, making it excellent for handheld video.
Better autofocusing. While the a7S II’s autofocus system is still not the best on the market, or even better than the a7R II, it has improved since the original a7S.
All of the above technical specifications are nice to know, but the true test of a camera is whether or not you want to shoot with it. Tony and I took our copy out on the town to test it’s low-light capabilities and overall usability and, overall, were really pleased with the a7SII performance.
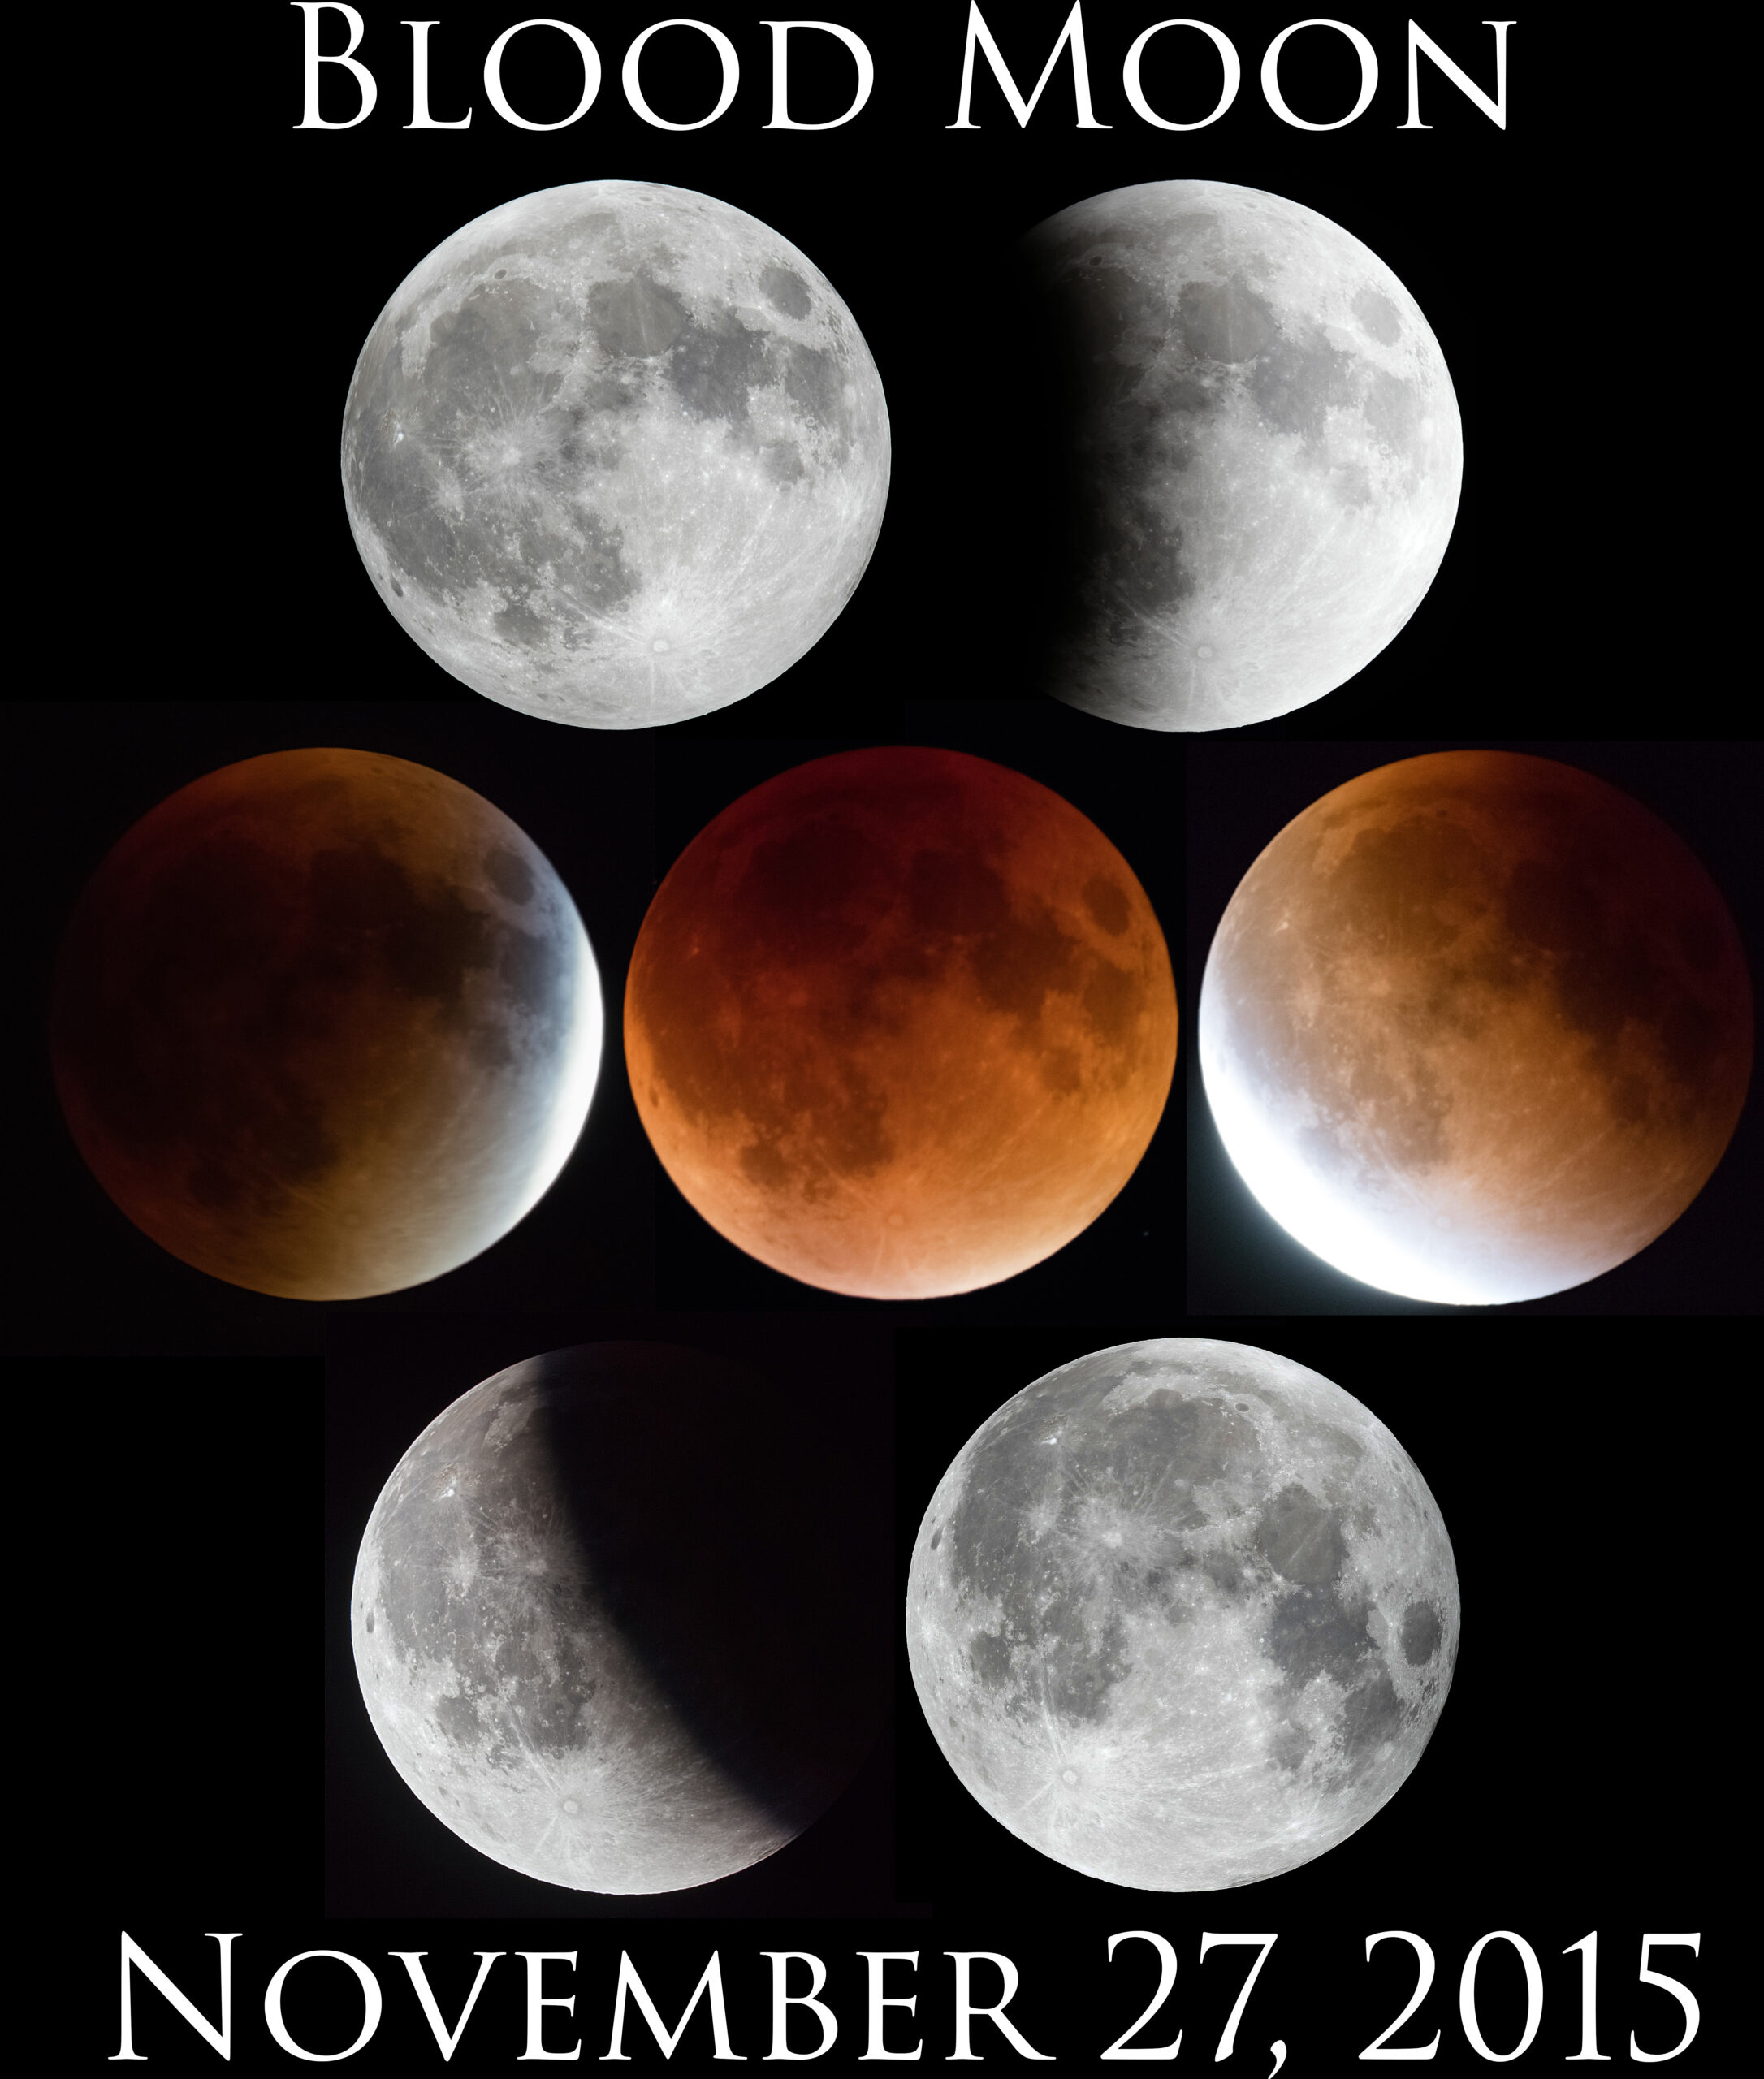
September 27, 2015 had a “blood moon” visible where we are in North America, and by great luck, we had clear skies. I’ve never shot a lunar eclipse before, and I was surprised how challenging it was.
First, here’s a 30 megapixel comp of a sequence of stacked exposures. Feel free to download it (by clicking it), and please do share this page with it. Here’s a more square version, for Instagram or a poster or whatever.
Getting the Possible Sharpest Shot of the Moon
Photographing the moon is a bit challenging. Your camera will probably wildly overexpose it, because your camera sees more black sky that bright moon, and it tries to make that black sky grey.
Because of that, you’ll need to use manual mode. There’s no one set of camera settings that will work for every condition. However, I usually start at ISO 100, f/8, and 1/100th of a second. Autofocus should work fine.
I usually handhold moon photos using a lens that has image stabilization. A tripod could help, but usually the moon is clearest when it’s high in the sky. Pointing a telephoto lens straight up at the sky on a tripod is difficult, or even impossible, with most tripods. As a result, it’s often more stable just to hand-hold it.
After you snap your first picture, look at it on your LCD screen. Zoom all the way in, and make sure that no part of the moon is overexposed. If it is, use a faster shutter speed, like 1/200th. The brightest parts of the moon should be almost completely white. If they’re more grey than white, use a slower shutter speed, such as 1/50th.
For the aperture, f/8 should work fine, but choose your lens’ sweet spot for optimal sharpness. Watch this video for detailed information. If you have a teleconverter, use it, and select your f/stop by multiplying the teleconverter multiplier (such as 1.4X or 2X) by your lens’ sweet spot.
Take lots of pictures–at least a dozen. Later, on your computer, you can look through them and choose the sharpest photo.
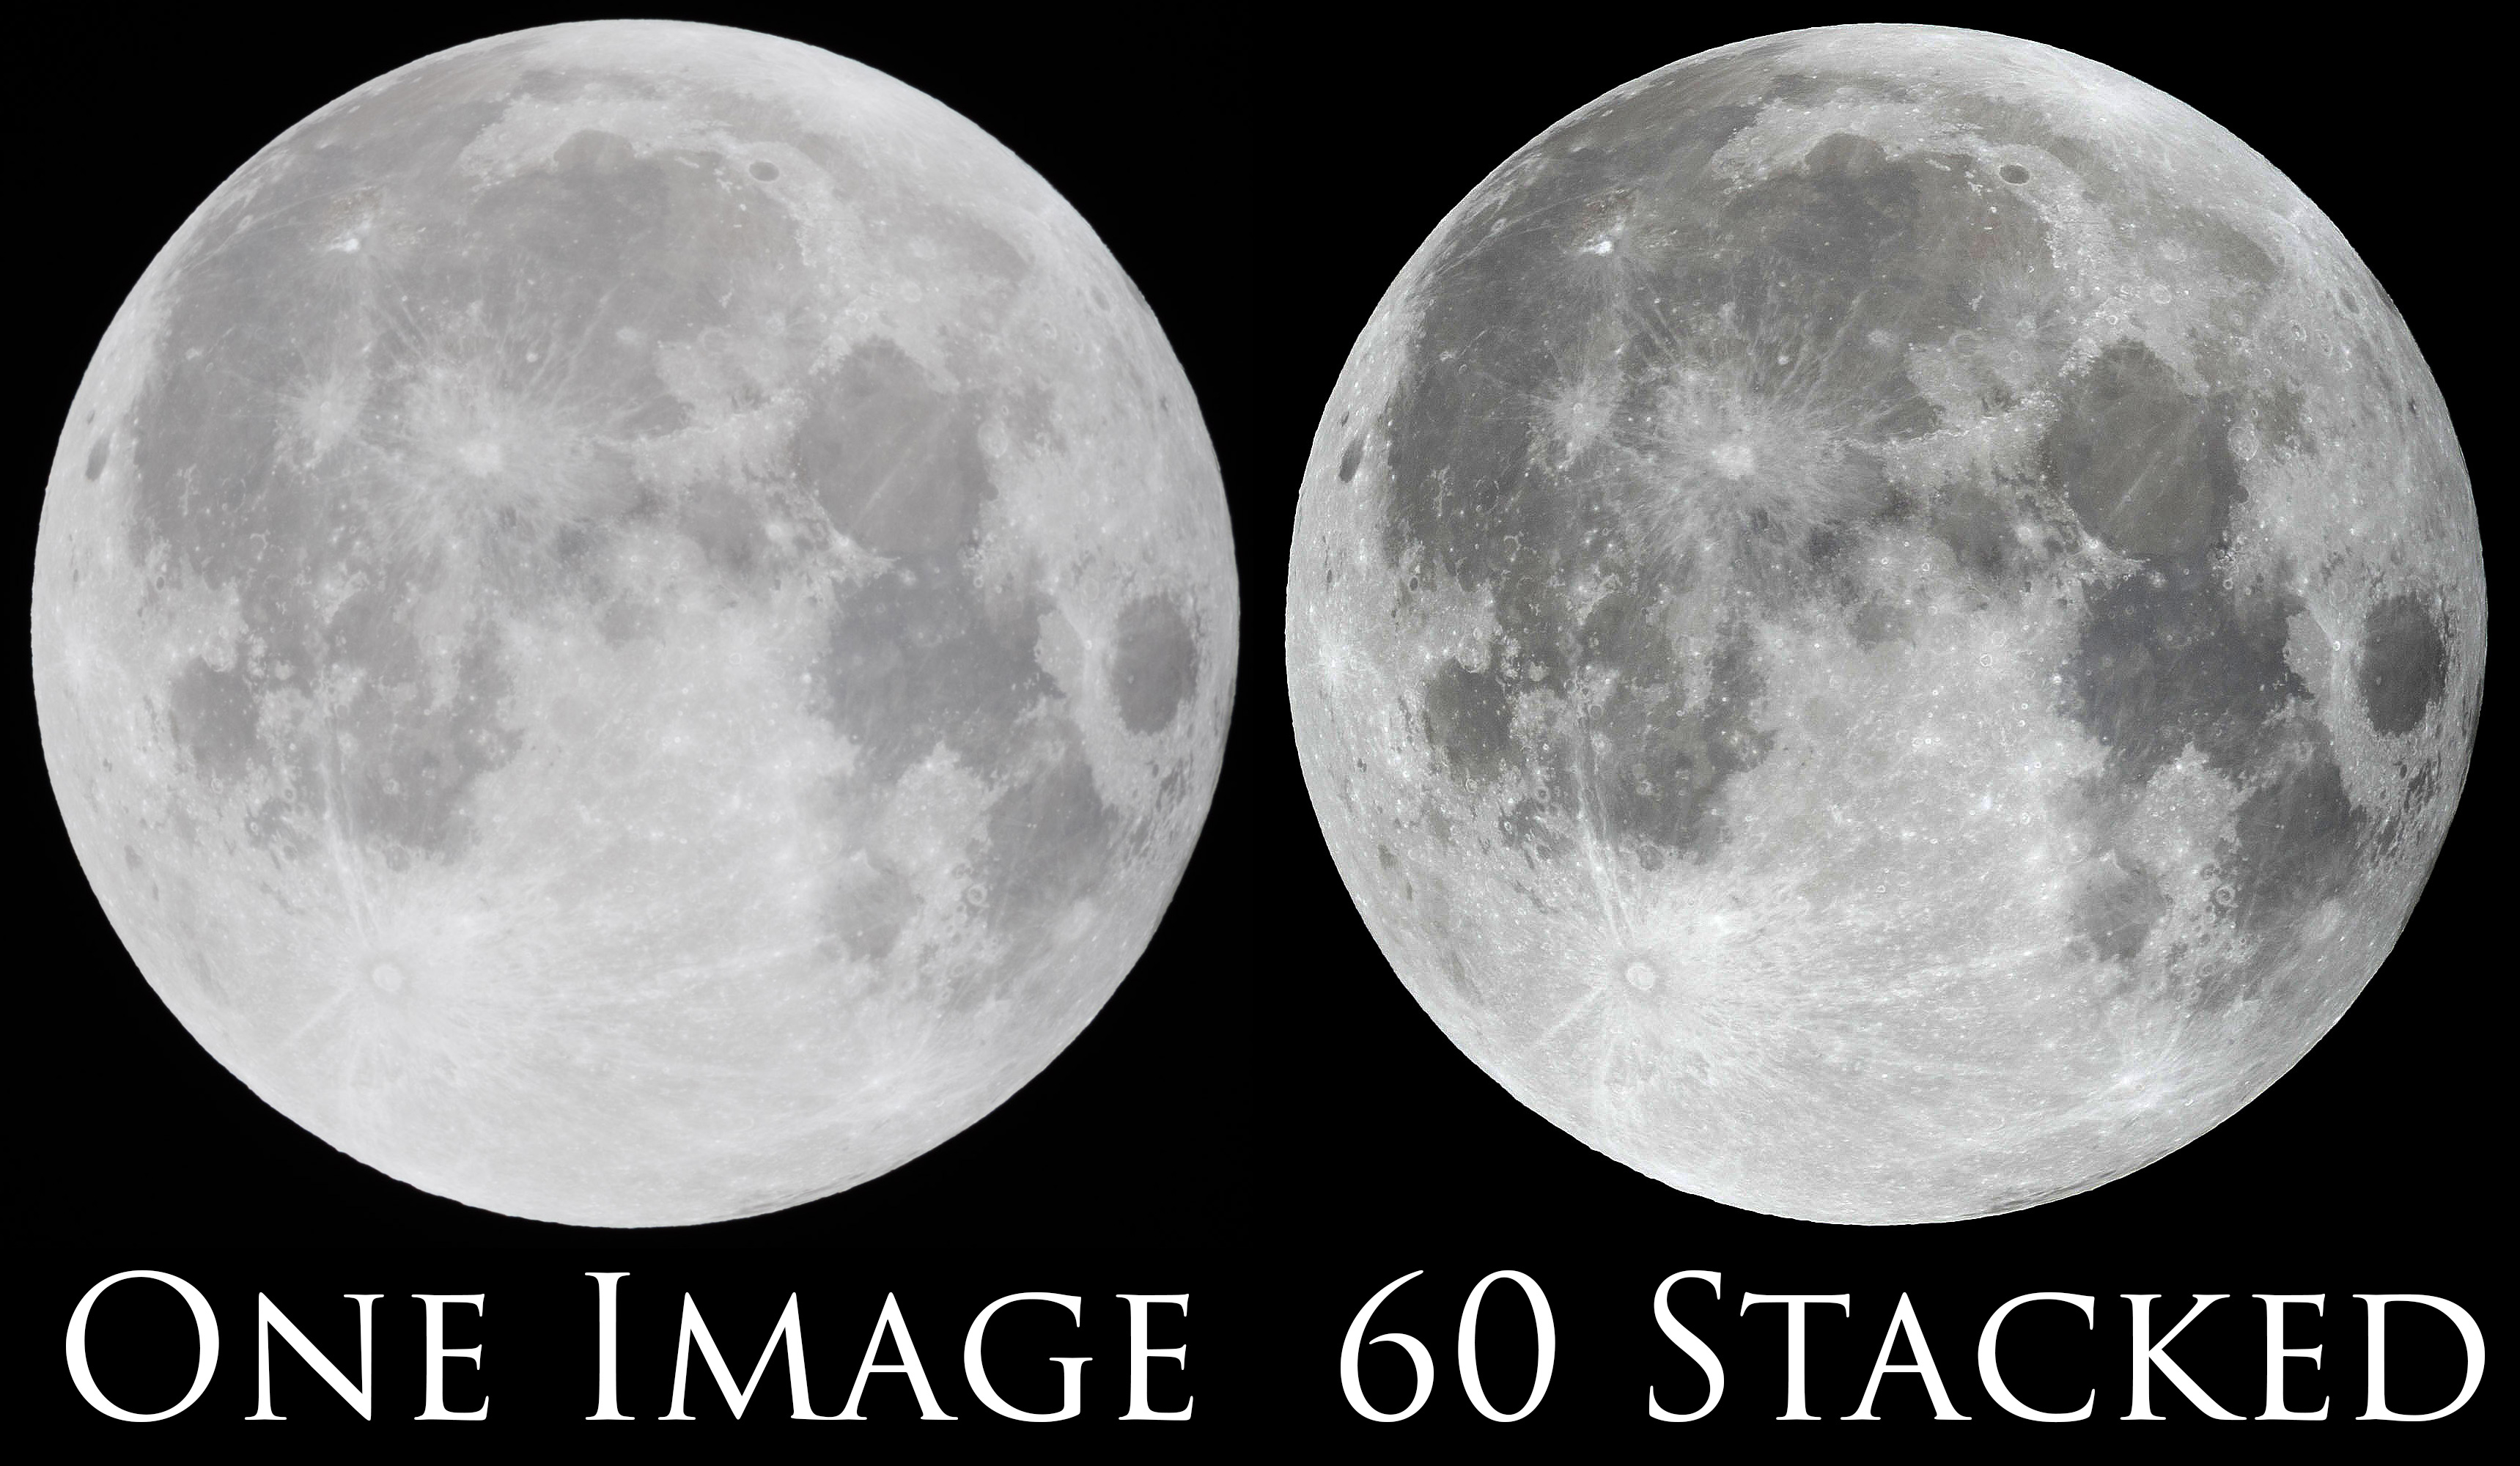
Using Stacking to Get Even Sharper
That technique will get you the sharpest single exposure. However, you can get MUCH sharper exposures by stacking multiple exposures.
To stack the exposures, follow these steps:
Take as many photos of the moon as you can. I usually take at least 100, but more is better. Here, using a tripod makes life much easier.
Import the pictures into your computer. I use Lightroom. Render 1:1 previews of the photos.
Check each image for sharpness. If any image is slightly less sharp than the others, delete it.
Crop all the images the same to reduce the picture size. The moon will have moved while you were taking the pictures, even if you used a tripod, so leave plenty of room on all sides. I usually give one of the middle pictures a generous crop, and then paste that crop into all other pictures in Lightroom. For more information, check out my Lightroom book.
Now, export those pictures to high quality JPG files.
Run Registax, and click Select. Find the folder you saved your images into, and press Ctrl+A to select them all.
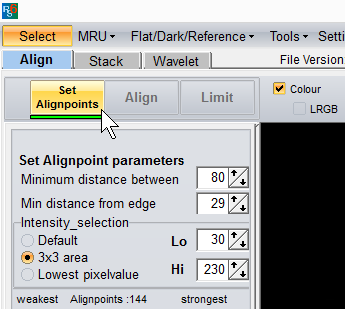
Click Set Alignpoints. This will draw some red dots on your photo.
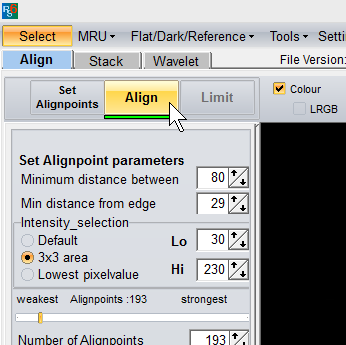
Click Align, keep your fingers crossed, and be patient because it might take a minute or two. If it stops processing and simply hangs, close Registax and repeat this process up to the previous step. Next time, click Set Alignpoints, adjust the Number Of Alignpoints slider to a lower number, click Set Alignpoints again, and try Align again. If it continues to fail, you might try selecting fewer images.
Click Limit.
Click the Stack button. Again, this requires patience and a bit of luck.
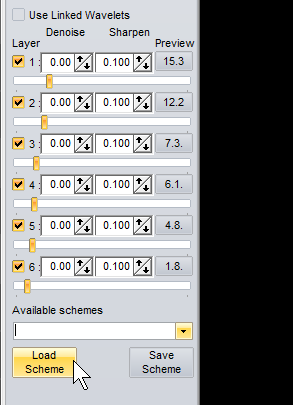
Click Wavelet. The 6 wavelet values can be adjusted deeply by those who wish to study how the software works, or you can try loading my scheme: Right-click the link and click Save As to save it to your computer, then click Load Scheme to open it.
Now, click Do All, and then Save Image. You’re done!
Registax is extremely complex software, and while it often works perfectly the first time, you sometimes need to spend extensive time troubleshooting it… and that might require going through the documentation. Good luck!
How to Photograph a Lunar Eclipse
While photographing a moon under normal conditions is challenging, it because EXTREMELY difficult to photograph during a lunar eclipse, because the moon is in the Earth’s shadow, and might be 5,000 to 100,000 times darker. You simply can’t get your images as sharp or clean, but here are some tips:
Use a tripod. A big, heavy, tripod. You need all the stability you can get.
Start with an exposure of 1/4 second, ISO 6400, and your lowest f/stop number. If you use a longer shutter speed, you can use a lower ISO. However, the moon is constantly moving. On my particular camera, I calculated that the moon traveled 2.3 pixels during the 1/4 second exposure. Therefore, slower shutter speeds will result in even greater motion blur, depending on your focal length and your camera’s pixel density.
Take HUNDREDS of photos. Many won’t be sharp, because of the combination of a slower shutter speed and a telephoto lens. Choose your sharpest images. Don’t bother to stack them in Registax. Instead, use image averaging, as I show in this video.
If you can borrow a tracking head from an astronomer, that would allow you to take a clear, long exposure at a low ISO. A tracking head could pan your camera to follow the movement of the moon.
I’ve got 2,149 clicks on our new 50 megapixel Canon 5DS-R. So, what’s life like with a 50 megapixel camera?
50 Megapixels Rules!
I always know that I’m getting the sharpest image possible out of my lens and technique. I get more sharpness out of my existing lenses, even when they’re not optically perfect.
My primes become zooms, and my zooms become deeper. I get the pixel density of an APS-C camera with all the benefits of full-frame. If my 400mm lens is a 400mm lens is a 640mm lens on my APS-C Canon 7D Mark II (with a 1.6x crop factor), it’s a 400-600mm lens on my 5DS-R, because I can choose to crop in post.
I can zoom a 1080p timelapse 550% (see the video at the top of this page).
I can increase the noise reduction in Lightroom and trade some of that detail for a cleaner image (and still be sharper than other cameras).
Even 11×14″ images are sharper. Technically the 22 megapixel 5D Mark III is 350 DPI at 11×14, but in practice, all lenses & techniques are imperfect, printed images are always cropped, anti-aliasing filters reduce sharpness. The visible DPI of an 11×14 from a 5D Mark III is closer to 250 DPI… and I like to make 20×30″ prints, and larger. At that size, the 5D Mark III is at about 140 visible DPI, while the 5DS-R is above 200 visible DPI.
50 Megapixels Sucks!
The CR2 raw files are 55-75 MB each. Converted to DNGs, they’re 45-60 MB each.
Flaws in my technique become obvious. The reciprocal rule works OK for a 24 megapixel camera, but at 50 megapixels, I need a faster shutter.
Even on a tripod, I benefit from mirror lockup and a heavy tripod. As a result, I’m now more often using (and carrying) a tripod.
Lightroom will take 2-3 hours to import and render previews for the raw shots from a typical wedding.
Switching between pictures in Lightroom takes 2-5 seconds, even with 1:1 previews rendered.
Working with multiple images is exponentionally more painful. I wrote this entire article while waiting for Photoshop to blend about 25 images (median averaging to remove people from a scene), and my PC is the fastest you can get.
Basically, all intense processing requires planning. You’ll be saying things like, “I’ll start processing this panorama before I leave for lunch.” and “I’ll be in bed in a minute, I just have to start rendering these 1:1 previews.”
To be clear: 50 megapixel images always look better than the lower resolution images, even when technique isn’t perfect. But it does make your technique flaws more obvious, and no matter your budget, you simply cannot buy a computer that can process the images at a reasonable pace.


