Posted on

Beginner Photography: The Right Light

Hey folks. This weeks topic is “the right light”, which is pretty open to interpretation. What makes the perfect light is different for every subject. The perfect light for a portrait is different than the perfect light for landscapes which is different than the perfect light for a still life, etc. What I focused on was the perfect light to make a shot worth capturing. The right light can transform everyday subjects into something that captures your attention and draws the eye. Obviously, photography doesn’t exist without light and being able to manipulate light to properly expose an image. But sometimes light itself can be your focal point, be it a well-placed sun or backlighting used to create interesting shadows. I went out shooting yesterday with some ideas in mind, but some of the images below are older shots where the light just made it.

Capturing the perfect light can take planning; setting up lights for a portrait shoot or waiting for the golden hour for landscapes. The Photographer’s Ephemeris is a great resource to plan your shots around natural light. Often times, though, it’s just being in the right place at the right time and paying attention.

I took this shot almost exactly a year ago, and when looking through my photos it caught my eye. Tony is backlit and the light is perfectly illuminating the snow globe, which is reflected in Tony’s glasses.

Peep that “Stay Focused” shirt

This shot was taken at a wedding I was second-shooter for a few weeks back. The wedding dress was hung in front of a window, backlit to illuminate the shape and texture of the dress.

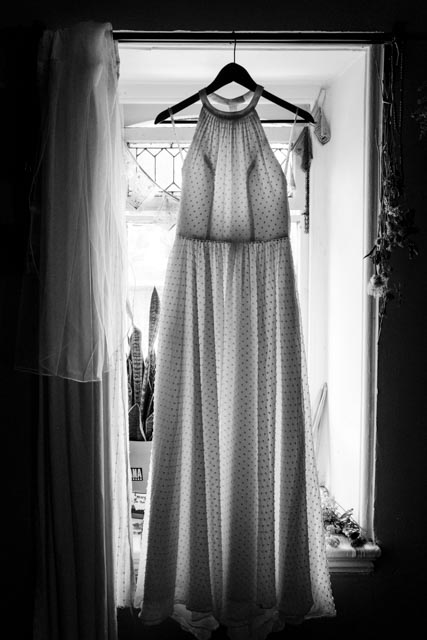
Note that so far, all of these are black and white shots. Black and white helps to focus your gaze, highlighting the shape and texture of your subject and making the light and shadow the focus. 

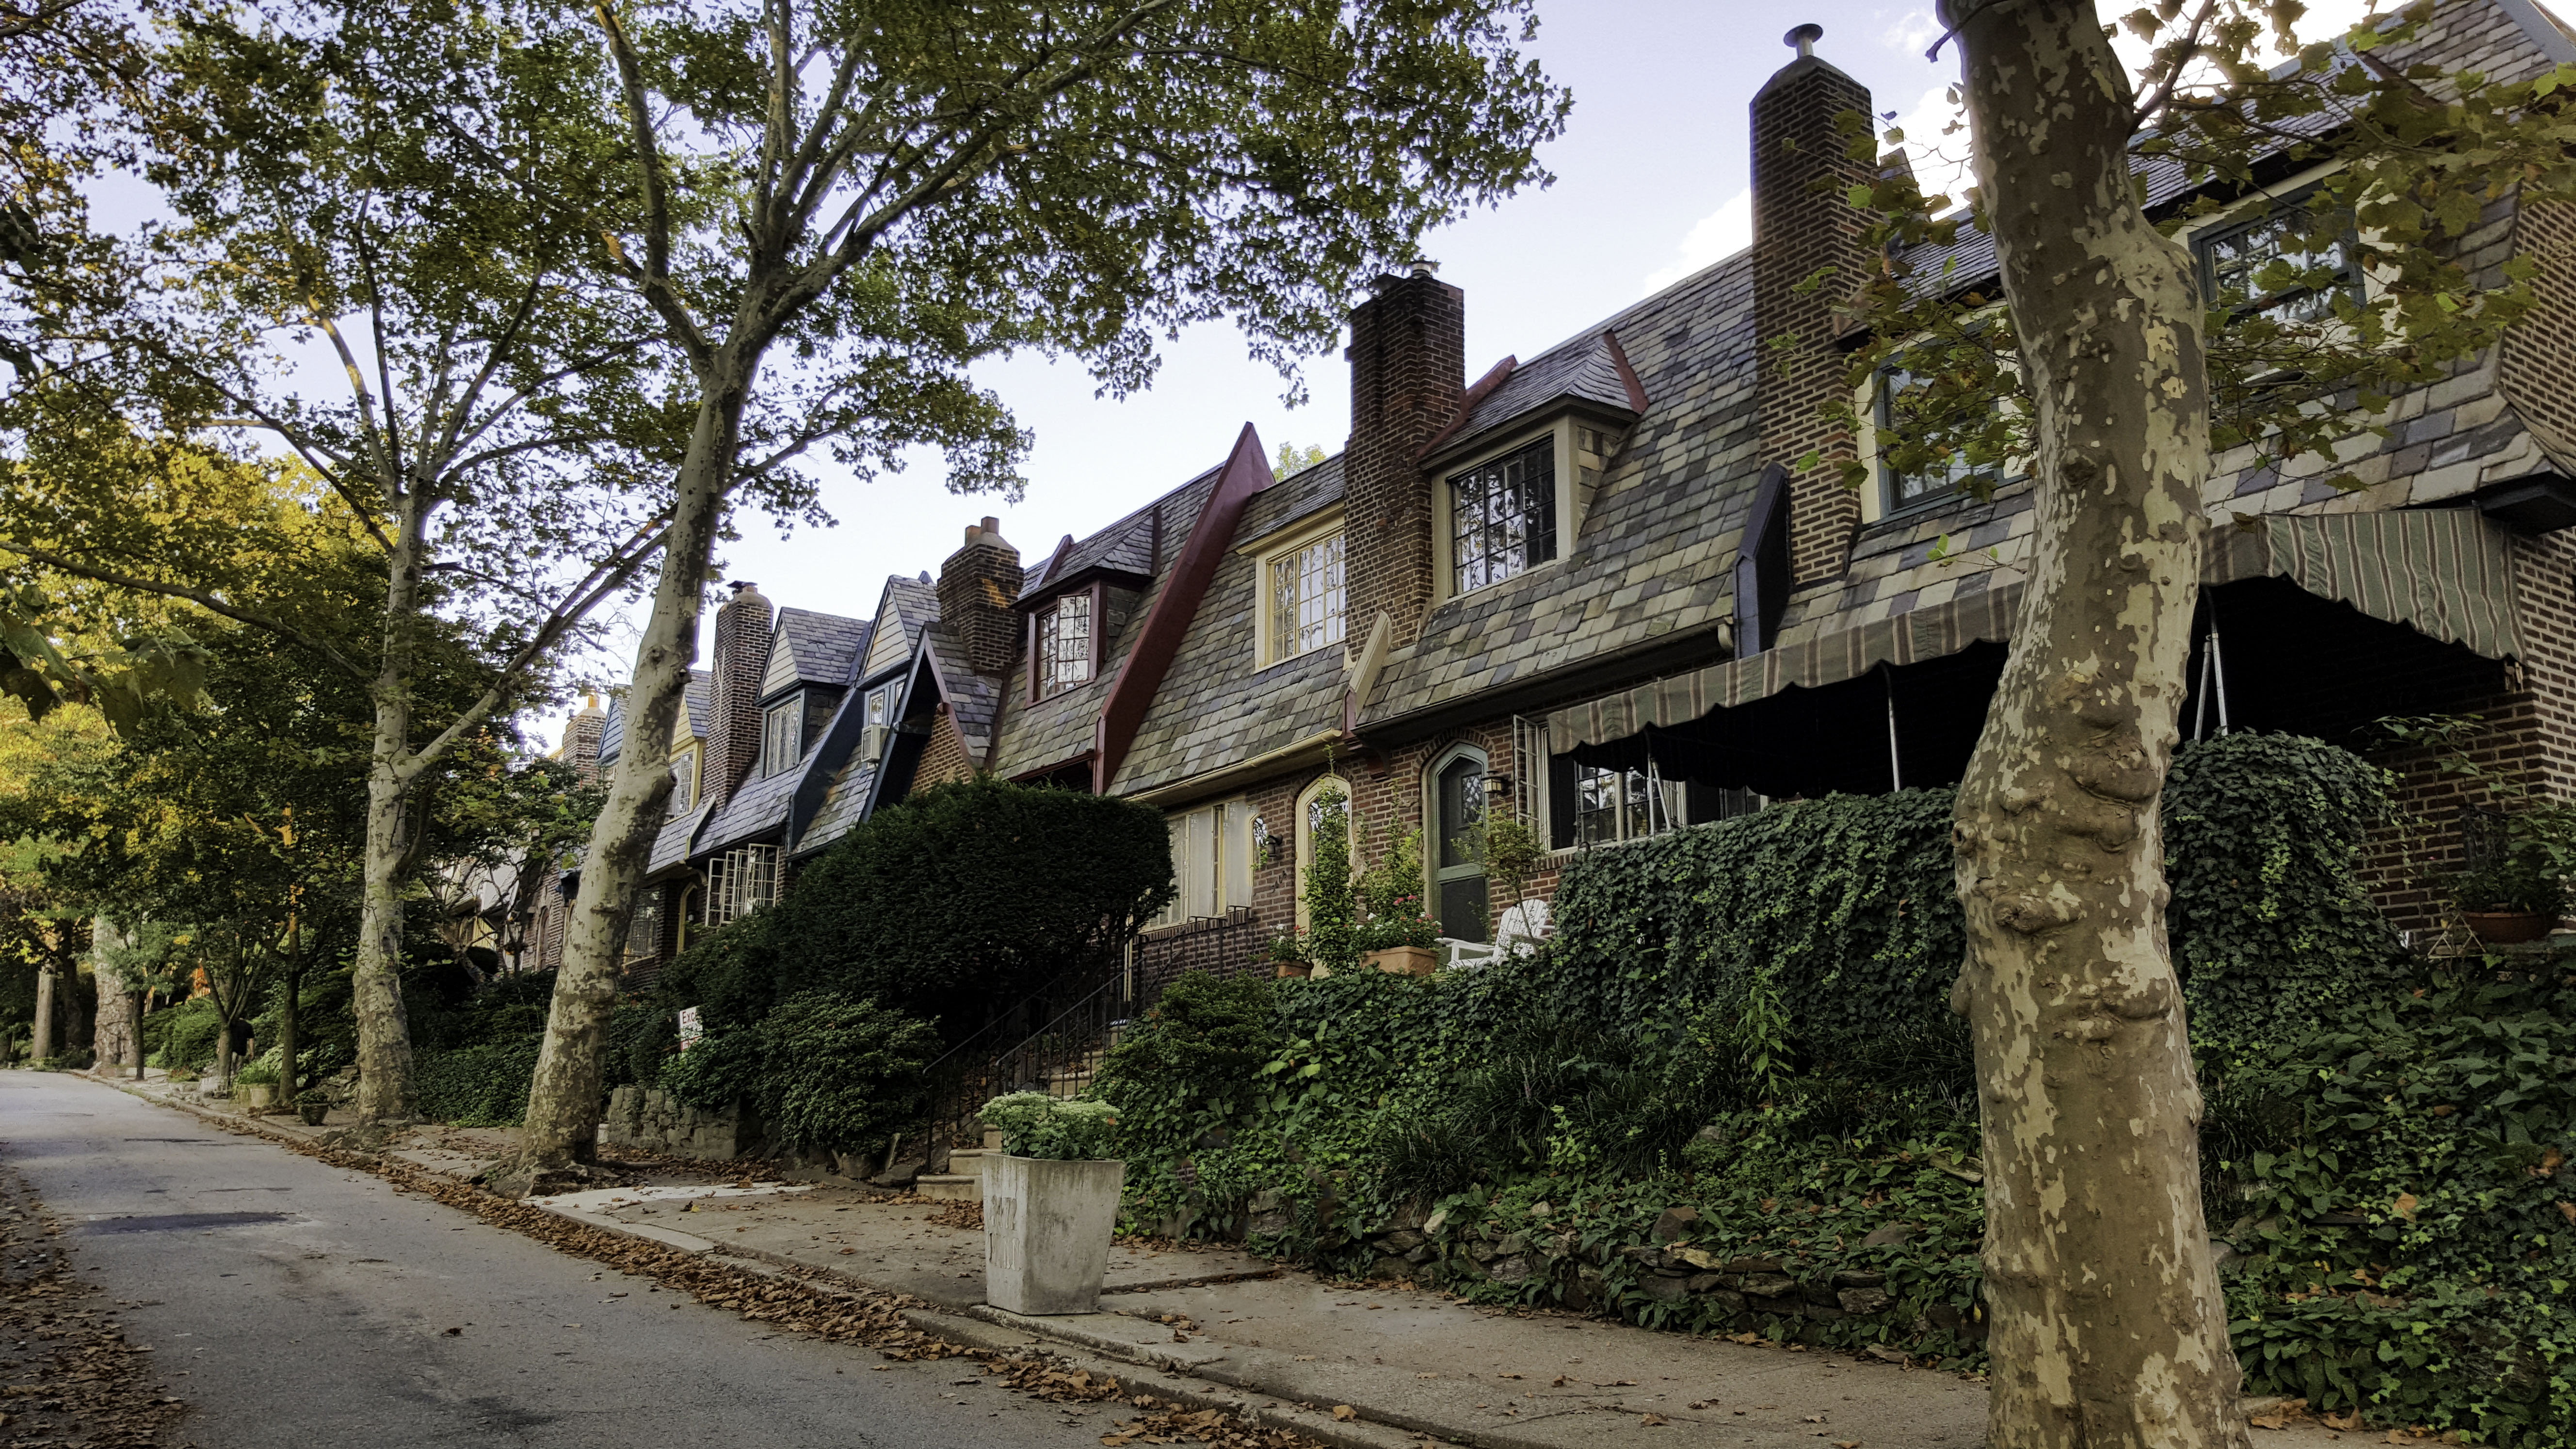
I took this of the shadows on our front porch. I’d taken shots of it before, but without the right light I could only capture the heart cut-outs and the vines, not the repetitive shadows on the ground. 


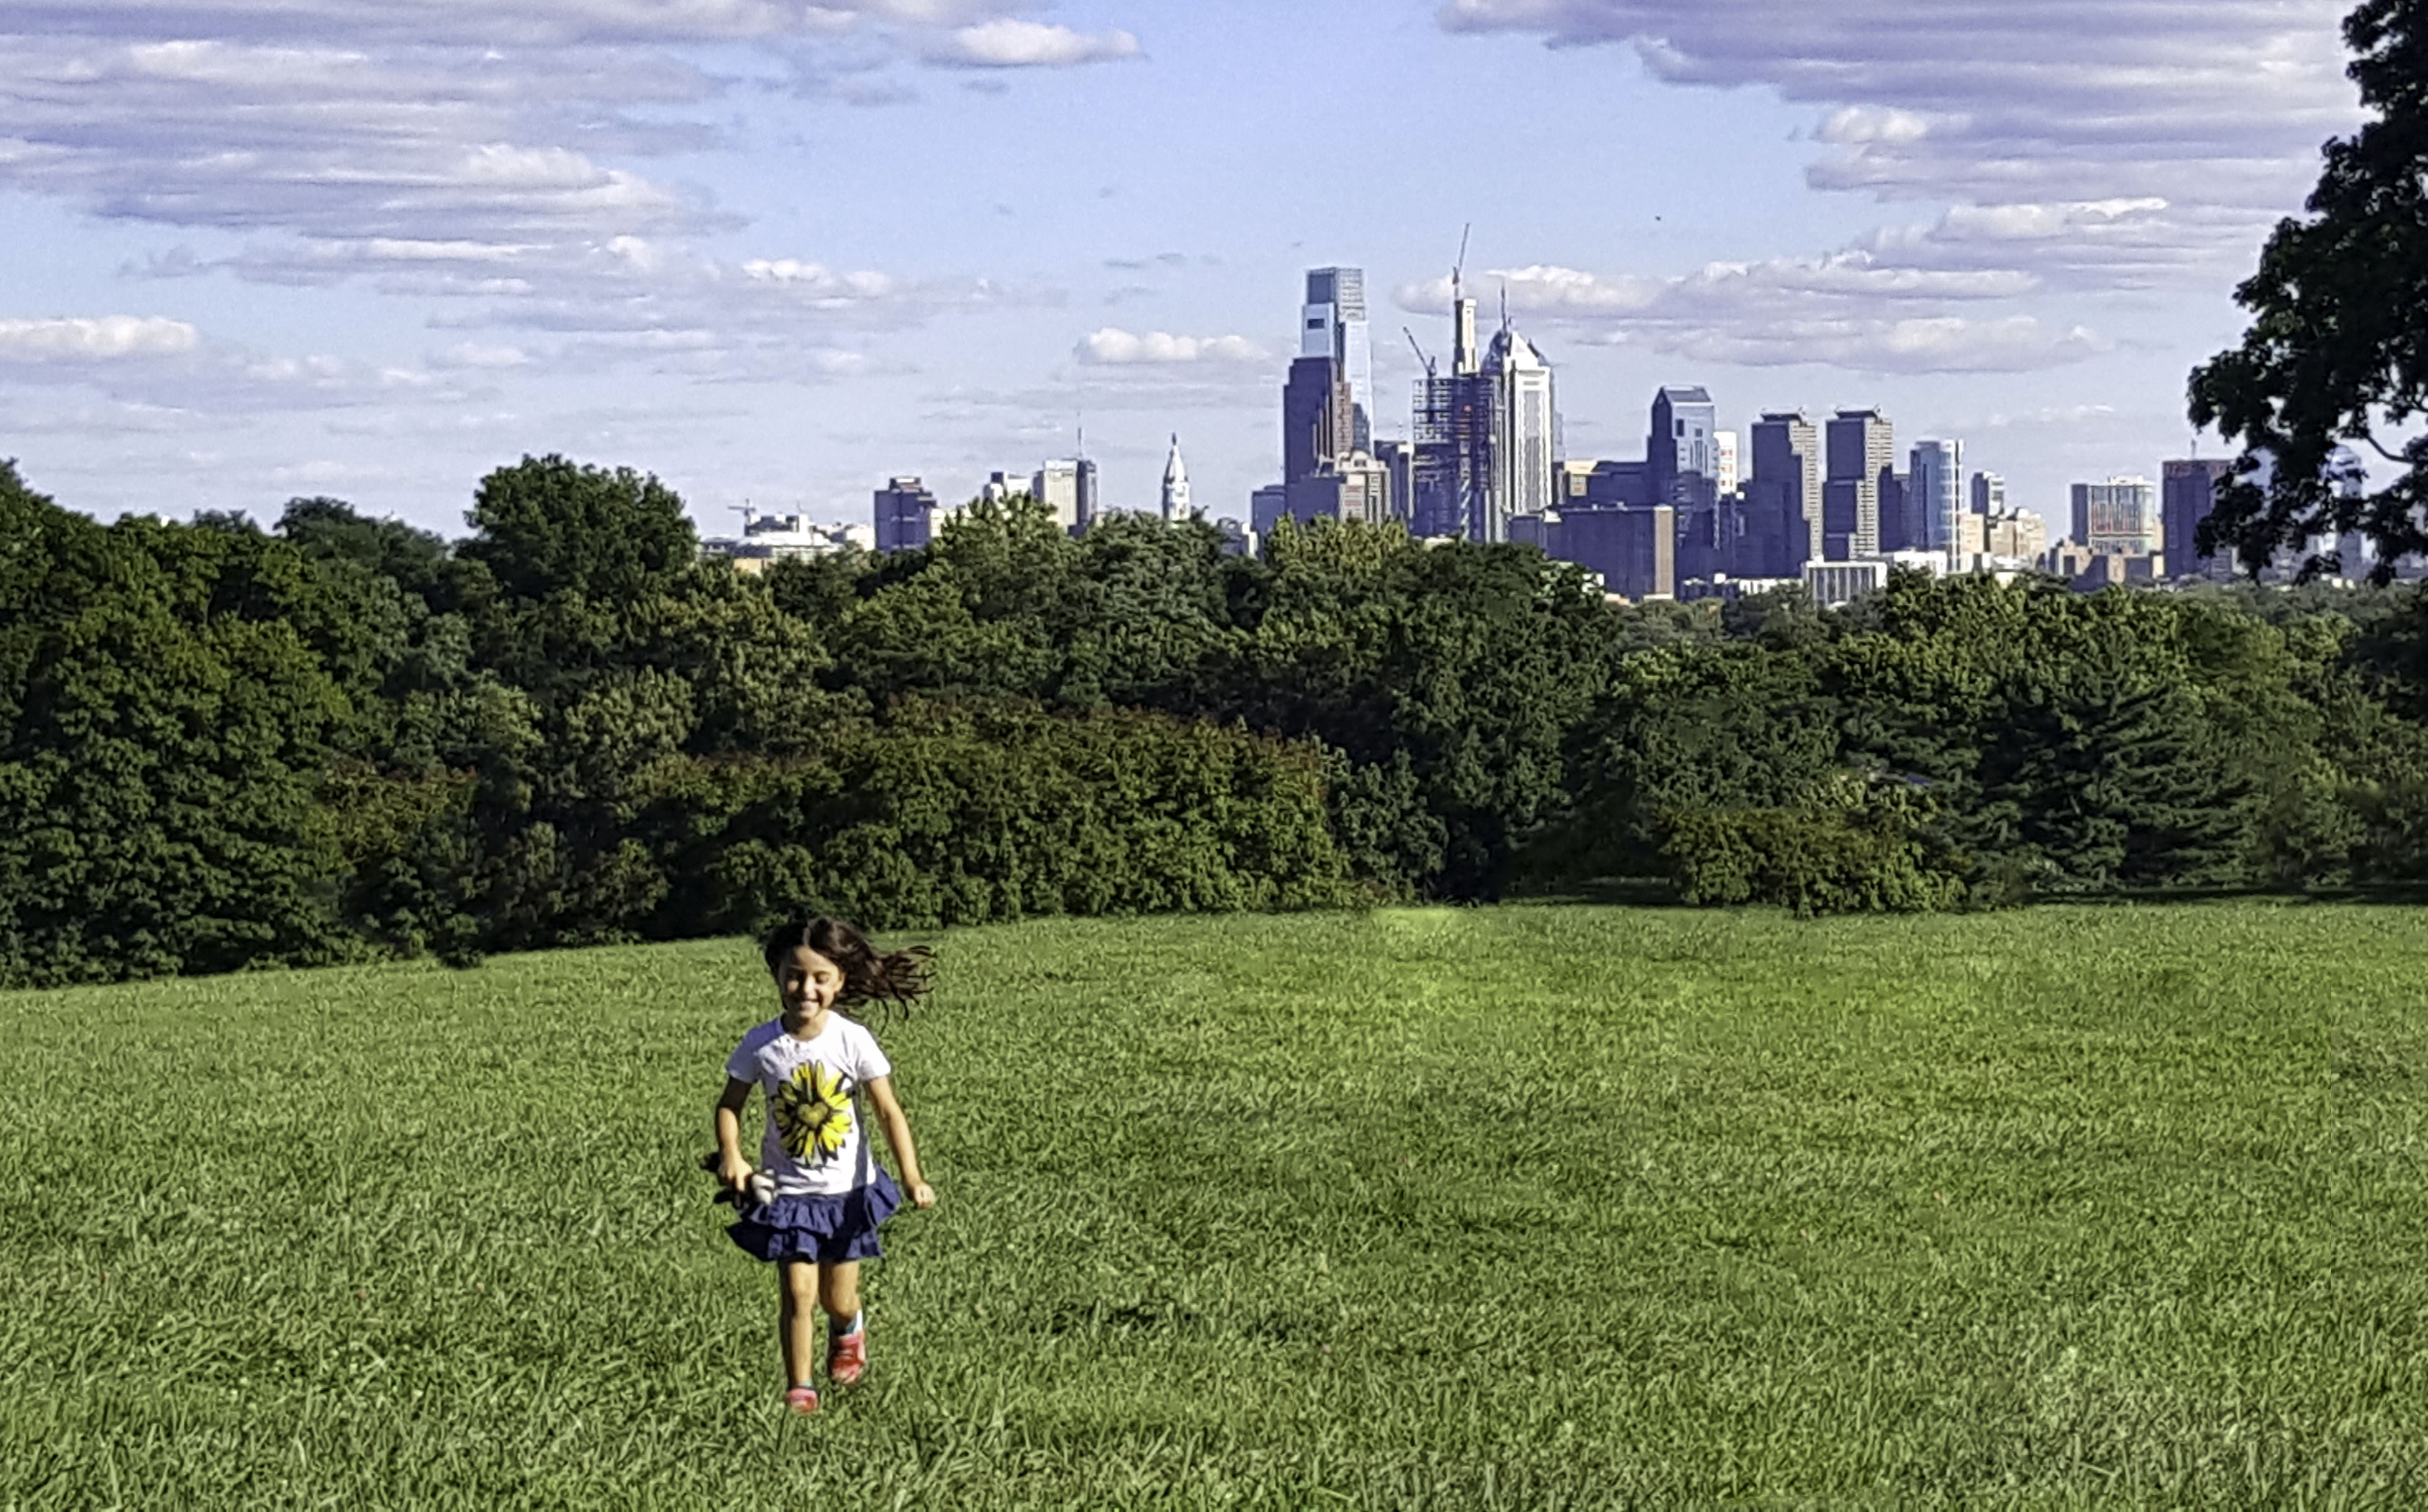
This I took yesterday when I went out looking. I knew that in our local park there were a few trees with yellow leaves still clinging on. I positioned the sun behind it so that the leaves would light up.


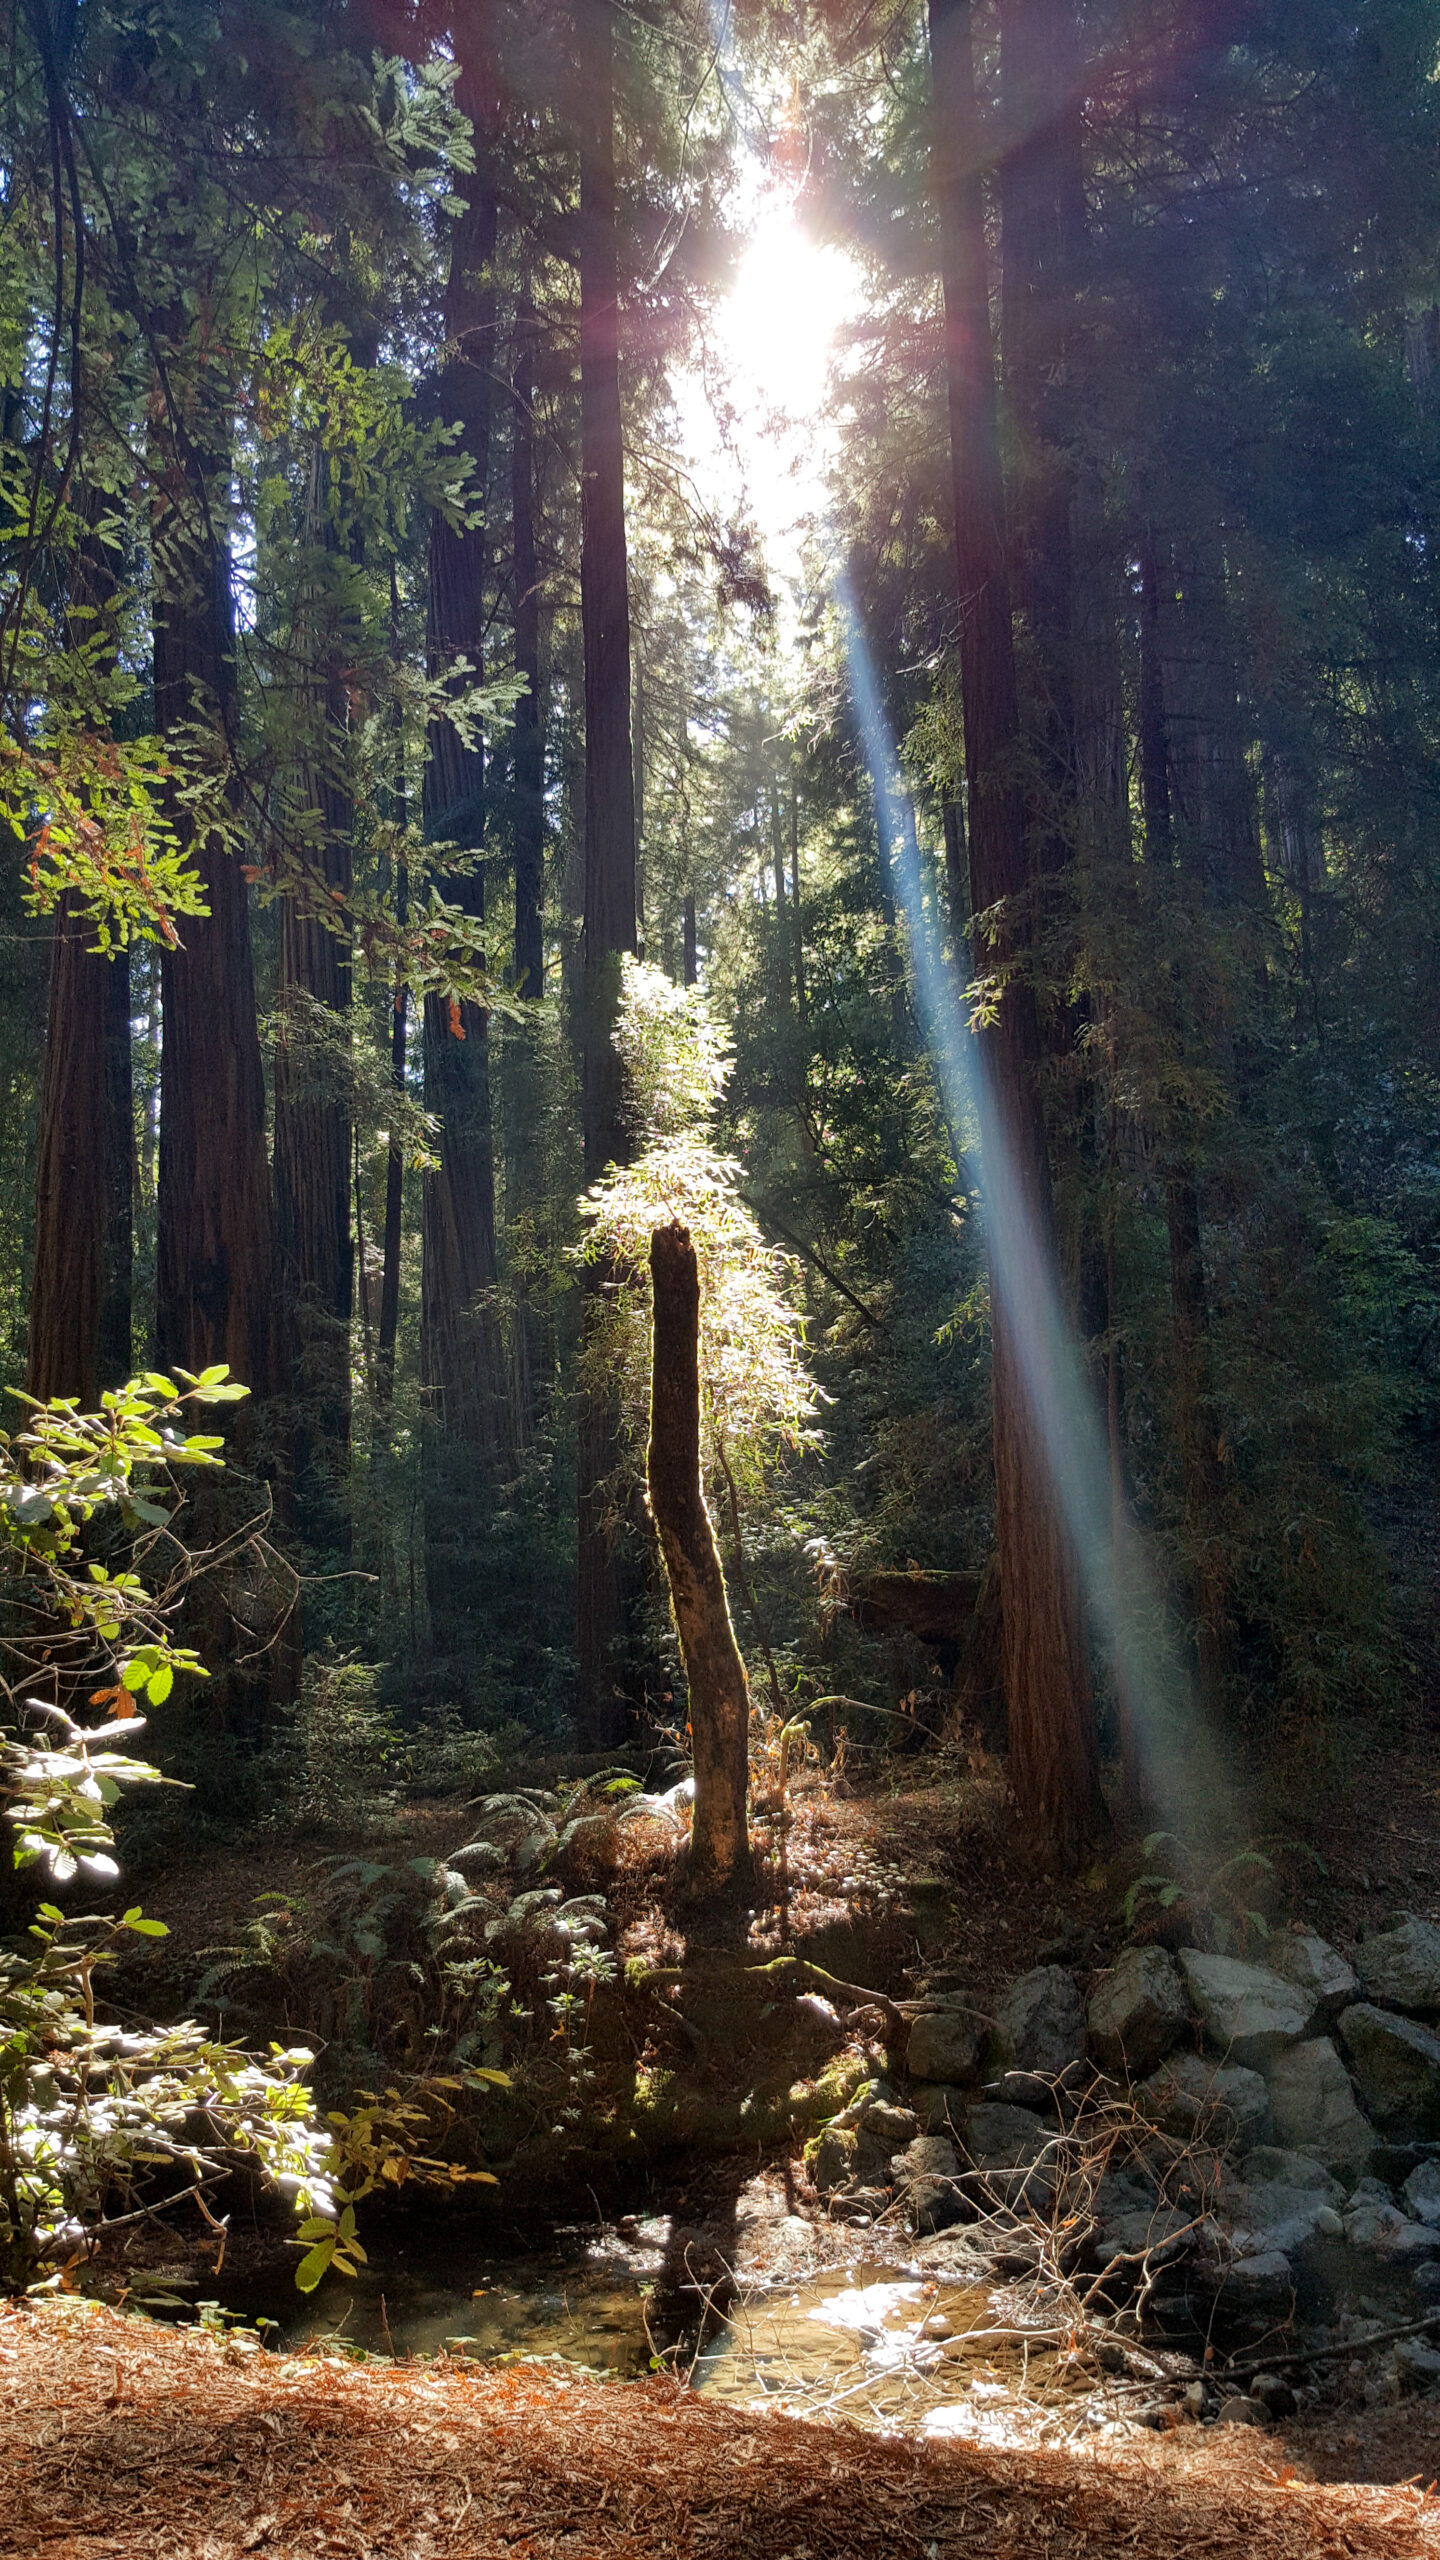
And this one I’ve posted before, but it is easily one of my best images. And captured with my cell phone! The light is breaking through the trees, perfectly illuminating a lone trunk and casting it’s shadow off-frame.

Those are my picks for the week, I can’t wait to see all of yours tomorrow. What are your tricks for capturing the best light?

Posted on

Beginner Photography: Architecture

Hey folks! This week we’re tackling architectural photography. I have to admit, I wasn’t sure the difference between architectural photography and real estate photography. For our purposes here, there really isn’t much of one. The difference between the two mostly has to do with its purpose and marketability. While real estate photography is meant to be temporary (it is only intended to sell real estate and must be up-to-date,) architectural photography can be timeless. It is meant to capture the essence and aesthetic sensibilities of a structure and show them in it’s best light (often literally.) You can see one of Tony’s videos on shooting architecture here, which I watched before going out shooting.

I certainly didn’t have any light set-up while I walked around my neighborhood, and I didn’t have any fancy gear like tilt-shift lenses. But I had the late-day sun and bracketing, so I worked with that. I use an Olympus E-M10 with a Lumix 14-42mm 3.5-5.6 lens, not the ideal set up for architecture, but it’s what I’ve got. I shot with a high f/stop and bracketed my shots. I then merged them in Lightroom (you’ll for sure see some chromatic aberrations in the trees from the process. I’m not that advanced yet!) Tony suggests using Photomatix if you can, it makes the HDR process pretty seamless.

Alright, enough talk, here’s what I wound up with:

Look! HDR doesn’t have to be gaudy!

I used a graduated filter to bring up the exposure on the house but leave the sky untouched

There seems to be a lot of chromatic aberration in this one, unfortunately.

Black and white was the way to go for the beautiful light and shape of these posts

Ah, this one I want to like, but I can’t seem to get the crop right. What would you do?

I’m in love with my neighborhood and had been meaning to photograph it for a while, so I have a feeling I’ll try more architectural photography over time. I want to capture the beauty that I see here every day.

So those are just a few of literal dozens I took this week. What do you think? Where was I successful and where did they fall flat? 

A reminder that this week our show is on Wednesday at 1pm EST! See you there.


Posted on

Beginner Photography: Wildlife

Hahahahhaha oh man you guys, wildlife photography is not something you can just take up for a day. This stuff is serious. If you want actual, helpful wildlife tips, please visit this page of our site and learn from a real photographer, because what will follow here is just tomfoolery. 

I do not blame myself for my failure this week. Wildlife photography takes the proper gear, knowledge, and lots of time and patience. I have literally none of those things. Not to mention, it’s Autumn in a city. All we’ve got are squirrels.

To take proper wildlife shots, it helps to have a lens with reach, so you can take close shots without actually getting close. You also need a spot where you can sit still and let animals get acclimated to your presence, camouflage and a bird blind would help you blend in and get closer. If shooting birds, choose a background and wait for them to come to you. Keep shooting the same spot until a bird comes into the space. A flowering tree and direct sunlight makes for a great setting.

So here’s what I attempted (and failed) to do:

  • lure wildlife into my backyard with bread (my dog ate most of it)
  • go to a park and stalk squirrels
  • walk around my neighborhood hitting up all the best gardens hoping to catch birds

So birds, smartly, avoid my yard. I have a big dumb dog. If I go out back and let him out, he scares everything away. If I don’t let him out, he whines and barks at the door, scaring everything away. So my baiting was a bust.

Next I went to the closest park. There were plenty of squirrels running around, but the adjective “squirrelly” exists for a reason. I generally shoot in aperture priority, but that seemed like a bad call with this fast of a target, so I switched over to shutter priority. That… didn’t work either. I wound up with VERY dark pictures of squirrels in trees. So then I just shot in automatic. Here’s the result:

Sigh. A blurry head and a sharp tail.

You guys. That is actually the best photo I got out of, I dunno, 50? I went home dejected, scanning gardens on the way. 

Right by the steps up to our porch we have a butterfly bush, which two weeks ago might have gotten me shots of a monarch butterfly or two before they migrated. As it was, though, I was left with some bees.

Not great, it’s not facing me so I didn’t get the eye in focus

Once again. Got that butt though.

I like that I got it cleaning it’s antenna, but I seem to have focused on the back leg

So all in all, the bees were my most successful attempt, and those probably count as macro. I certainly don’t have the equipment for that either, but they made a far better subject than the squirrels. I also had a great backdrop in the butterfly bush and direct overhead lighting.

Bonus: here’s a picture of my cat, indoor wildlife.

Hi Frank!

Posted on

Beginner Photography: Street

Hey y’all. Here’s the second of my two-parter of my trip to San Francisco. I went knowing that the topic of street photography would be covered a few weeks later, so I made it a point to take some shots I wouldn’t normally. I’ve been shooting with the Olympus E-M10 and a Lumix 14-42mm 3.5-5.6 which is a good, discreet little set up for street shots. The screen in the back flips out, so you can take shots without looking like you are.

Street photography is a very loose concept. All it needs to entail is a person and the space they exist in. It is often candid, but street portraits are also a subset of street photography. (Street portraits take a boldness I don’t quite have yet, but maybe I’ll tackle that another time.) Now, the fact that street photography is vague doesn’t mean it’s easy. It takes a lot of consideration to bring a photo of people from a snapshot to an image of interest. Here are a few ways to do that.

First: Backdrop

I found that scouting out a good backdrop and sitting at an outdoor cafe was a good way to stealthily get shots of passers-by, like this one:

I had a hard time getting people’s faces in focus. I was more concerned about not getting spotted when I started out, but got more bold as I went.

You can take photos of your backdrop before a person walks into frame, and then just keep shooting once they walk past. Most of the time they won’t notice you’re shooting at all, or if they do and pause to not walk into their shot, you can just wave them through. 

Second: Interaction 

One thing that makes people an interesting subject is their interactions with each other. Try to capture a moment between people, be it a simple conversation or a touch.

My next spot was at the beach. Everyone takes pictures at the beach! And I was so obviously a tourist, wearing a leather jacket and jeans, carrying a camera. This time I took a ton of shots, and did better with my focusing.

So many great looking surfers

That can also mean interaction with you, the photographer. If your subject notices you shooting and you still feel comfortable doing so, keep shooting! That connection can make your photo.

I wanted a picture of the van, but got these guys instead

This was shot with my phone, but I loved her expression and the fact that the man she’s interacting with doesn’t seem to notice.

Third: Light, Shadow, Shape

These are what make compelling images in any genre. Interesting light, the play of shadows and leading lines draw the eye where you want it to go in the frame.

It wasn’t until going through my photos afterwards that I realized how many were facing the sun, which means I got a lot of silhouettes and shadows

I loved the line in the sand bringing you to the fisherman and his fishing rod leading off frame


I feel pretty good about this. Some feel a bit more landscape than street, because I took a lot of distance shots instead of getting in their space, but I think I’ll do better with that the more I practice. I had a lot of fun shooting street shots, I wasn’t sure I would. I need to practice on nailing focus and getting in closer, but I think this is a good start. 

What other tips do you have for shooting street shots? What makes a street shot compelling to you?

Our live show this week will be with street photographer Andy Shields, whose work I love. He does amazing things with street photography. You can read his beginner blog post here and make sure to tune into the show on Thursday at sdp.io/live.

Posted on

Beginner Photography: Travel

Hey friends! This weekend I got to do a whirlwind weekend in San Francisco for my friends wedding. This will essentially be a two-part post, since next week’s topic is street photography and I did quite a bit of that while I was there (get ready to see some surfers)!

This was my first time on the west coast, so there was a lot to capture. We stayed by the beach in a great, diverse little neighborhood. I also got to go out to the Muir Woods and hike among the redwoods. I hope I can do them some justice! I pulled a total rookie move and forgot to bring my Olympus battery charger. My camera made it through to the last day, halfway through my hike. Luckily I had my phone with me still, and wound up getting some of my better pictures with that.

I wish I’d taken some more time to just go out and shoot, but it was an action-packed weekend and I wasn’t about to take time away from friends and events to take pictures. I hope I can go back and spend some more time in the future, there’s a lot more I wanted to capture.

There was a lot of great street art and signage in the neighborhood


There’s that distant SF fog


This needs some editing, the exposure on her doesn’t seem right

The water was so cold, these men are insane


I got this shot with my phone after my camera died

So those are some of my faves! I did minimal editing to them all to adjust exposure and make sure I had black and white points in each photo, as well as some cropping and straightening. I hope I captured the feel of the area (let me know, Kyle Wolfe)!

Help me out here, how’d I do? What would you change/add/leave out from these shots?


Posted on

Beginner Photography- Dogs!

Hello friends! As you know we don’t have a live show this week since T&C will be in Germany for Photokina! So I spent the week getting used to my little Olympus E-M10. I’m really enjoying this thing. I just shot whatever caught my eye around the house and tried to get used to all the buttons and dials. 

Yesterday was hazy and grey, but it made for some good light, so I followed my dog into the back yard to get some shots. He is not the most patient model. I did my best with a fast shutter speed and a liberal sprinkling of dog treats and “sit” commands to get what I could. And most of all, I took lots of shots. Here’s what I came up with.

f/3.5, 1/80th of a second, ISO 200

Meet Hungry! Shot at 1/80th of a second, f/3.5, ISO 200.


Same settings, handsomest boy.


Can you spot all my sloppy cloning and patching? 


I’m pretty proud of these, but I might be biased. He’s definitely a one-note model, we really need to work on his expression. 

Black dogs are hard to photography because they just seem to swallow light, luckily he has some brown mixed in, so I think I was able to show some detail in his fur. The yard is a bit distracting, so I had to clone out some random things, and went black and white on a few of my edits to simplify. I did basic edits in Lightroom, adjusting the exposure based on my histogram to make sure I had some white points and black points. Then I brought them into Photoshop and used the content-aware-fill tool to get rid of some distracting twigs and backyard clutter. 

We did a live show on dog photography with our wonderfully talented friend Erkki Alvenmod a few months back that I found helpful, you might too! Have you photographed pets? What are your tips? 


Posted on

Beginner Photography: Cars

Hey guys! I don’t know anything about cars, but I know that my Honda Accord wouldn’t cut it for a compelling photo. So I did what every socially anxious lady in a city wants to do, walked around my neighborhood looking for aesthetically pleasing cars and hoping no one thought I was a stalker.

Oh! And I have a real camera to use. T&C sent me an Olympus E-M10 with a little Lumix 14-42mm lens. It is such a cute, manageable little camera, I look forward to shooting with it more.

Thankfully T&C have a video on shooting at a car show, which was helpful for shooting in the busy environment of a city street. You can watch that tutorial here. I used a low aperture to focus close and blur my background, focused on interesting shapes and forms, and went black and white when I needed to declutter the background. Here’s what I came up with!

p9110009final

I did some basic edits to adjust the exposure and converted it to B&W to keep focus on the car and not on the background


Something about this shot doesn’t quite do it for me. The shapes are nice, I like the shadows on the hood, but it’s not quite compelling enough.


This one strikes me a little better, but maybe I just don’t like cars?


I missed focus on the Mustang logo, but I liked this license plate repping my neighborhood


I wish I had a bit more subject matter to work with, I would have loved to find a car with interesting colors, or to be able to shoot an interior. I think I did okay with what I had though. Next time I’ll have to try out some HDR or bone up on my post processing skills to really make these pop.

I could try to shoot in harder light to get more shine off the cars, I went out at the golden hour, which is good for most things, but not cars! You want that gleam. I could have also taken a bit more risk, getting lower and closer to shoot at better angles, and from the street to get different backgrounds. I was a little tentative about looking like a weirdo in my neighborhood. But do what you can to get the best shot!

I’m going to watch the tutorial for my camera again to master my settings. I used touch to focus on the live view screen, but I wish I’d been able to focus more accurately.

How’d I do? What could I have done differently? Let me know in the comments below. See you for the live show on cars this week!

Posted on

Beginner Photography: Still Life

YOU GUYS, photography is hard. This subject broke me. We don’t have a live show this week to base my blog off of, so I decided to do something “easy”, still life. Here’s a great video Chelsea made to teach you the basics:

I was sick this weekend and leaving the house was an impossibility, so I thought “hey, I have stuff! I can just do a still life!” But no. I think this project broke me.

We have no shortage of interesting looking objects in my house, and a ton that are meaningful, so that part didn’t seem so hard. What was hard was finding a backdrop and lighting. First I tried putting everything on a leather chair. But nope! Everything was slanted and cramped. 

SAM_0020

Dark! Cramped!


Then I put everything on my dining room table, but that’s just silly because the background is a wall or my kid’s toys or the kitchen.

SAM_0036

No, Siobhan. Why? So dark. Such hard overhead light.


Then, in a last ditch effort I used by bedroom rug, with a duvet as the backdrop. The lighting was better, natural light off to the left, dim lamp to the right, but the backdrop became the bane of my existence. It was so wrinkly. SO WRINKLY. I swapped out some of my original objects to a few that wouldn’t swallow the light (that dark wood and dark metal weren’t doing me any favors) and added some flowers and feathers to add a leading line back to the globe. But then I spent well over an hour trying to blur/smooth/blend the background so that it wouldn’t look so distractingly wrinkled. To no avail. So here, friends, is me giving up:

SAM_0057FINAL

I just… ugh. I can’t even.

So there you have it: some old dirty stuff that represents my family? I’m sorry guys. Oof.

Posted on

Beginner Photography: Adventure

Hey guys! The topic for this weeks upcoming live show is “Adventure,” which is a pretty broad topic. I was trying to think of what I could shoot this week to fit the theme, as I don’t get a whole lot of adventure in my day-to-day life. It just so happened that we were headed to my brother-in-laws for a family party over the weekend and my focus changed. Instead of shooting something adventurous for me, I got to shoot the adventure of being children.

I am lucky to have an adorable child and equally adorable nieces and nephews. They spent the day splashing in kiddie pools, sliding down plastic slides and (my daughter’s favorite) jumping in a bouncy house.

While I did just borrow a cute little Samsung WB1100F from my stepdaughter, I hadn’t thought to bring it with me. So as always, these are shot on my Samsung Note 5 smartphone.

20160827_172958FINAL

The lighting and the color of this photo just screamed “summer” to me


20160827_175105FINAL

The movement and expressions make this one a favorite.


final-175039And another of this cool baby in B&W to focus the image on her and not the distracting, bright pool in the back. 


finalornage-2

The backlighting caused me to lose some detail in their faces, but I dodged them a bit to make up for it.


I spent some time with these images in Lightroom and Photoshop, adjusting the exposure, cropping and straightening. I feel good about these. While the detail isn’t there, the colors, lighting and action make up for it. I think I captured the mood and joy of the scenes, which is what I hope for!

What would you do differently? How can I improve? Comment down below!

Posted on

Beginner Photography: Landscapes

Phew. Guys, landscapes. I can tell you right now that this is not my bag, for a number of reasons. 1) I live in Philadelphia. There are very few landscapes that won’t include people, cars, or trash. 2) I find landscapes boring (not yours! Yours are great) and 3) my camera phone is not made for them. All that to say, this week feels like an epic failure.

To make compelling landscapes you should have most of these things: large depth of field, interesting foreground or background, a focal point, interesting light, and leading lines. Since I have no control of my camera settings with my phone, I couldn’t control my depth of field or shutter speed, so all I could really do was with my composition.


I walked my dog, Hungry, earlier in the week and got a decent shot of my favorite block in the city.

20160819_191008FINAL

Nice light and colors during sunset, leading lines.

A few days later I got my family to come out with me to Belmont Plateau, where you can see the city skyline. Turns out my camera phone doesn’t do too well with distance. Or detail. 

20160822_170829FINAL

This is indeed a cityscape, but man is it boring.

20160822_170941_003FINAL

I tried to add a bit more interest by capturing my running daughter in the foreground.

I would have been better off waiting for sunset so I could have gotten some better light and more interesting color to the photos. As they are they seem very flat and boring. Next time I think I’ll go shoot some abandoned buildings. This city has a lot of character which just isn’t captured from a distance.

I attempted to stack a bunch of the images using Tony’s method in this video, but even that couldn’t seem to pull enough data from my wimpy camera phone to make any difference.

Do yourselves a favor and learn from Tony and Chelsea here

And please, PLEASE tell me what I could have done to make these images interesting!