
Tony shows you how to get a great picture of the moon. If you’re patient and technically inclined, he’ll also show you how to extract amazing detail out of your existing gear.
Photographing the Moon
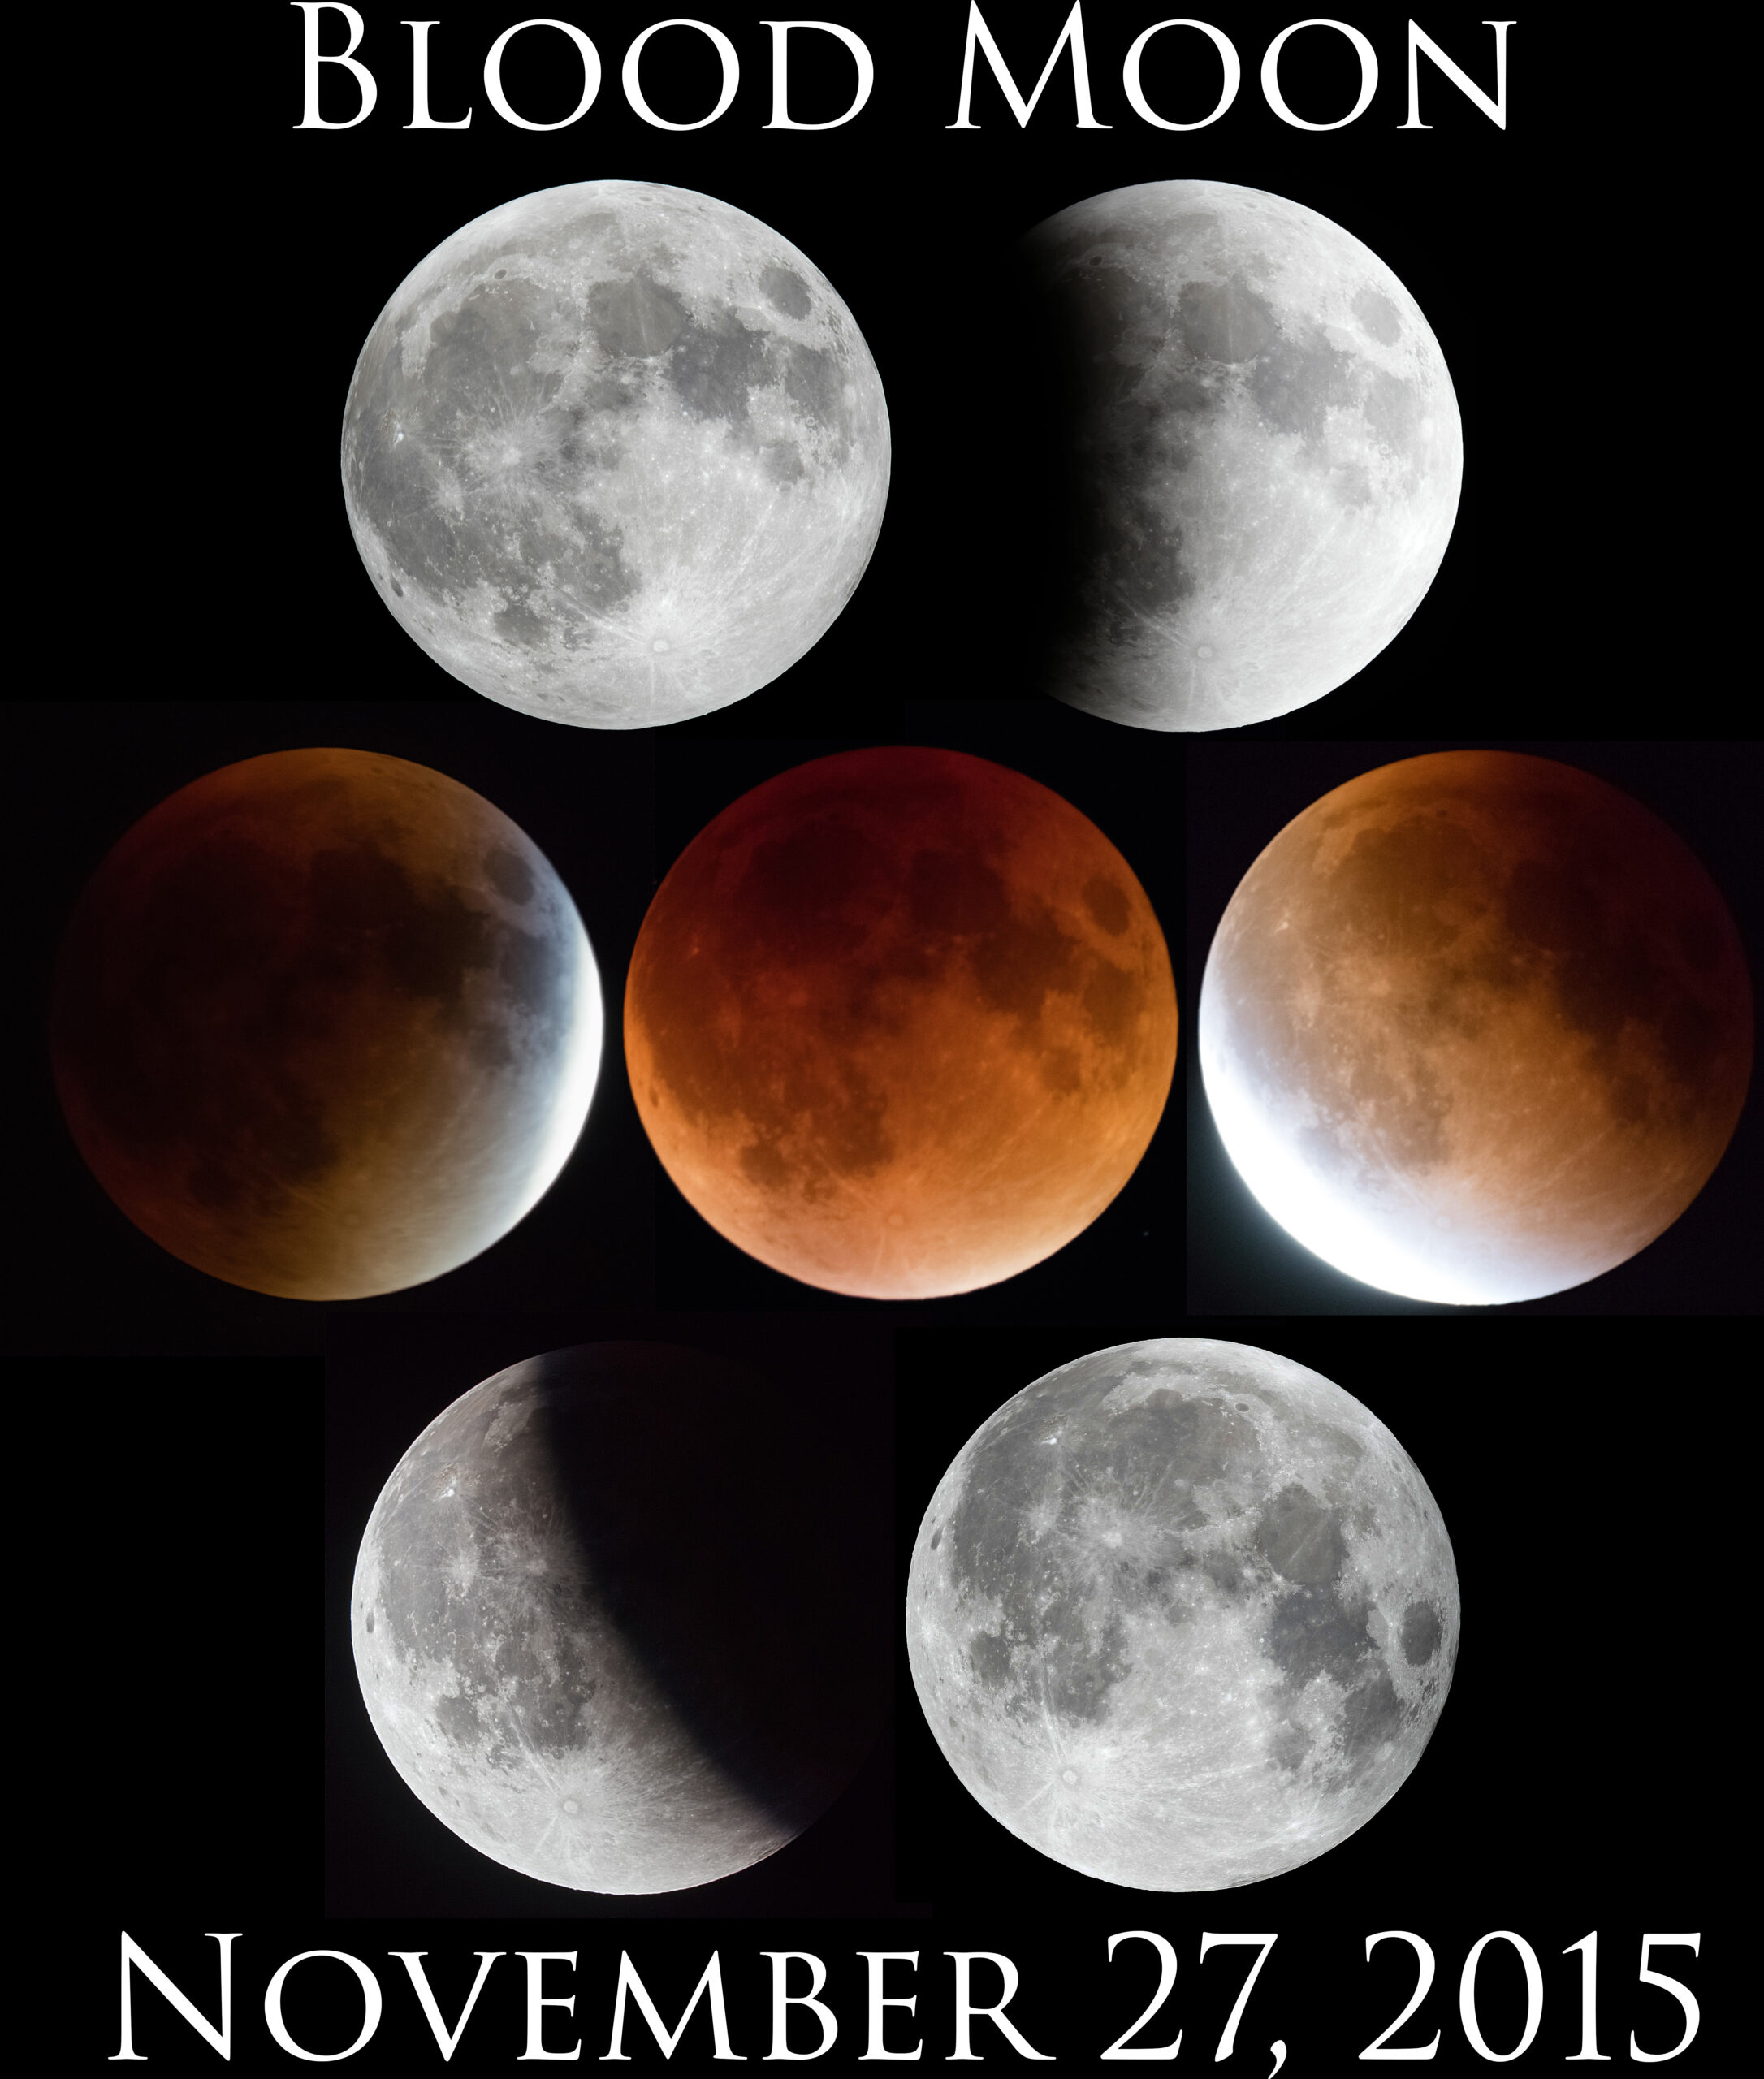
September 27, 2015 had a “blood moon” visible where we are in North America, and by great luck, we had clear skies. I’ve never shot a lunar eclipse before, and I was surprised how challenging it was.
First, here’s a 30 megapixel comp of a sequence of stacked exposures. Feel free to download it (by clicking it), and please do share this page with it. Here’s a more square version, for Instagram or a poster or whatever.

Getting the Possible Sharpest Shot of the Moon
Photographing the moon is a bit challenging. Your camera will probably wildly overexpose it, because your camera sees more black sky that bright moon, and it tries to make that black sky grey.
Because of that, you’ll need to use manual mode. There’s no one set of camera settings that will work for every condition. However, I usually start at ISO 100, f/8, and 1/100th of a second. Autofocus should work fine.
I usually handhold moon photos using a lens that has image stabilization. A tripod could help, but usually the moon is clearest when it’s high in the sky. Pointing a telephoto lens straight up at the sky on a tripod is difficult, or even impossible, with most tripods. As a result, it’s often more stable just to hand-hold it.
After you snap your first picture, look at it on your LCD screen. Zoom all the way in, and make sure that no part of the moon is overexposed. If it is, use a faster shutter speed, like 1/200th. The brightest parts of the moon should be almost completely white. If they’re more grey than white, use a slower shutter speed, such as 1/50th.
For the aperture, f/8 should work fine, but choose your lens’ sweet spot for optimal sharpness. Watch this video for detailed information. If you have a teleconverter, use it, and select your f/stop by multiplying the teleconverter multiplier (such as 1.4X or 2X) by your lens’ sweet spot.
Take lots of pictures–at least a dozen. Later, on your computer, you can look through them and choose the sharpest photo.
Using Stacking to Get Even Sharper
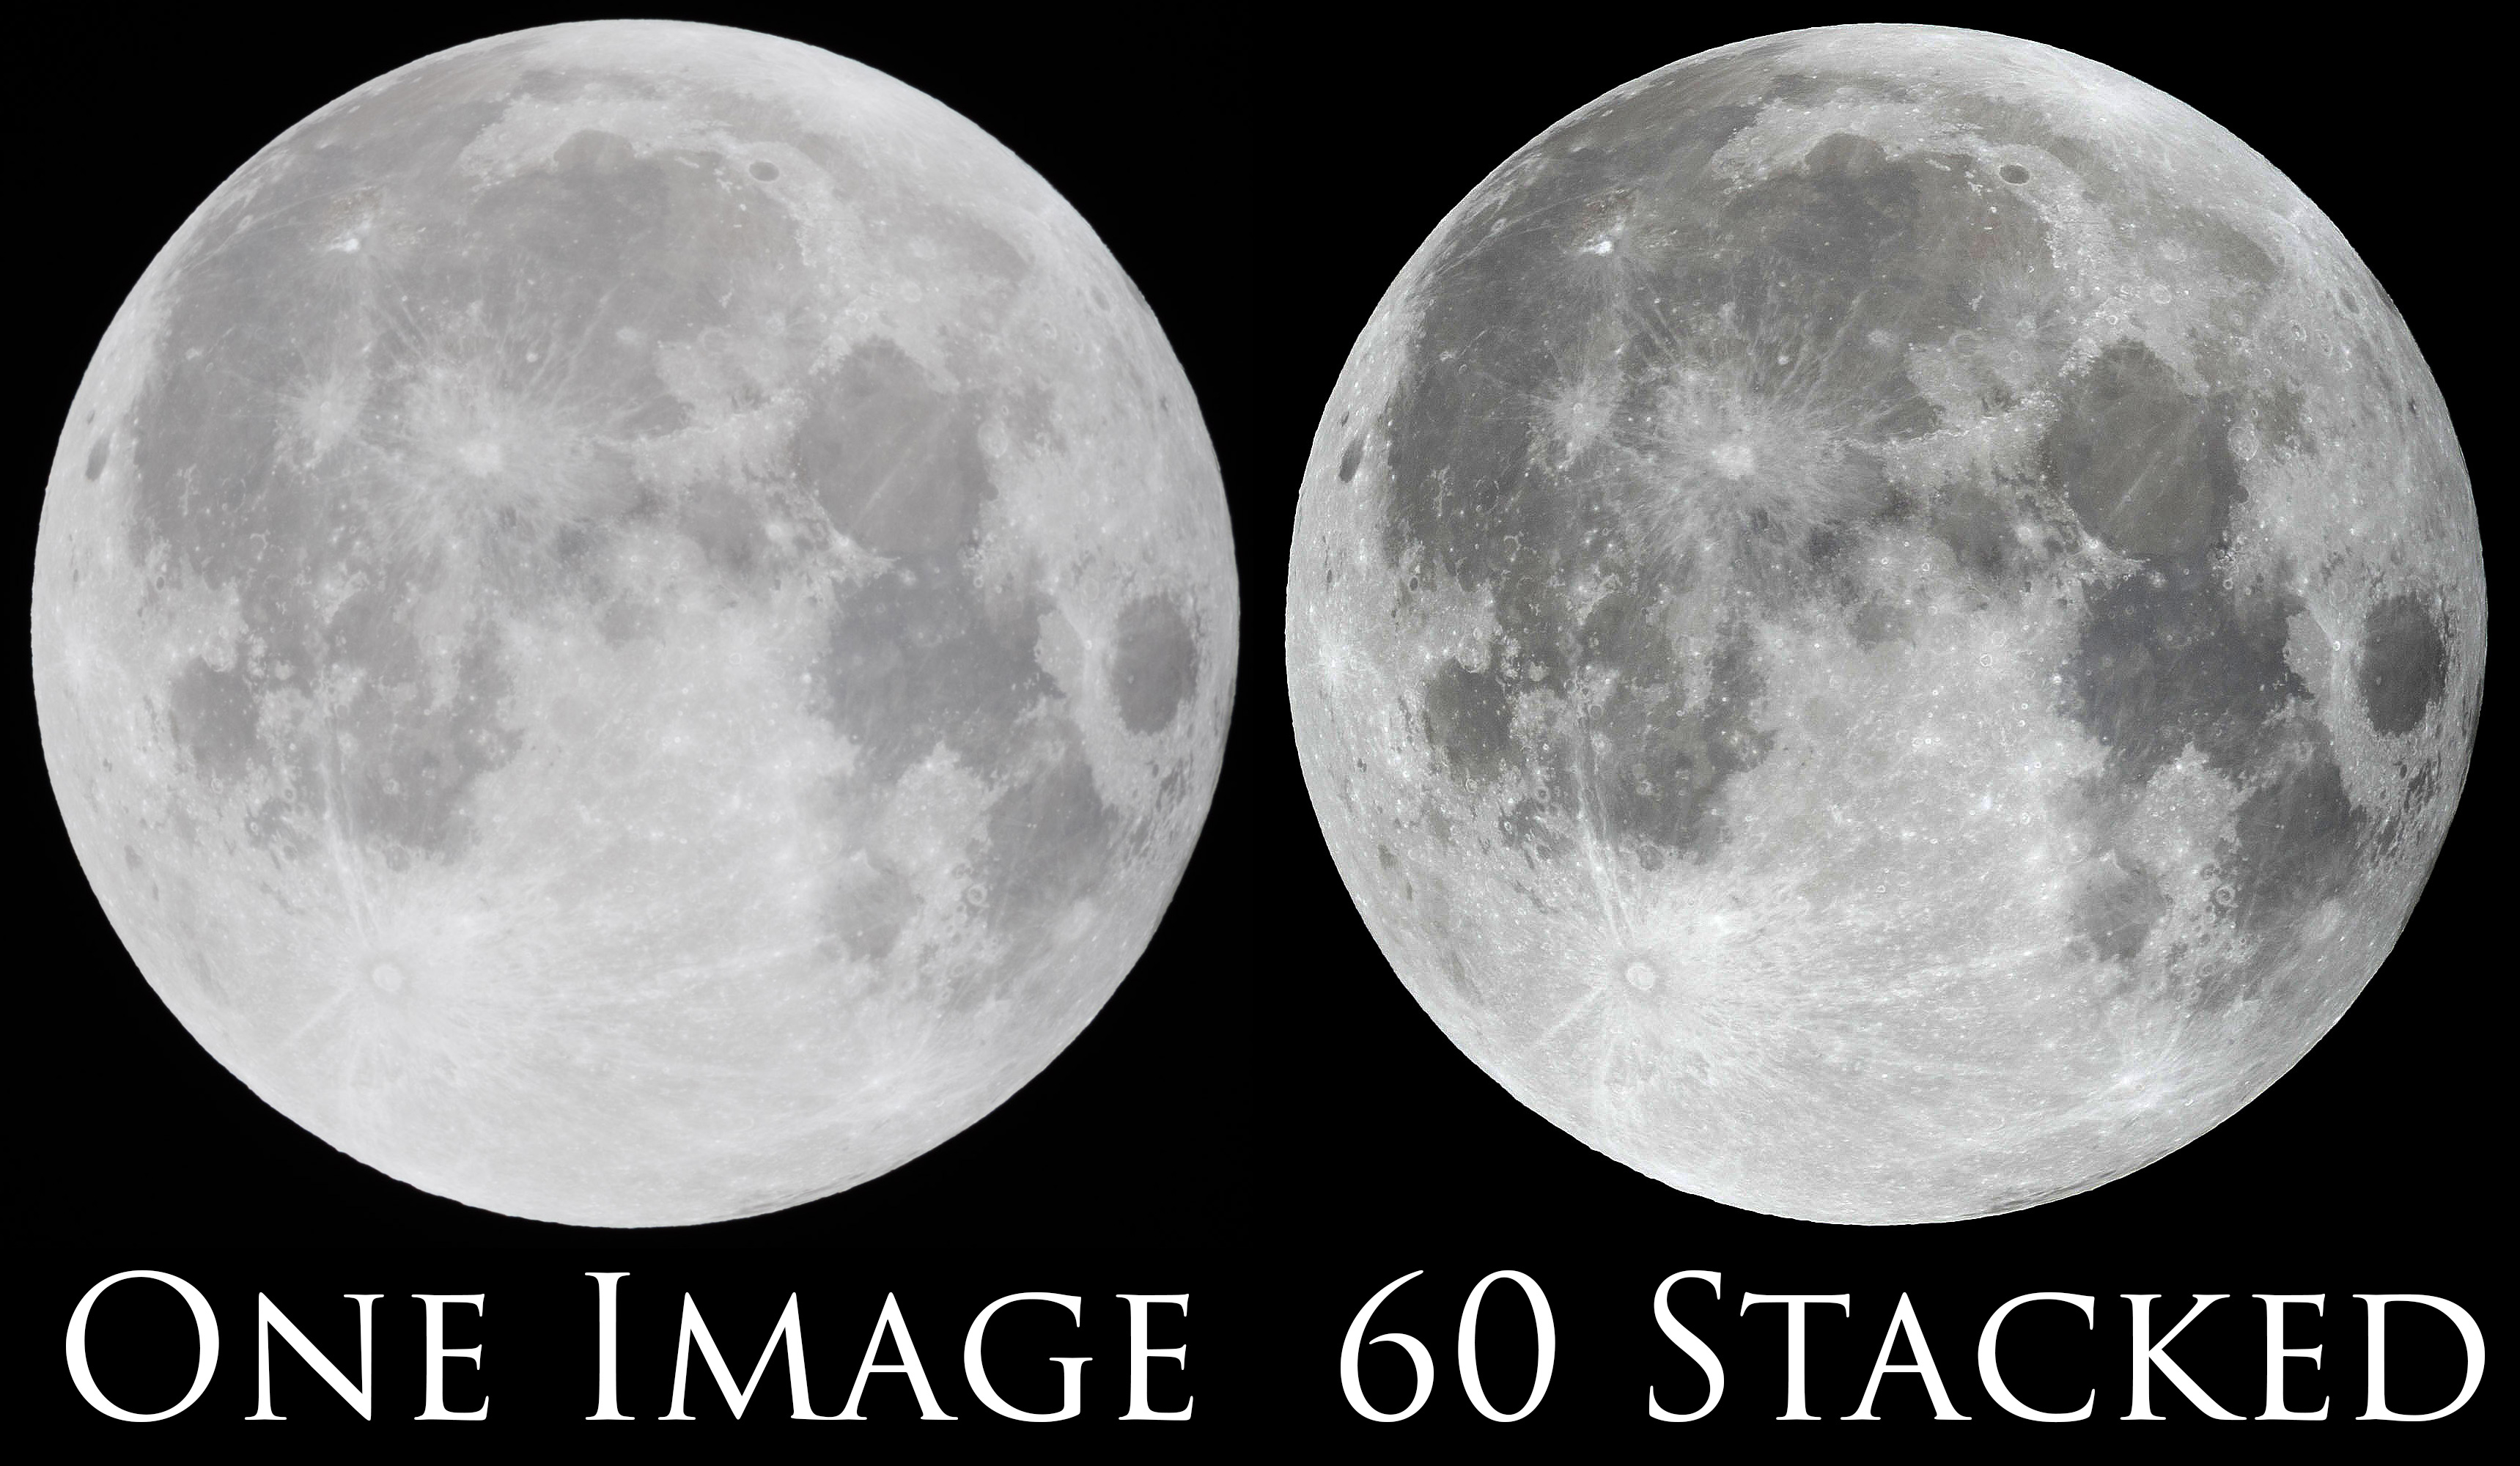
That technique will get you the sharpest single exposure. However, you can get MUCH sharper exposures by stacking multiple exposures.
To stack the exposures, follow these steps:
- Take as many photos of the moon as you can. I usually take at least 100, but more is better. Here, using a tripod makes life much easier.
- Import the pictures into your computer. I use Lightroom. Render 1:1 previews of the photos.
- Check each image for sharpness. If any image is slightly less sharp than the others, delete it.
- Crop all the images the same to reduce the picture size. The moon will have moved while you were taking the pictures, even if you used a tripod, so leave plenty of room on all sides. I usually give one of the middle pictures a generous crop, and then paste that crop into all other pictures in Lightroom. For more information, check out my Lightroom book.
- Now, export those pictures to high quality JPG files.
- Install RegiStax.
- Run Registax, and click Select. Find the folder you saved your images into, and press Ctrl+A to select them all.
- Click Set Alignpoints. This will draw some red dots on your photo.
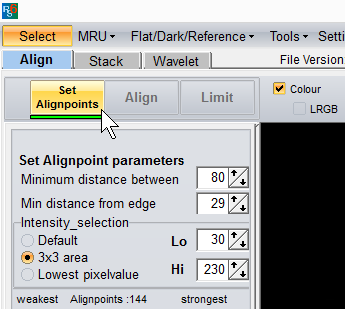
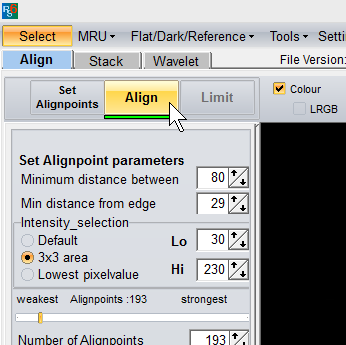
- Click Align, keep your fingers crossed, and be patient because it might take a minute or two. If it stops processing and simply hangs, close Registax and repeat this process up to the previous step. Next time, click Set Alignpoints, adjust the Number Of Alignpoints slider to a lower number, click Set Alignpoints again, and try Align again. If it continues to fail, you might try selecting fewer images.
- Click Limit.
- Click the Stack button. Again, this requires patience and a bit of luck.
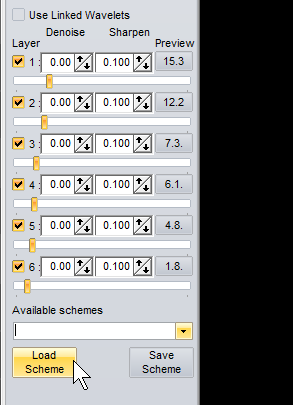
- Click Wavelet. The 6 wavelet values can be adjusted deeply by those who wish to study how the software works, or you can try loading my scheme: Right-click the link and click Save As to save it to your computer, then click Load Scheme to open it.
- Now, click Do All, and then Save Image. You’re done!
Registax is extremely complex software, and while it often works perfectly the first time, you sometimes need to spend extensive time troubleshooting it… and that might require going through the documentation. Good luck!
How to Photograph a Lunar Eclipse
While photographing a moon under normal conditions is challenging, it because EXTREMELY difficult to photograph during a lunar eclipse, because the moon is in the Earth’s shadow, and might be 5,000 to 100,000 times darker. You simply can’t get your images as sharp or clean, but here are some tips:
- Use a tripod. A big, heavy, tripod. You need all the stability you can get.
- Start with an exposure of 1/4 second, ISO 6400, and your lowest f/stop number. If you use a longer shutter speed, you can use a lower ISO. However, the moon is constantly moving. On my particular camera, I calculated that the moon traveled 2.3 pixels during the 1/4 second exposure. Therefore, slower shutter speeds will result in even greater motion blur, depending on your focal length and your camera’s pixel density.
- Take HUNDREDS of photos. Many won’t be sharp, because of the combination of a slower shutter speed and a telephoto lens. Choose your sharpest images. Don’t bother to stack them in Registax. Instead, use image averaging, as I show in this video.
If you can borrow a tracking head from an astronomer, that would allow you to take a clear, long exposure at a low ISO. A tracking head could pan your camera to follow the movement of the moon.
13 thoughts on “Photographing the Moon”
Comments are closed.


Thanks a lot for this article Tony. I have photographed the moon before and have had good results, but all stages of this eclipse proved to be a bit difficult handheld. I also took a timelapse on my other camera but it ran out of batteries about 1/4 through the eclipse, because I started from the horizon. I live in New York so it took a while to get to the main event from the horizon. I know you said you were planning on doing a timelapse. Did you get to? I found that extremely difficult to get a good exposure for the moon all while having a decently exposed foreground. My results were a blown out moon which defeated the purpose, but I did get beautiful rolling clouds and night sky. I think I was exposed more for stars. Just wanted to mention that I have learned a lot from you guys, and think that you both have great talent in everything you do! Keep up the great work! Oh and very nice lunar eclipse shots!
Tony, I agree with pretty much everything you say but would like to add one option. I choose a light weight tripod, which will vibrate even with shutter release. To combat this, I use 1. a bag of stuff attached to the hook on the bottom of the main shaft and 2. a tripod shelf which came with a Vanguard tripod. It has 3 velcro deals, one for each leg, and produces a shelf, into which you dump water bottles, rocks or whatever. This trick makes you light weight tripod super steady while at the same time reducing your back pack weight, since you can usually find rocks or water anywhere (here on earth at least). https://flic.kr/p/ybe9gb
This is good advice if someone wants to duplicate your photos. While taking a photo of just the moon might be an interesting technical challenge, I’m not sure it makes for an interesting photo. Anyone can get almost this same photo from anywhere in the US (if they have the gear). How about finding a landmark or something interesting to put in the photo with the moon that’s specific to your location? The photo would be much more unique (and wouldn’t require a 700mm lens).
Thank you!! Just what I was looking for. Great results on my Sony A6300. No tripod, just handheld. I tried other recommendations found on youtube without good results and found them too be lengthy. That you for getting to the point.
Thank you. I’ve downloaded and installed Registax for Mac and used the Wine app. However I’m interested in knowing how to do this in photoshop (mostly out of curiosity). Could you provide a link on where to learn to do this in PS?
The process worked great and I got similar results using Nikon D5100, 300mm (Nikon 55-300), F10, 1/250 ms, ISO100, (50 images). I wonder why a higher ISO and a longer exposure is recommended in the article. I had trouble to not get it overexposed at ISO 100. Also I read on other tutorials that a short exposure is absolutely necessary due to the fast movement of the moon. Therefore I selected 1/250
I watched the video version of this and this is the best tutorial about moon photography. Also thanks to Tony and Chelsea for so many great tips, as for beginner or just a person who wants to take pictures of their vacation and etc it is important to know many things in order to capture moments in really beautiful way.
Also about moon photography, you need to have a really good quality telephoto lens (better if it will be used lens but sharper on telephoto length that some cheap piece of hardware from unknown brand). I noticed that for me 130mm wasn’t long enough. 200mm is not enough either, so the best will be on 300mm (for cropped sensor). I guess for a full frame body it will be great to use 400mm or even more
[…] только что скаченный файл, который подготовил Tony Northrup (как и весь этот туториал, просто тут по-русски). И […]
Hello Tony,
Don’t know if you have installed Registax on a new computer 3 years since you published this article. I have a Windows 7 and a Windows 10 machine and Registax would hang at the Align step on both. I tried reducing the number of align points and reducing the number of images to no avail. My machines’ specs are pretty powerful, core i7, 16GB RAM. I wonder if this program works on Windows 7 or 10.
Thanks.
I had this problem Martin, I went back to Lightroom, re-added my raw files and exported the jpgs with no cropping and it worked fine
I had this same problem. I reduced the number of CPU cores from 8 to 4 and then tried again, and it worked.
Your tutorial was great and it helped me get a really sharp shot. I was wondering how I open the saved file because all of the programs I have tried say the file type is not supported. I am trying to send it in an email to my phone but it won’t open with any programs I have. Thanks!
[…] Photographing the Moon […]