
I’ve been shooting portraiture for a while now and there are a few things that I think are important to know, other than how to use your camera! Some of these tips may seem of little importance but, in my experience, addressing them has improved my portraits greatly.
1. Try Not to Over-Expose
In my experience, it’s much better to underexpose an image than over-expose. You can change the exposure afterwords in Photoshop, but you will have already lost more detail in an over-exposed image and may not be able to bring it back. If in the end you want your image brighter but have a tendency to go too far, just underexpose and achieve your desired exposure in Photoshop.
2. Talk to Your Client
Of course you’ll want your shoot to go smoothly, and to make this easier you need to make sure that your subject is comfortable! To avoid stiff and awkward images, talk to your subject, and not always with the camera in front of your face. Compliment them on their outfit choice; let them know that they’re photogenic. When they’re making progress in the shoot, inform them of that!
3. Make Sure Nails are Groomed
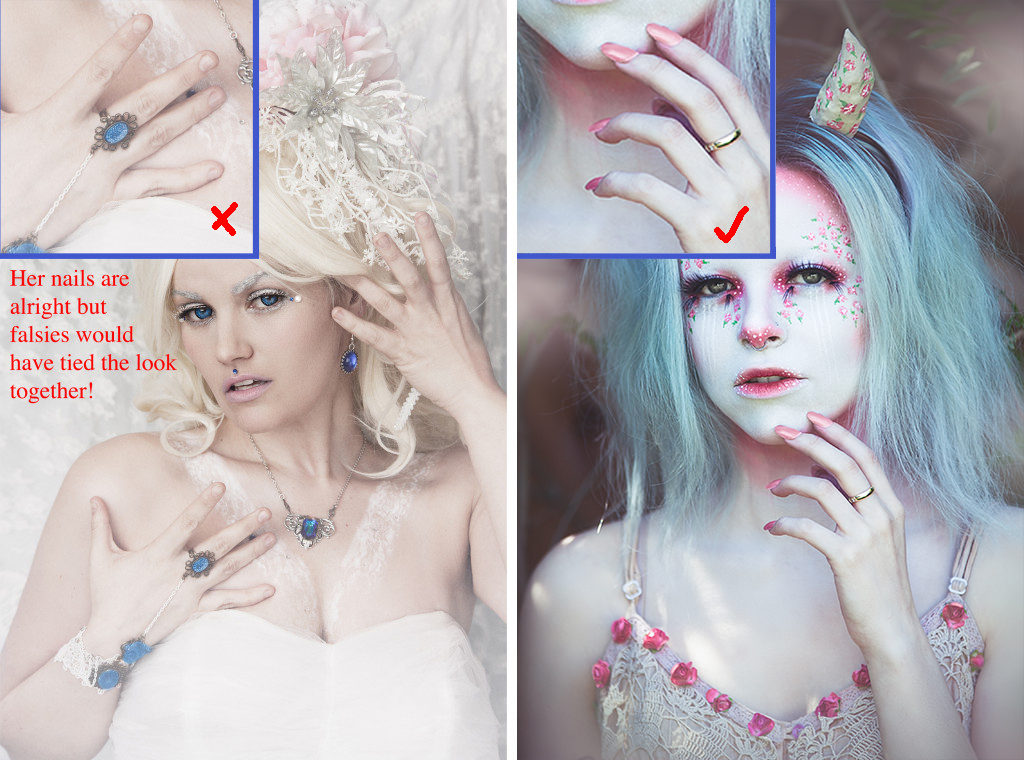
“Groomed nails? What are you talking about Sarah? That just sounds weird. I’m not going to tell my client that they have to groom their nails.” Well, I have been on many shoots where everything else has turned out perfectly, but in the images the model’s nails are chewed up or have nail polish that has partially worn off not having been prepared. This is a pet peeve of mine. I know that I don’t always have control over this, but I find that it can really take away from an image. You can let your client or model know that its a good idea to make sure they have groomed or polished nails, or you can keep some falsies and nail glue as a part of your kit! It’s such a great quick fix and your client will appreciate the advice once you show them the finished portrait.
4. Understand Light
Light is your best friend! As a natural light photographer, I’m completely reliant on what light the sun provides me. Some people are great with studio light and can manipulate it wonderfully. The same can be done with natural light. You want a fair amount of light to be on your subject but, at the same time, it’s better if the light is diffused. Harsh lighting, like direct sunlight, can be unflattering for a portrait, so you’ll want to understand how you can diffuse it. You’ll also want to know how to reflect more light onto your subject if needed. Tony and Chelsea have an entire video that goes over the basics of natural light!
5. Be Aware of Your Background
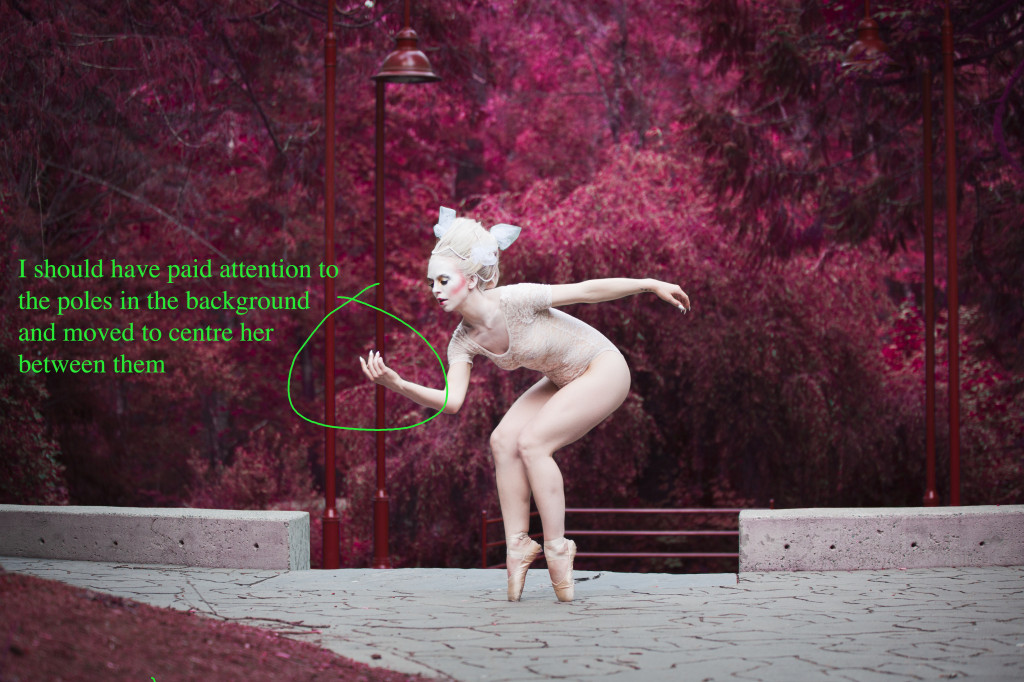
Pay attention to what’s going on behind your subject because you don’t want to discover while sifting through your images that there are distracting things in the background. It could be a sign, other people, or a pole coming out of your subject’s head. This can be especially important if you’re doing a period themed shoot and the buildings or vehicles don’t match the era.
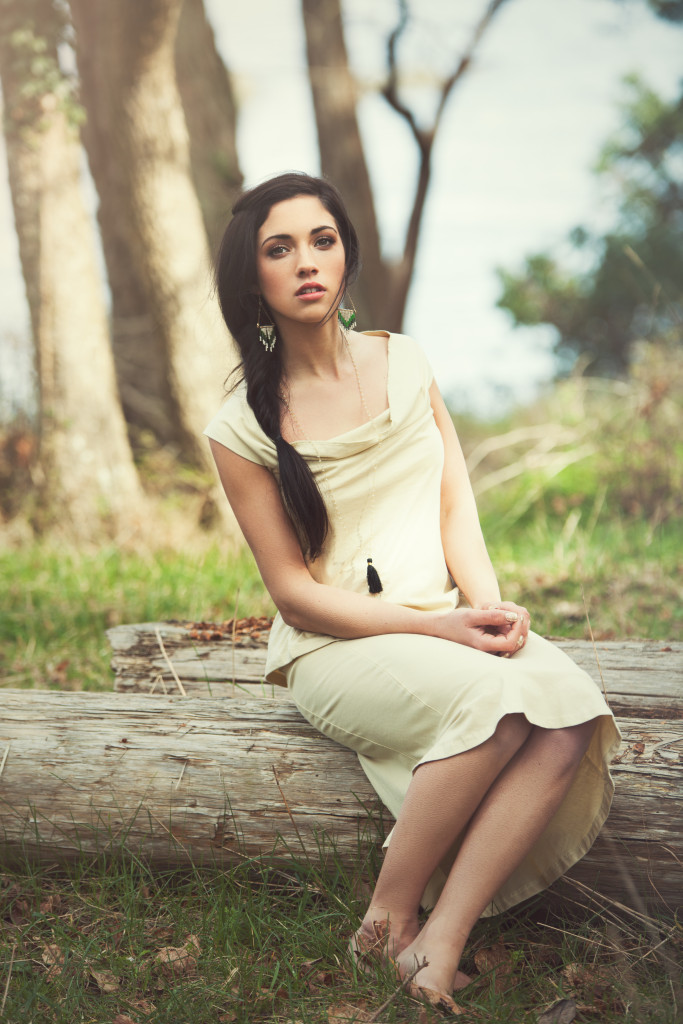
6. Use a Shallow Depth of Field

Keep your depth of field low (wide aperture). This keeps the focus on your subject and blurs out everything else.
7. Learn How to Pose Hands
Hands can be awkward to position, so learn how to pose them naturally. Do some research or even keep a pose book handy.
8. Change Perspective

Change your perspective. Try taking pictures at different levels. This normally applies to children because you don’t want to only take pictures of them looking up at you, and it can make them feel more comfortable if you go to their level. Also try the opposite with adults. Get them to crouch or sit, and try taking pictures from above.
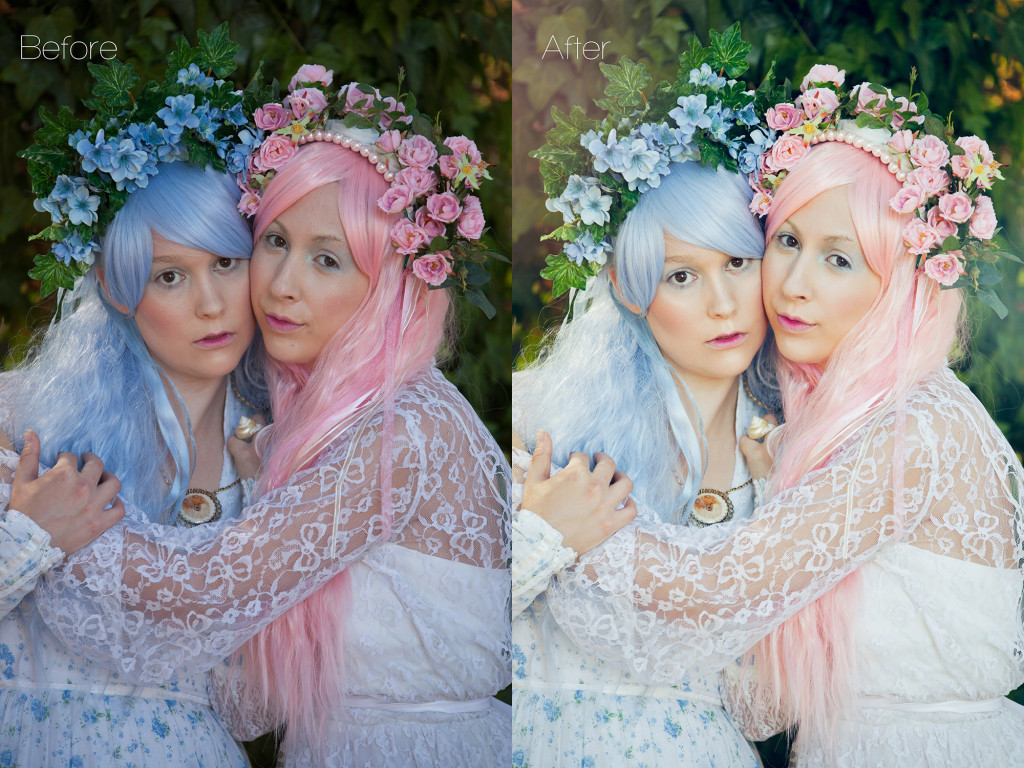
9. Careful When Retouching Skin
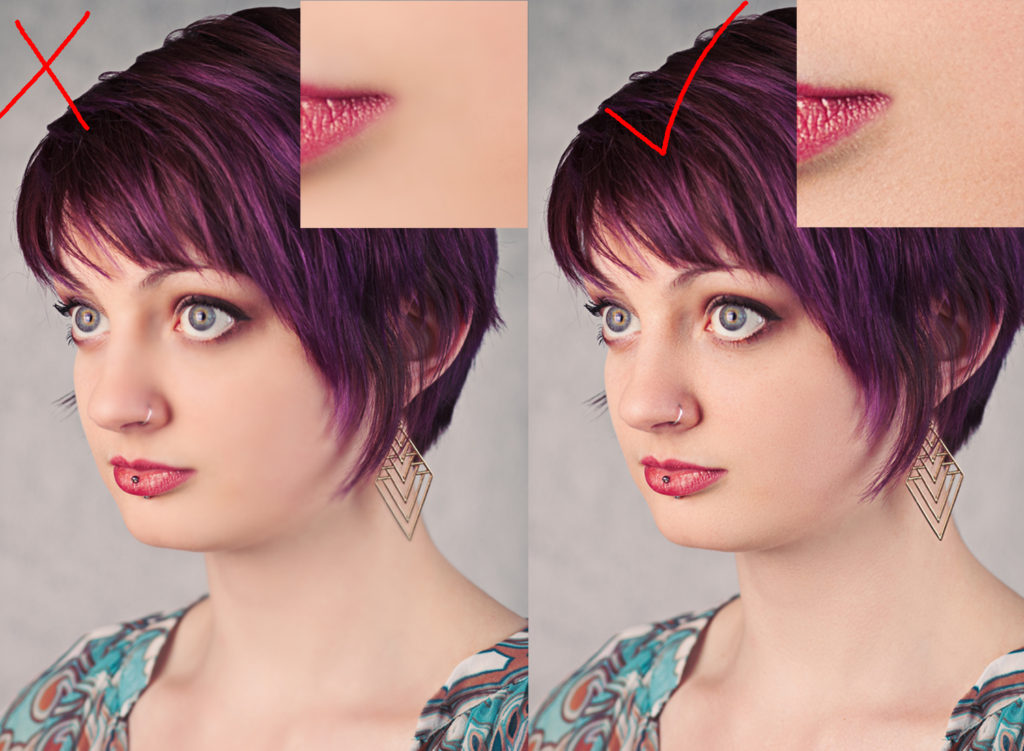
Don’t get carried away when editing skin. You all knw what I’m talking about! We’ve all seen skin that’s been blurred or shopped so much that it no longer looks natural and has lost the detail. Texture in skin isn’t bad! If you’re unsure if you’ve crossed the line, ask someone else for their opinion! This brings me to my last tip.
10. Ask for Criticism
If you’re wanting to grow as a photographer then you should be willing to understand where you can improve. Become a part of photography related groups and post your work, asking for critique. Try not to take it personally. It was difficult for me when I first started doing that. I would post an image I was pretty proud of and let other photographers tell me what they didn’t like about it. Some of it can be a matter of opinion, but you need to take it seriously. How is one to grow as a photographer if one isn’t willing to take others’ advice?
~Sarah Bowman
Read all Sarah’s previous blog posts here.
Facebook – Instagram – Website – 500px – Website – YouTube – Twitter


No offence but the ‘retouched’ images look worse than the originals. They are very overdone, skin tones are yellow and not very pleasing
Actually I do agree with you that on that image it has too much yellow! I sometimes have the habit of going on the yellow side and don’t always catch myself. I am also still growing as a photographer and I appreciate the feedback ^_^
I think that is both rude and subjective. I LOVE Sarah’s editing style. Most of them are not meant to be natural, they are so obviously fantastical and dreamy. It might not be for you, but saying it’s not pleasing is your opinion.
Awe!! Thank you Siobhan !!
Colors look good on my screen. Great article and gorgeous examples.
Yes i agree, its the eye of the photographer and what her mind creates. I don’t think there’s a wrong or right. if she sees it in her mind and puts it out there. Hat off to you !!!!
Am I not entitled to an opinion SiobhanKyle? I was only referring to the skin tones and Sarah seems to agree with me on the yellow tint of it, so sorry of constructive criticism is perceived as rude these days.
I agree with you that some, but not all, of the retouched photos are too yellow. Even if they are supposed to be surreal, yellow skin tones are ugly.
But I appreciate the article otherwise ( with the exception of advising clients to wear fake, ugly nails).
I concentrate on being creative when I shoot so oftentimes I forget to talk and connect with the people I’m shooting. Thanks for the reminder.
I wanted to edit my reply, but there is no option to do that so I’m adding a comment here. I don’t mean that natural, yellowish skin tones are ugly. Only post processed, unnatural looking skin where too much yellow was added.
Thanks Sarah! I am just starting to venture out into portrait photography and love your tips!
Thank you! I’m so glad that I could be helpful!
Thank you sarah
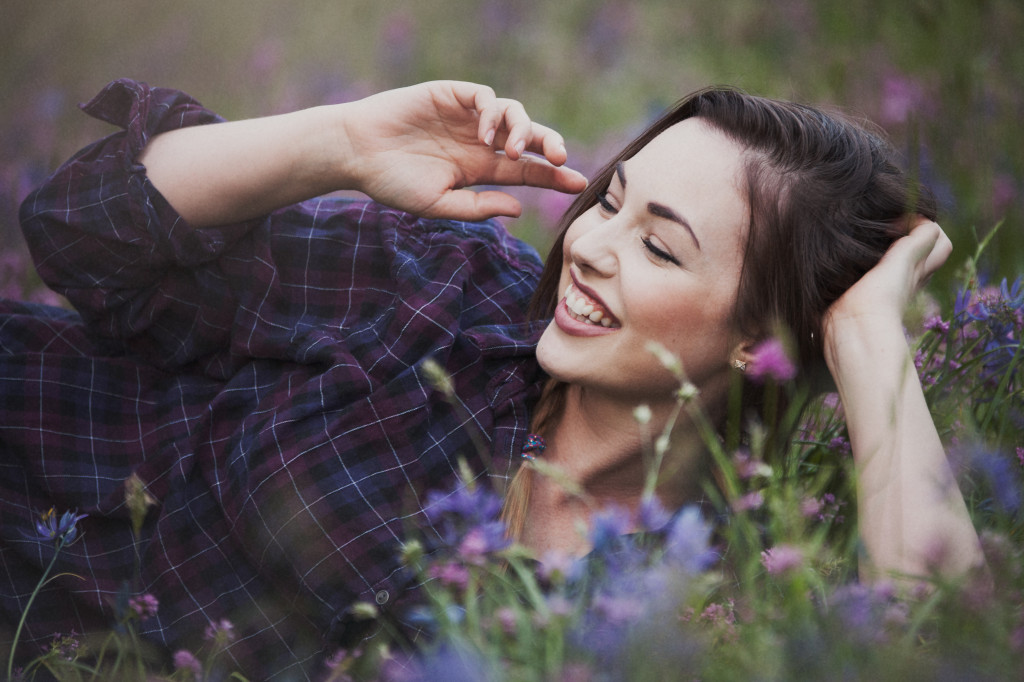
Great article, i love your portraits and your unique editing style
Thank you Adrian!
This is great! Your articles are always so inspiring and helpful!!
Awe, I appreciate it Matthew ^_^
This is really hepful! Your pictures are great. Thank you for sharing these tips! ??
Awe, thank you Paula!!
I am feeling much relaxed after reading this because I am doing the thing mentioned in No.1 and hiding this because i think i am doing something wrong and did’d show black picture to anyone before processing in Lightroom. I am 100% agreed with this to take photo with low ISO, sometimes people want clear background so i have to minimize aperture opening that make picture darker also it cause shutter to become slower.
Overall information make me more confident.
Thank you Sarah Bowman.
I am so glad that you found the post helpful mkkhurshid1978! I tried to think of tips that may be less common but still important and exposure is a big one for me. I love my image to be bright in the end but I also want to retain the detail and have less grain! Thank you for letting me know that the information helped you. It inspires and motivates me to make more ^_^
Another great blog Sarah! I’ve only done a few posed portrait sessions but nails…..oh nails! They really can make all the difference. Including that in this blog was a great idea!
Thank you Andy! I tried to think of things that aren’t always talked about but I still find are important! I was also thinking of making “Lips” on one of the tips because chapped lips are also not fun to photoshop!
Great article as always. To your point #1 I’ll offer up that different camera and lens combinations are going to behave differently and the decision to shoot to the left or to the right these days is partly how your gear handles low light and also a bit of your photographic style. The important thing is to experiment (take lots of bracket test shots and see how they compare after normalizing them in post) so you know how your gear can serve you best. Can’t wait until your next post.
Great tip Sarah! especially getting comfortable with the subject and avoiding fake smile and looks. Here a quick question does one need to use wide angle lens for portrait photography? Stunning images!
Thanks
I am not a professional photographer. But I would like to photoshoot. I think portrait photography is more difficult than normal photography. But your tips are more helpful for portrait photography.
You’re so awesome! I don’t believe I have read a single thing like that before. So great to find someone with some original thoughts on this topic. Really.. thank you for starting this up. This website is something that is needed on the internet, someone with a little originality!